Special thanks to Janet Kushner at Jauja Cocina Mexicana for this recipe, which I have unabashedly stolen!
My wife was raised in the Catholic faith, which came with all manners of rituals, rites and traditions. One of these is avoiding meat during the Lenten season, which is the 40-day period that begins on Ash Wednesday and ends at sundown, Holy Thursday. Eating meat from warm blooded animals is forbidden, but fish, and other seafood, is permitted because they are cold blooded. There’s a lot to unwrap there, but suffice it to say, Lent is something I can get behind, especially since I love seafood.
I come from a Protestant background, specifically an evangelical, Pentecostal, fire-and-brimstone sort of sect that has its own dos and don’ts, which include things like prohibiting alcohol, dancing, and gambling. Eat anything you want, but don’t dare have any fun while doing it!
Over the years I’ve realized that living a good life requires nothing more than treating people with decency and respect. It seems to me that religion can muddy the water, making it difficult to see the important things in life. Be kind. Be generous. Be sincere.
All that said, I still enjoy Lent when it rolls around each year! Let’s have some fish!
Note: The sauce from this recipe is a very versatile soup base. You could substitute the fish with meatballs, rice, lentils, or anything else that strikes your fancy. Control the spiciness of the sauce by adding or subtracting the chile de arbol.
Caldo de Pescado
Ingredients:
1 ½ lbs Tilapia filets, sliced into large pieces
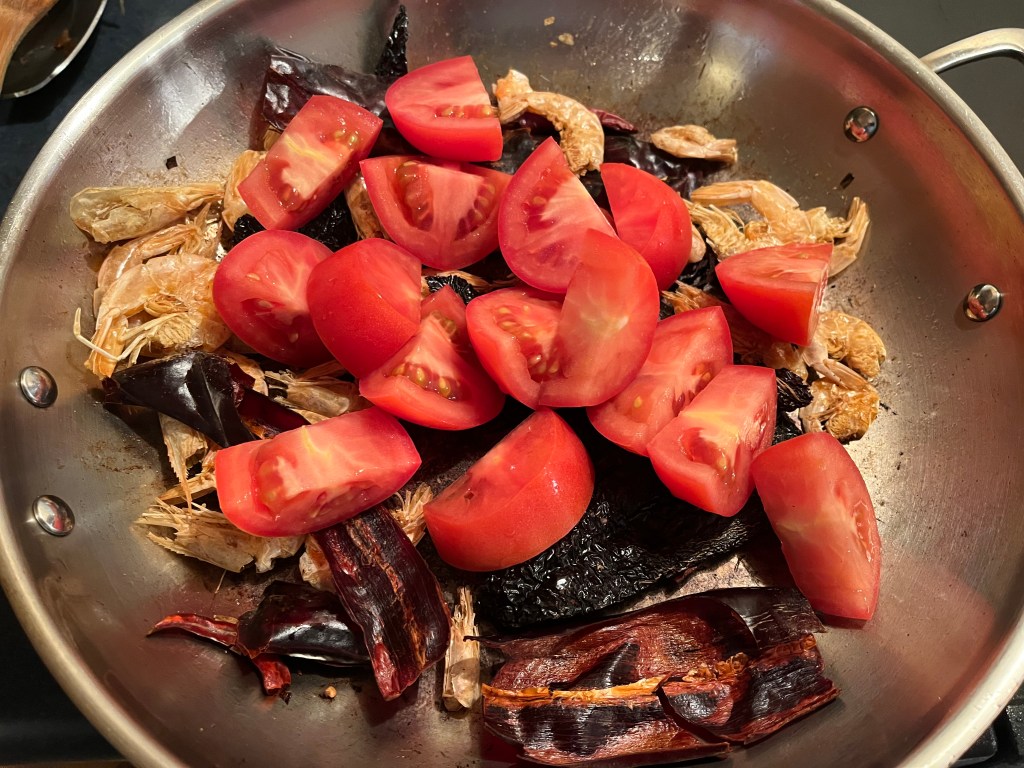
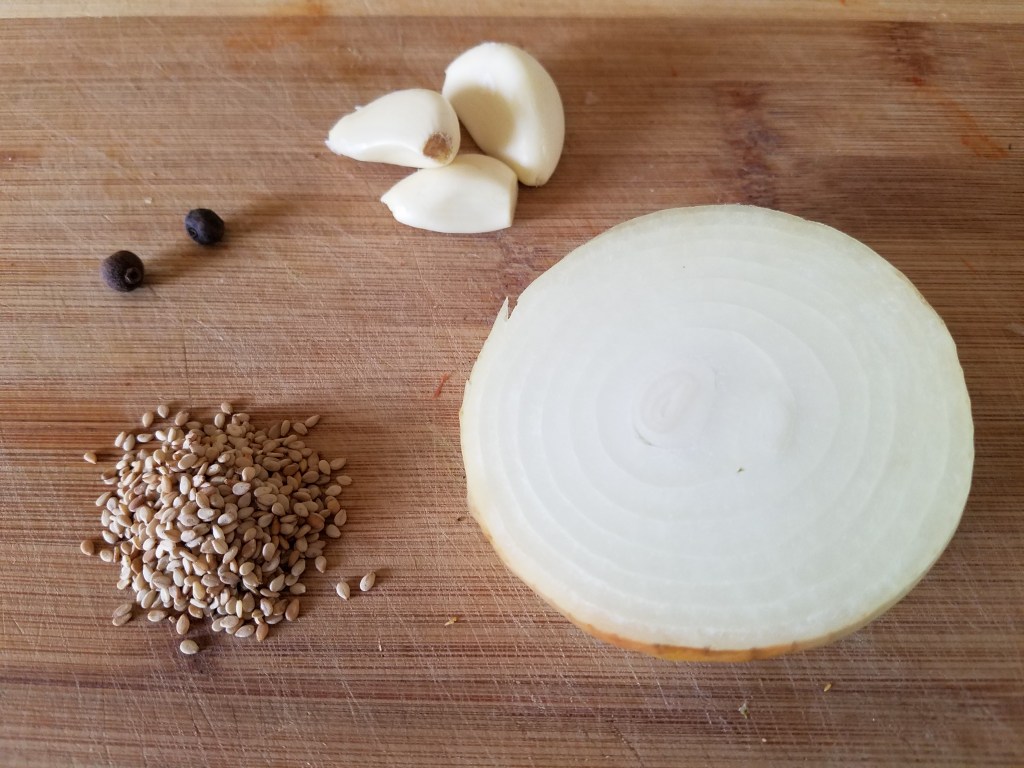
1 oz. dried shrimp (eyes removed)
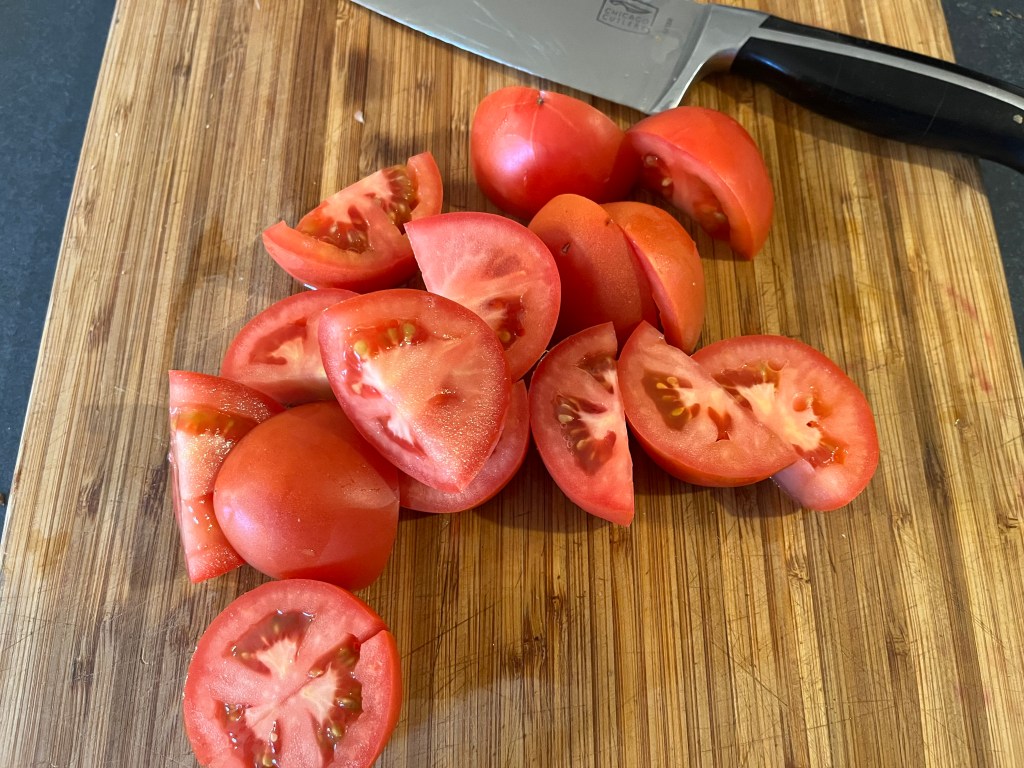
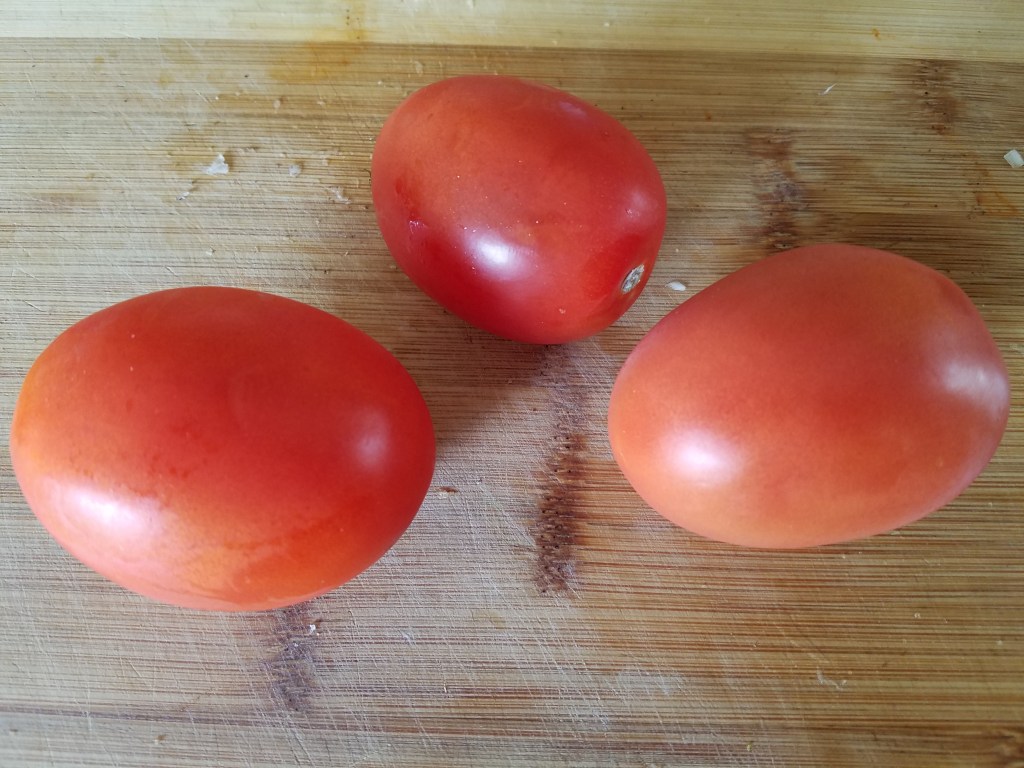
4 Roma tomatoes (quartered)
2 chile guajillo
1 chile ancho
A few chile de arbol, optional
½ onion, sliced
3 cloves garlic, peeled.
1 large leek, thinly sliced
1 bay leaf
1 Tbs oregano, crushed
Salt to taste
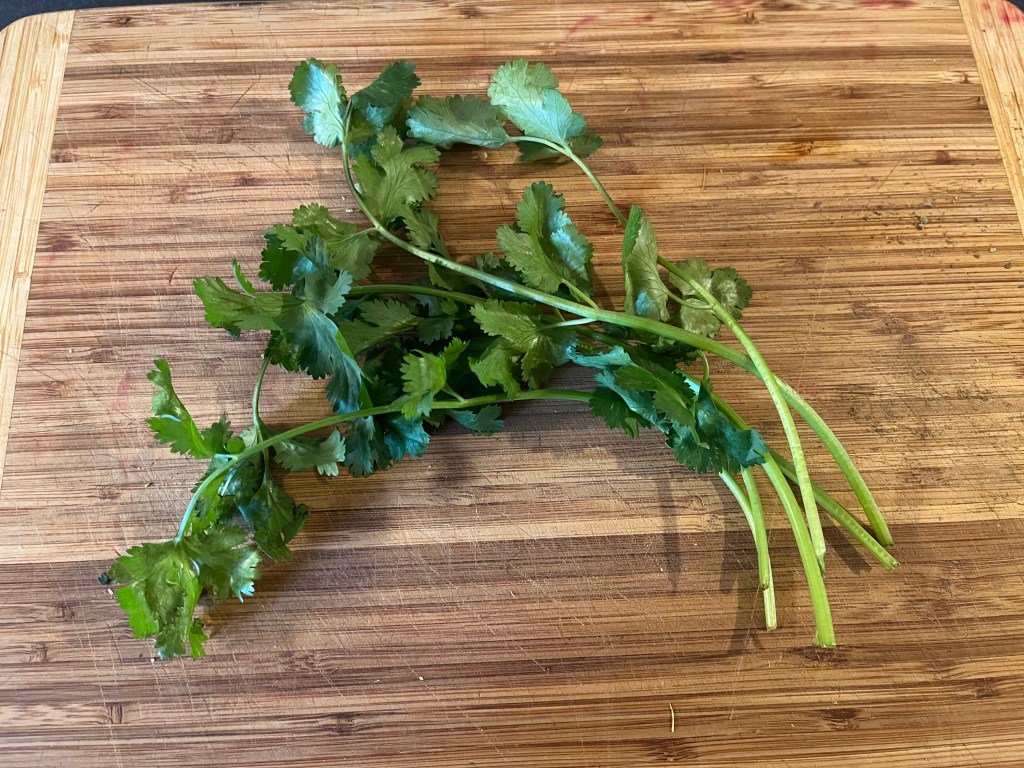
1 small handful cilantro leaves
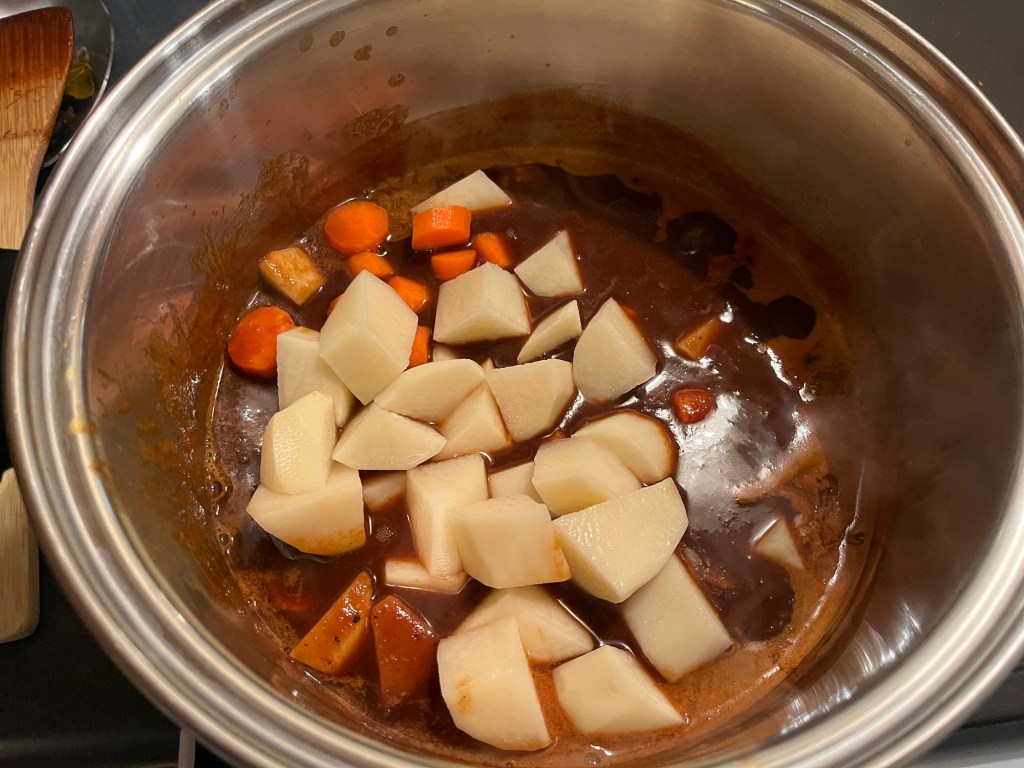
3 carrots, peeled and cut into ½” pieces
2 medium potatoes, peeled and cut into ½” pieces
Directions:
Cover cut potatoes in water and soak until needed.
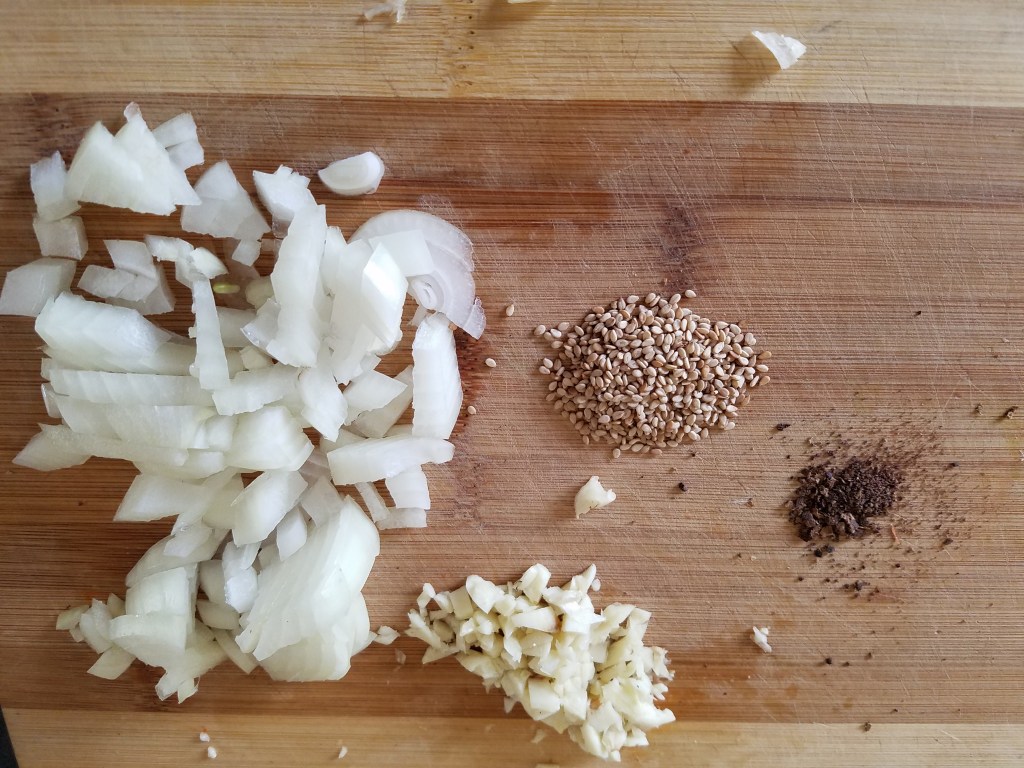
Sauté onion, leek, and garlic for 5 to 6 minutes. Set aside.
Sauté dried shrimp for 1 minute.
Add chiles. Sauté for 2 minutes.
Add tomatoes. Sauté for 2 minutes.
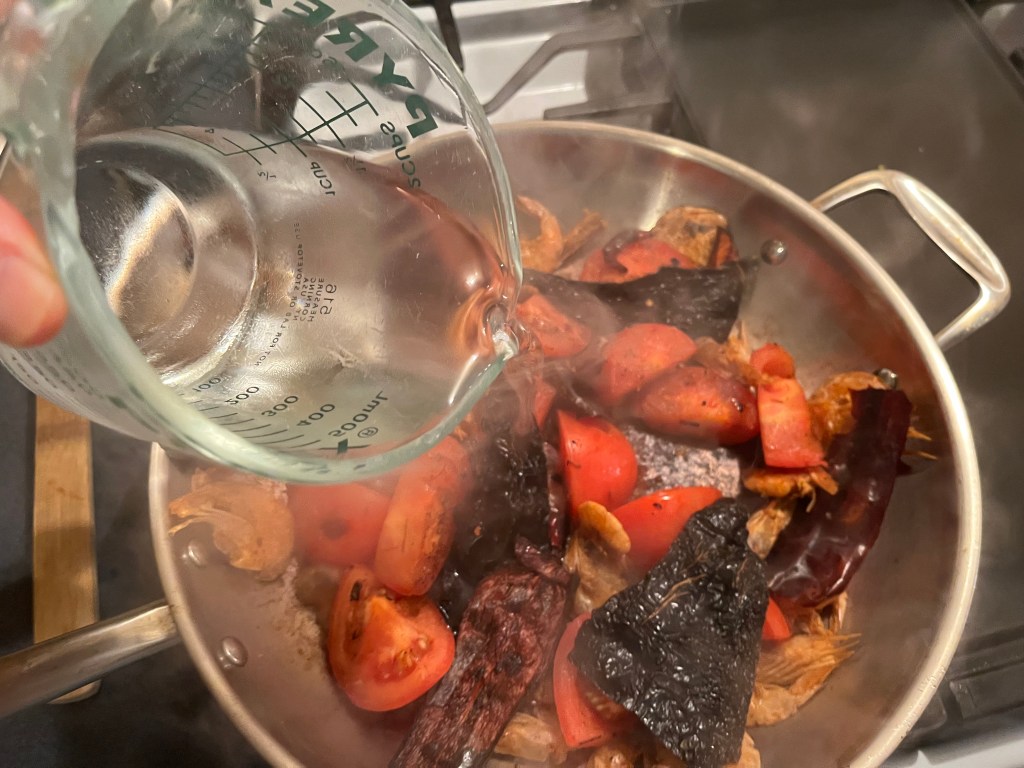
Add 1 ½ cup water. Cover and simmer for 10 minutes.
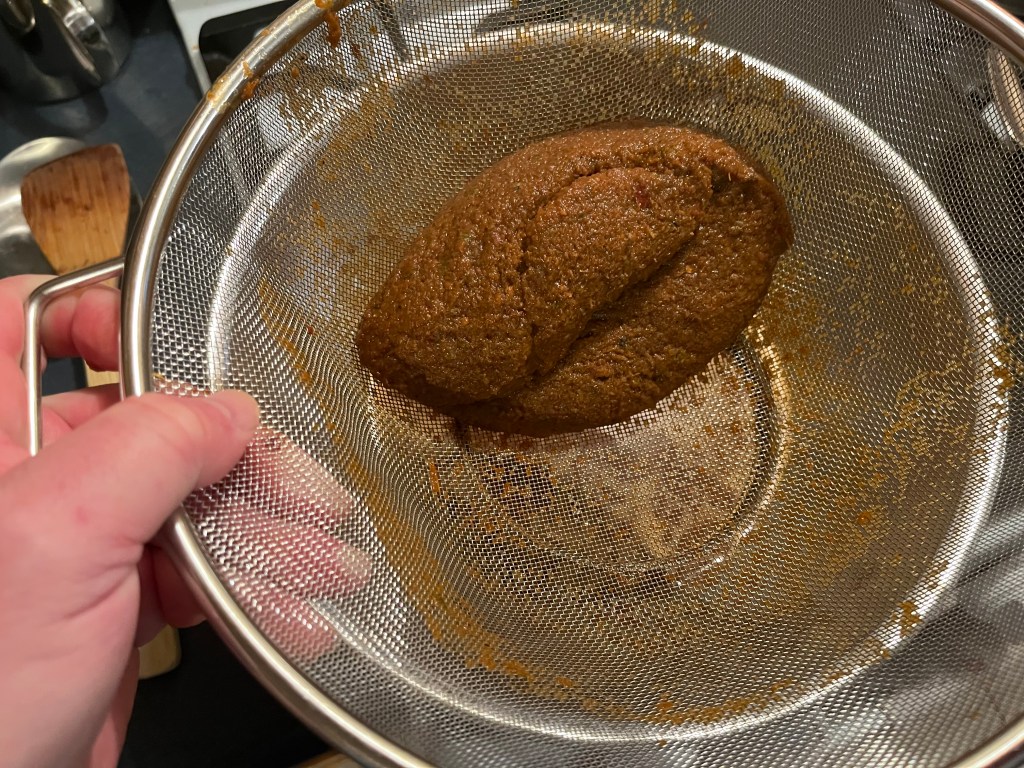
Add cooked salsa to blender. Add onion, leek, and garlic. Add 1 ½ cup water. Puree and strain into large bowl.
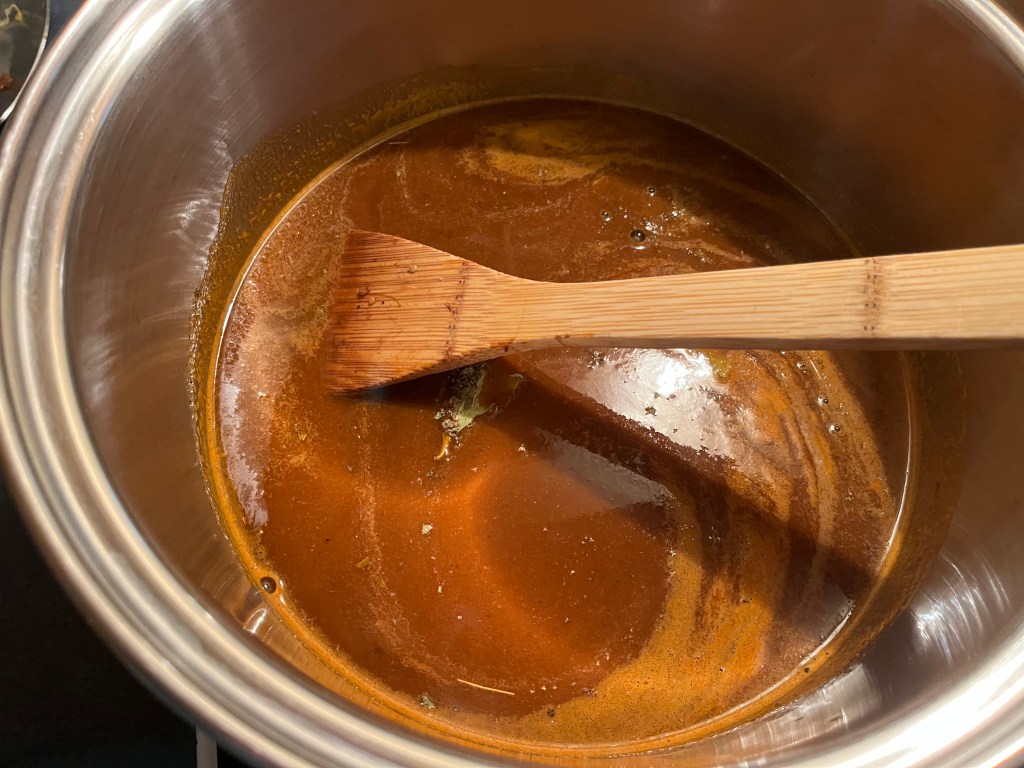
Add pureed salsa to a large pot.
Add bay leaf and oregano.
Cook uncovered over medium heat for 10 minutes. Stir frequently.
Often times, my approach to cooking is wham-bam-get-it-done! This is the sort of cooking that I tend to do when I prepare dinner, after coming home from work. It’s a fun, energetic romp that usually results in a good meal and doesn’t chew up a lot of time. That kind of approach allows for more time to sit down and enjoy a meal with the family, rather than slave away in the kitchen only to be faced with a need to eat quickly, clean up from dinner, and get ready for bed.
There are times that I enjoy a more relaxed, gentle approach to cooking, and I usually reserve those times for weekends. That’s when I like to prepare meals that require a little more time for preparation and, today’s chile rellenos are a perfect example.
It takes a gentle touch if you want to make delicious chile rellenos. Every step requires equal amounts of skill and care. I recommend watching one of the many tutorial videos that can be found online before making chile rellenos, for the first time. Pay attention to the way a chef gently handles the chiles throughout the process.
I’m always amazed at the versatility of Mexican food, and I feel like I say that every time I talk about Mexican food, but it bears repeating! Poblano chiles are probably the most common chiles used for chile rellenos, but you can use any fresh chile that you like. The same goes with the stuffing. Most chile rellenos include cheese, and any cheese is suitable, if it melts nicely. Other items for stuffing can include meats, grains, vegetables, or fruit.
I went with Queso Oaxaca (a Mexican cheese from southern Mexico), and I added a little cooked, ground breakfast sausage that we had, left over in the refrigerator.
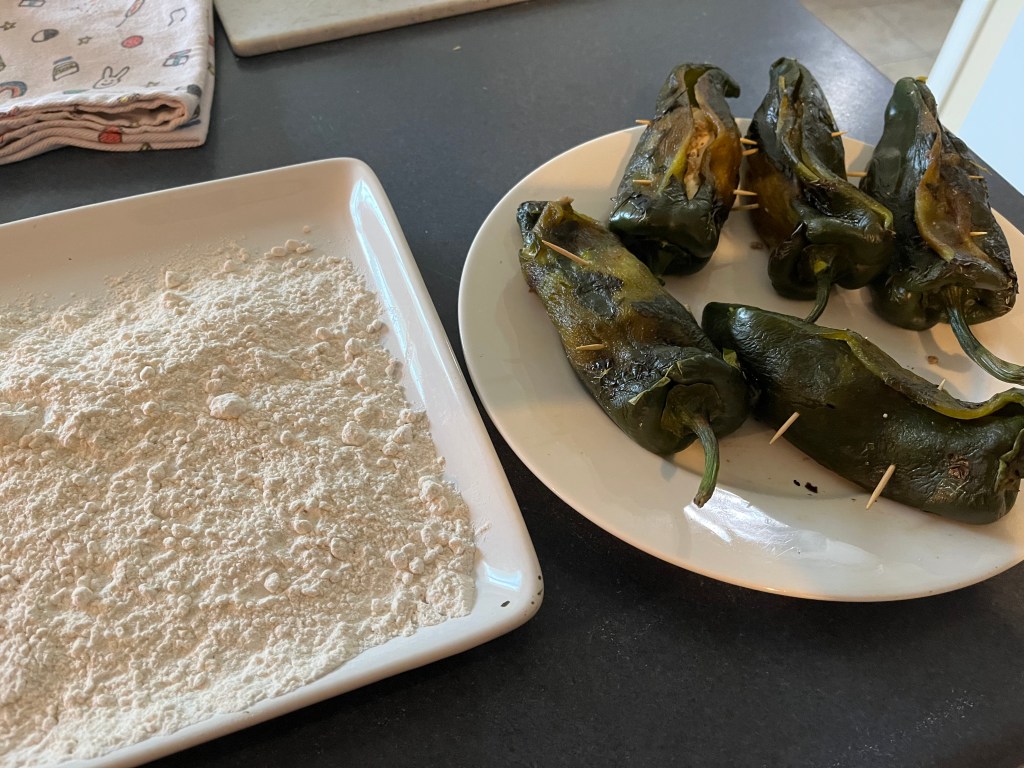
I prefer roasting the chiles over an open flame, rather than broiling. I lay the whole chiles on top of my gas burner and gently turn them until all sides are slightly charred. After the chiles have charred, I store them in a paper bag for several minutes, so that the chiles can gently steam. A sealable bag can be substituted for a paper bag.
With a small, sharp knife, gently make a slit down the length of the chiles, just large enough so that you can reach in and gently remove the seeds from the top of the chiles, with your fingers.
Form a ball of stuffing mixture in your palm and gently insert it into the cavity of the chile. Gently seal the chiles with toothpicks.
Whip egg whites to form stiff peaks and then gently fold the egg yolks into the batter.
Gently dredge the chiles in flour.
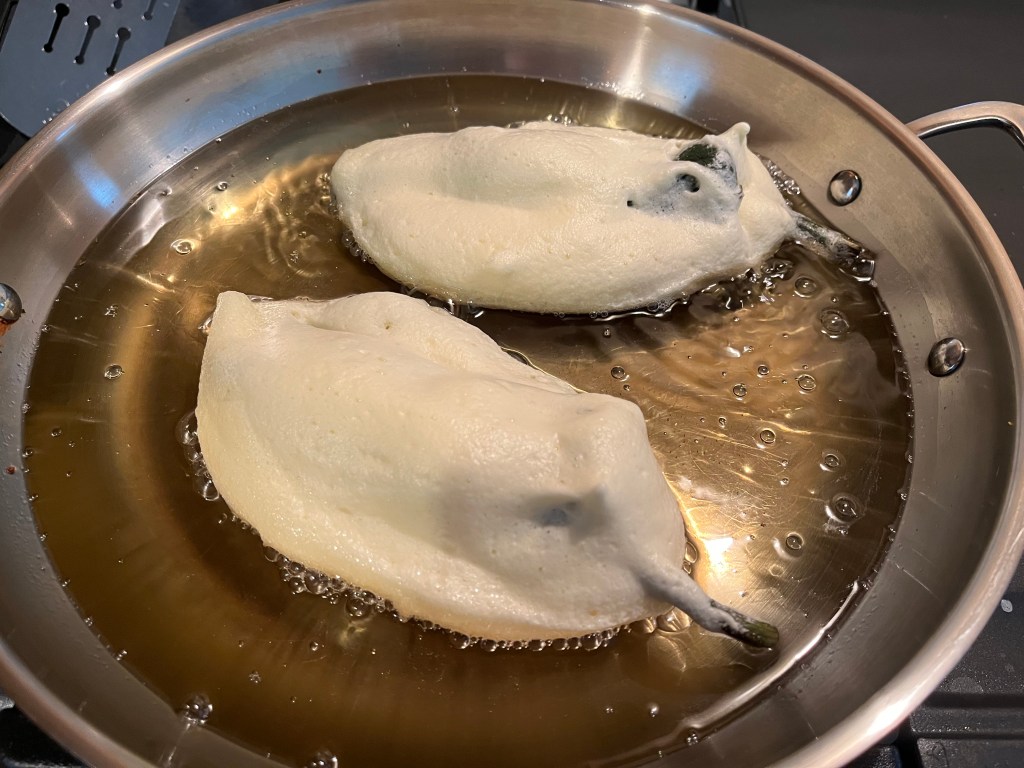
Gently submerge the chiles in batter, to coat the chiles, and gently place them in a pan of hot cooking oil. The cooking oil needs to maintain a temperature of about 350º throughout the cooking process. If your oil is not hot enough, the chile rellenos will be greasy and, if the oil is too hot the batter will brown and burn quickly.
After about one minute, gently turn the chiles over to cook on the other side.
Gently remove the cooked chiles and rest on rack, so that any residual oil can drip off.
The chile rellenos are ready to eat at this point but, you might want to consider adding an additional step.
I prepared a warm tomato sauce that I used to bathe the chiles in, before plating. I also spooned some of the sauce on top.
I am totally sold on the idea of adding tomato sauce! The slightly acidic and sweet sauce brought the chile rellenos to a whole new level!
To make the tomato sauce, I added some fresh Roma tomatoes, a little chopped onion, a few garlic cloves and about 1 cup of water to a blender. After the sauce was pureed, I simmered the sauce in a pan, over medium-high heat to reduce a bit. While the sauce reduced, I added some chicken bouillon, cracked black pepper, onion powder and some fresh, chopped epazote leaves. In case you are unfamiliar with epazote, it’s a Mexican herb that is commonly used when preparing beans, soups, or stews. Don’t worry if you don’t have epazote…it’s not essential, but it’s a nice addition, if you happen to have some on hand.
One chile relleno was enough to satisfy me, but my tastebuds wanted more!
Traditional Chile Colorado is a stew made with beef and red chile sauce. Even the toughest cuts of beef will become tender when cooked slowly in the sauce for a long period of time. I don’t always have the luxury of time when I cook, so I find ways to improvise.
This meal took about an hour and a half to make, which could have been trimmed down to about 45 minutes, if I had used canned enchilada sauce, but I wanted to use my dried Guajillo and New Mexico chile pods for the sauce.
I didn’t record the amounts of the ingredients I used for this dish because I was in a hurry, and I only took photos of the finished product. That said, this is an easy dish to make, and proportions are easy to figure out, on the fly.
I started by seeding the chilies and then steamed them. I added a small amount of beef stock to the chile pulp and simmered over medium heat for a few minutes, to thicken.
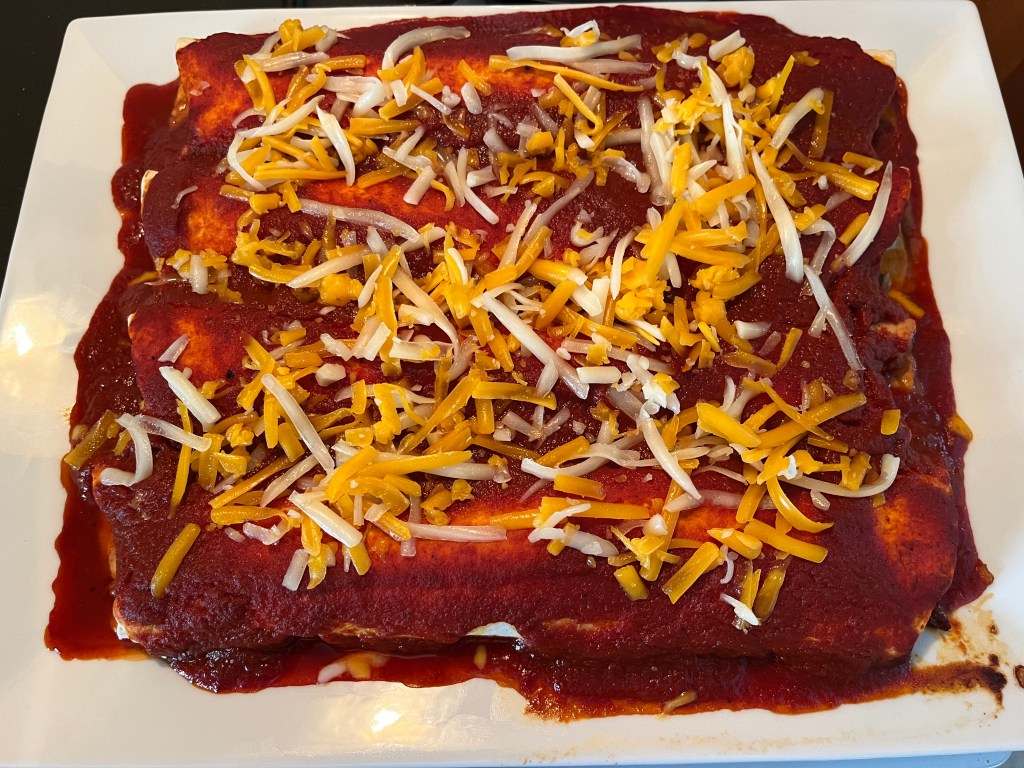
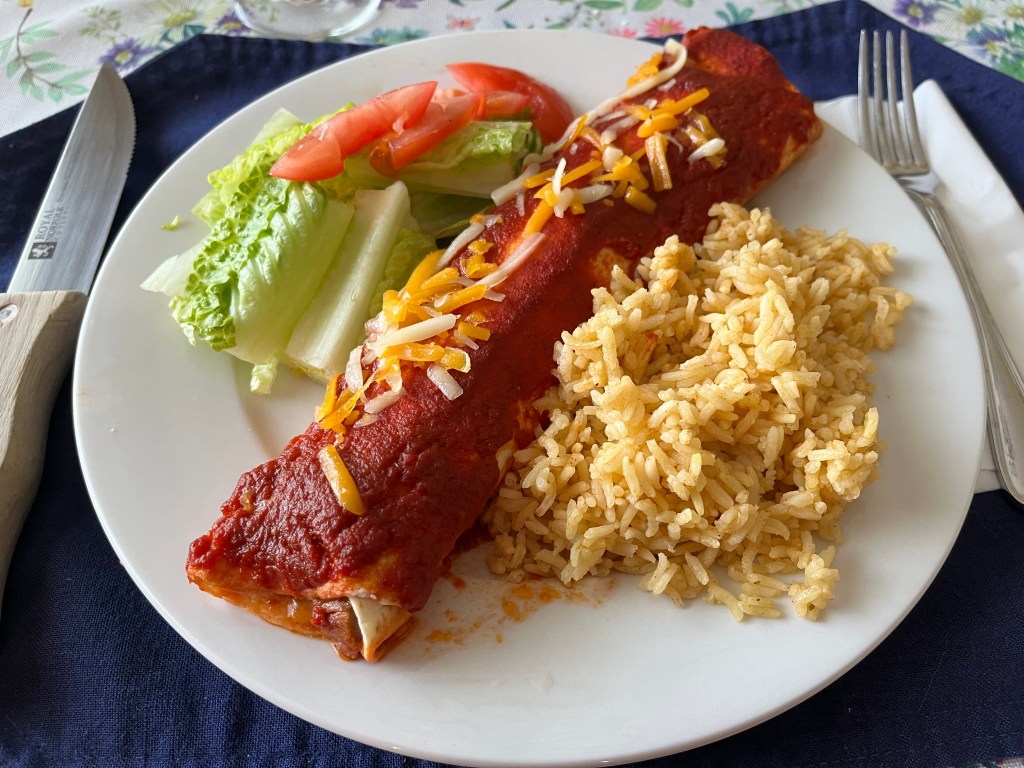
I pan fried thinly sliced steak over high heat to medium-rare. After a little chopping, I added the cooked beef to 14” burrito sized tortillas.
I added the rolled burritos to a large skillet and topped them with the sauce. The burritos baked at 350º for about 15 minutes. I added some shredded cheese to the top, after arranging the cooked burritos on a serving plate.
A little salad and Mexican rice completed the deal.
When did “Taco Tuesday” become a thing? Well, according to sources on the internet, we can thank New Jersey’s Gregory’s Restaurant & Bar, in 1982, Wyoming’s Taco John’s, in 1989, and more recently, LeBron James’ Instagram posts about his weekly dinner habits, and the amazing thing is that all three sought to trademark the term, “Taco Tuesday”.
How silly is that?
Tacos have been known to make an appearance on my dinner table more often than just one day a week. I could make tacos for dinner every day for a month and never have a repeat recipe!
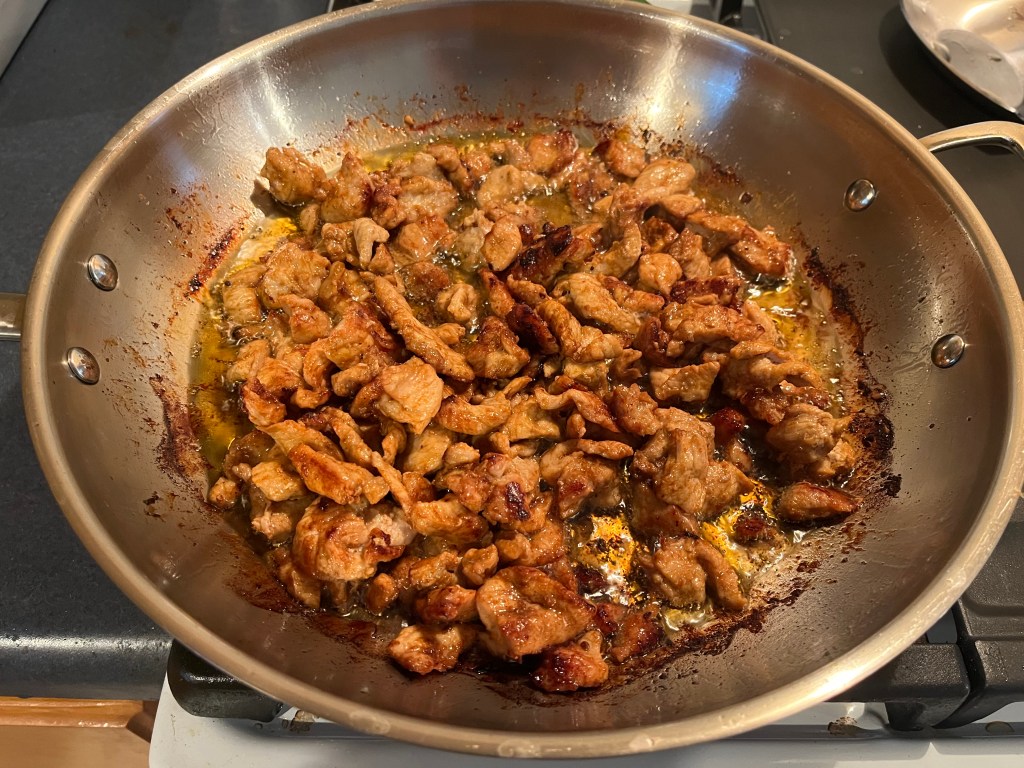
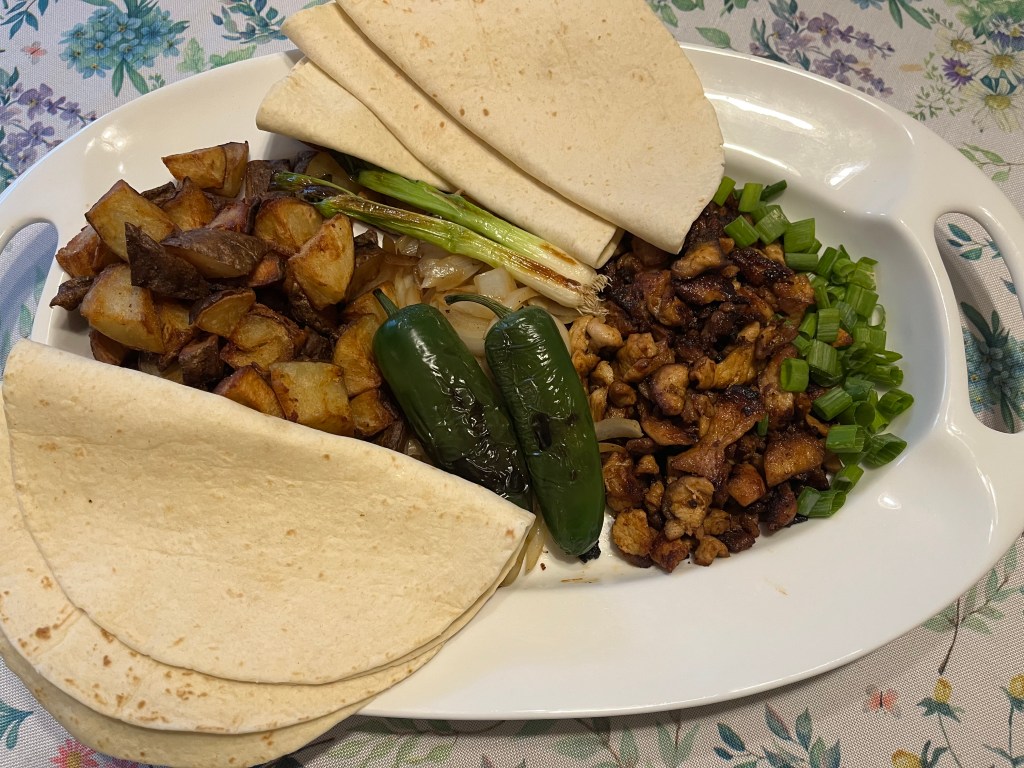
Tonight, it’s quick carnitas. Classic Mexican carnitas recipe requires simmering pork for several hours, until the pork is tender and shreds easily. My method is much quicker and better suited for making dinner in a hurry. I use country-style ribs, which, surprisingly do not contain bones and are not actually meat from the rib. Country-style ribs come from the fatty, muscular portion of the shoulder, which gives them a good amount of marbling, making them well suited to fast or slow cooking.
I sear the pork on all sides, in a hot pan, in a little oil. I remove the meat and cut it into tiny pieces and return the pieces to the pan. I add some chopped white onion, cumin, red chili powder, garlic powder, salt, black pepper, and a pinch of oregano and then mix everything together. I cover the pan with a lid and simmer at low heat for about 20 to 30 minutes, stirring occasionally.
As with any dinnertime meal, I like to be efficient while preparing everything, so I start cooking the potatoes in hot oil at the same time I start cooking the pork.
I roast a few jalapeños over the gas burner on the stovetop.
I chop some lettuce, tomatoes, and green onions while the pork and potatoes cook. I arrange the vegetables on a serving tray, along with some cooked corn, sour cream and salsa.
I steam the flour tortillas, just before the pork is ready.
Expect cooking time, including preparation, to be 45 minutes to 1 hour.
Just for fun, anyone who played Advanced Dungeons & Dragons, way back in the 1970’s and 1980’s might appreciate THACO Thursdays. That’s a very obscure reference, so don’t feel bad if you don’t get it.
During a recent conversation with my dad, I mentioned that I was making caldo de pollo. I was surprised when he asked, “What’s caldo?”
My dad speaks some Spanish so, I was a bit surprised when he wasn’t familiar with the word, caldo. I told him that it was like sopa, (which is soup, in Spanish). He knew sopa, but he had not heard of caldo.
That conversation got me thinking. What is the difference between caldo and sopa? So, after some research, I found that sopa translates to soup and caldo means broth. Caldo de pollo is chicken soup but, more importantly, it’s a soup made with a rich, delicious chicken broth.
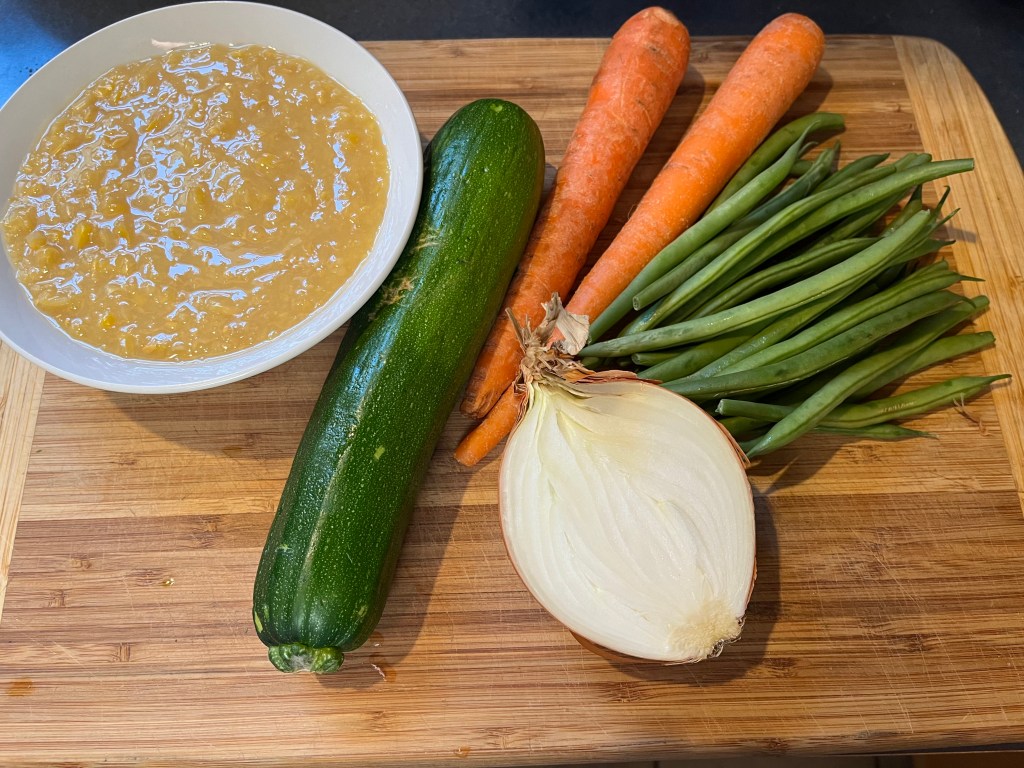
Like many soups and stews, ingredients can easily be substituted. I used ingredients that I had on hand. You can replace any of the vegetables I used with cabbage, potato, celery, or whatever else strikes your fancy. I looked at this caldo as a good way to use some items before they withered away in my refrigerator.
Ingredients:
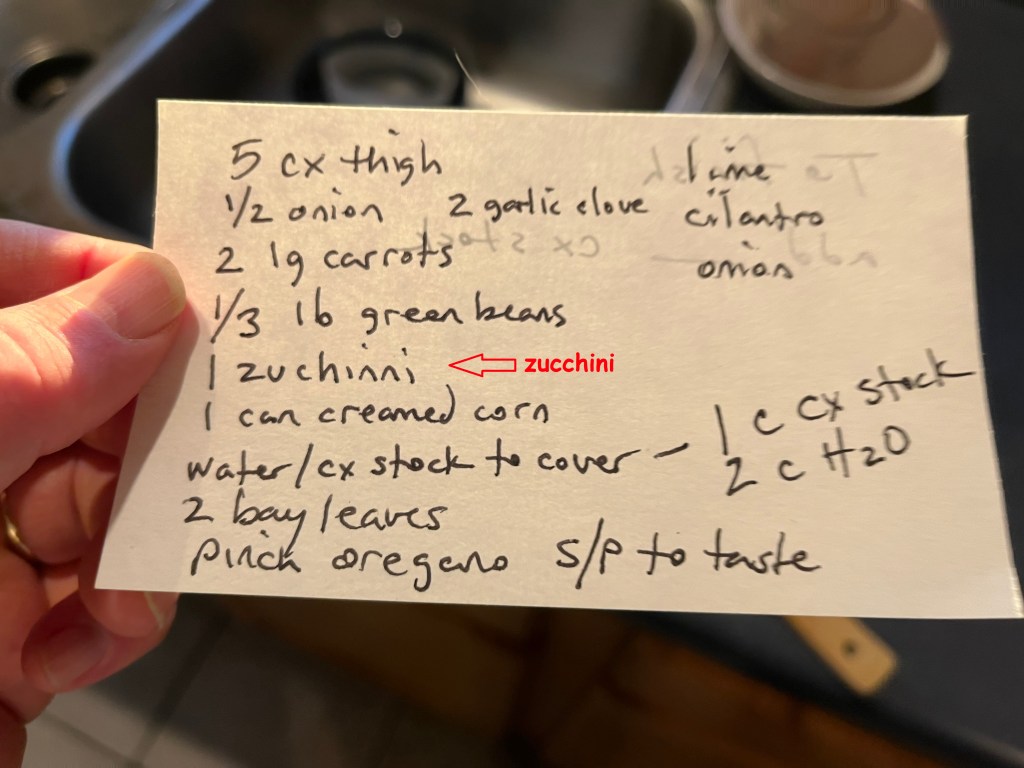
I rarely measure ingredients exactly when I cook because I like to measure by sight, feel and aroma. This makes cooking exciting for me, but that can make describing recipes difficult when it comes time to post on the blog! I sometimes jot down ingredients and proportions on a 3×5 card while I cook…
3×5 cards don’t have spell checkers!
5 skinless chicken thighs (bone in)
1 cup chicken stock
2 cups water
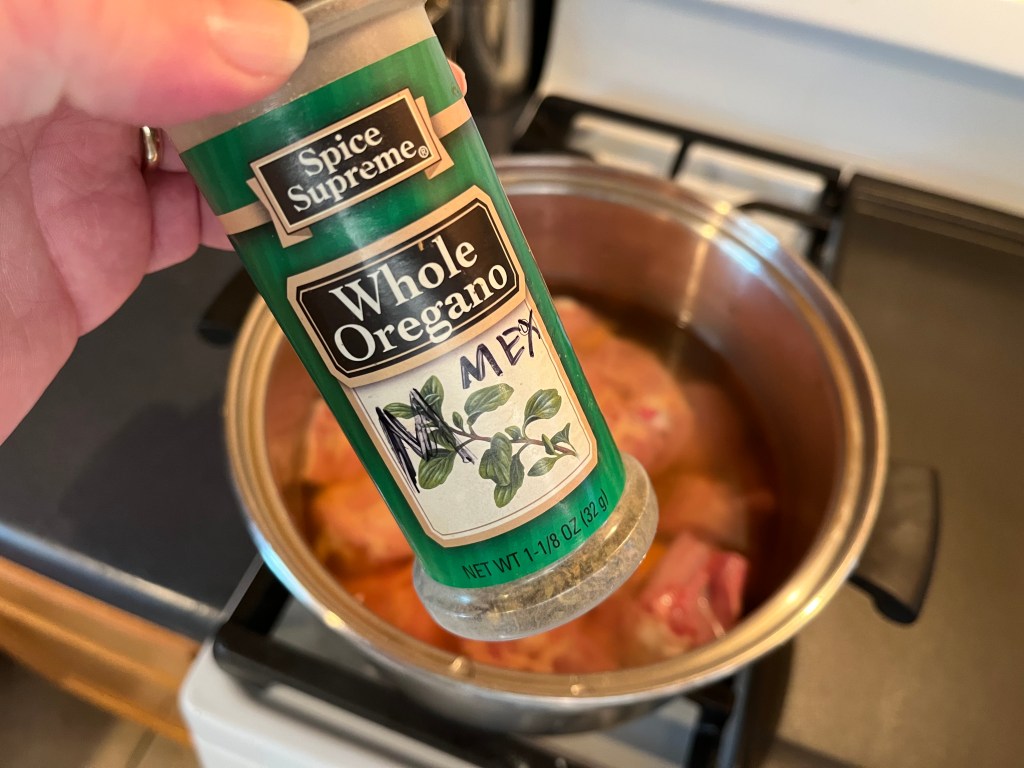
A pinch of Mexican oregano
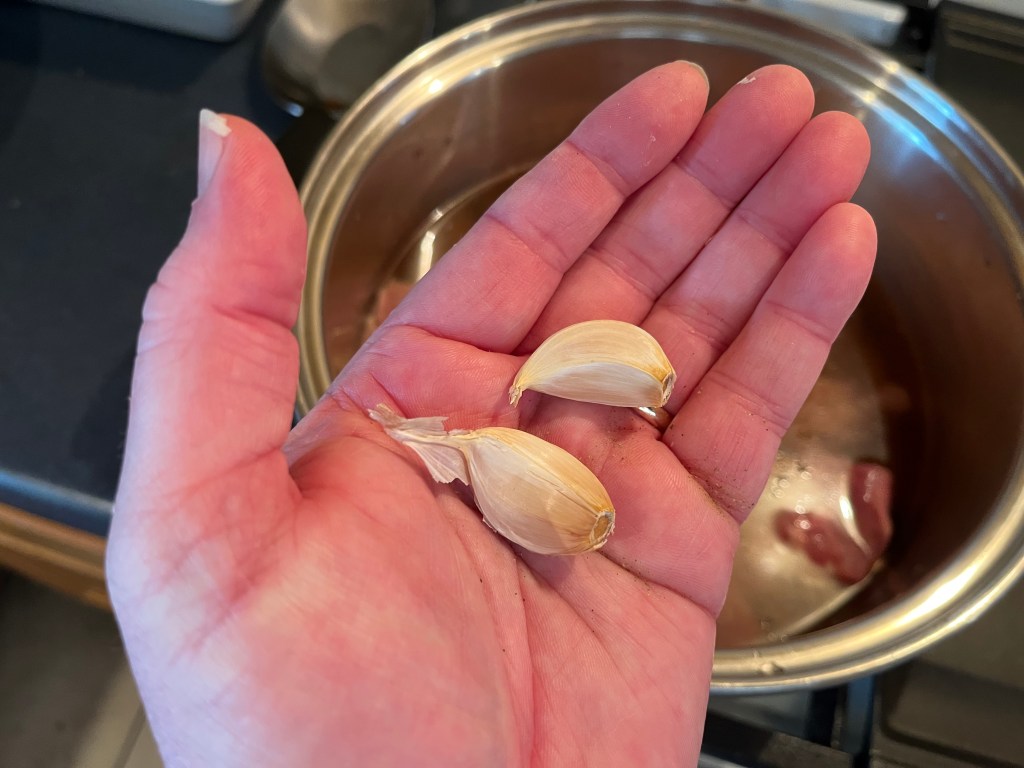
2 garlic cloves, mashed
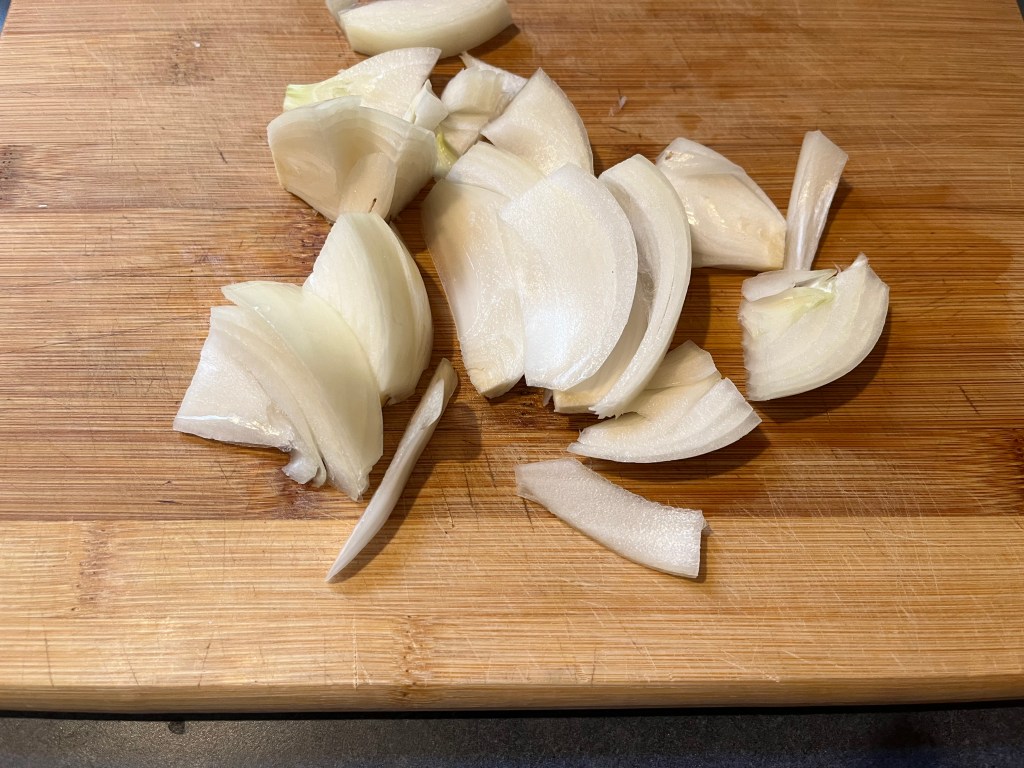
½ onion, chopped
2 large carrots, chopped
1/3 lb. fresh green beans, chop
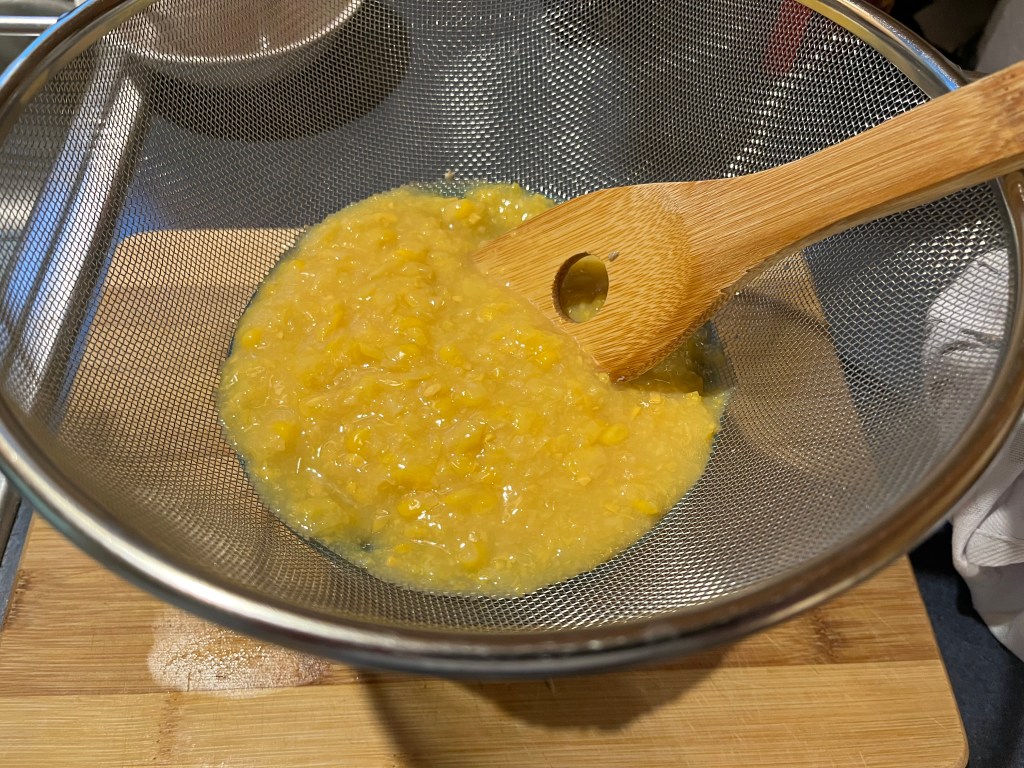
15 oz. can creamed corn, strained
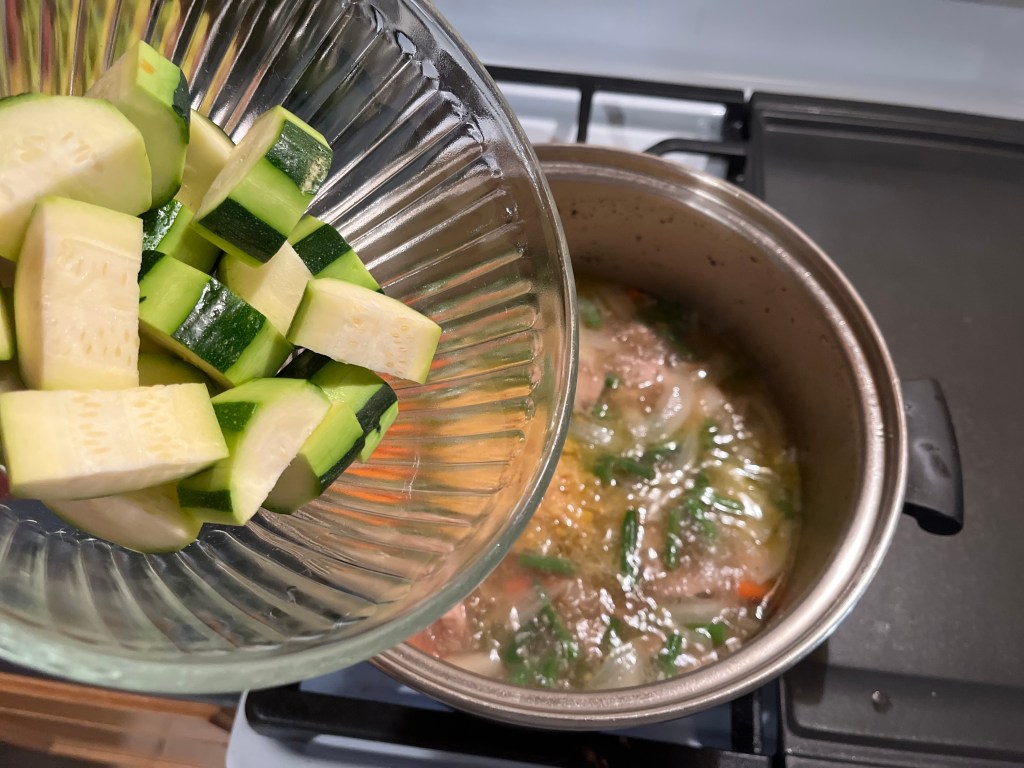
1 zucchini (calabacita, if you can get it), peeled and chopped
2 bay leaves
A pinch of Mexican oregano
Salt and pepper to taste
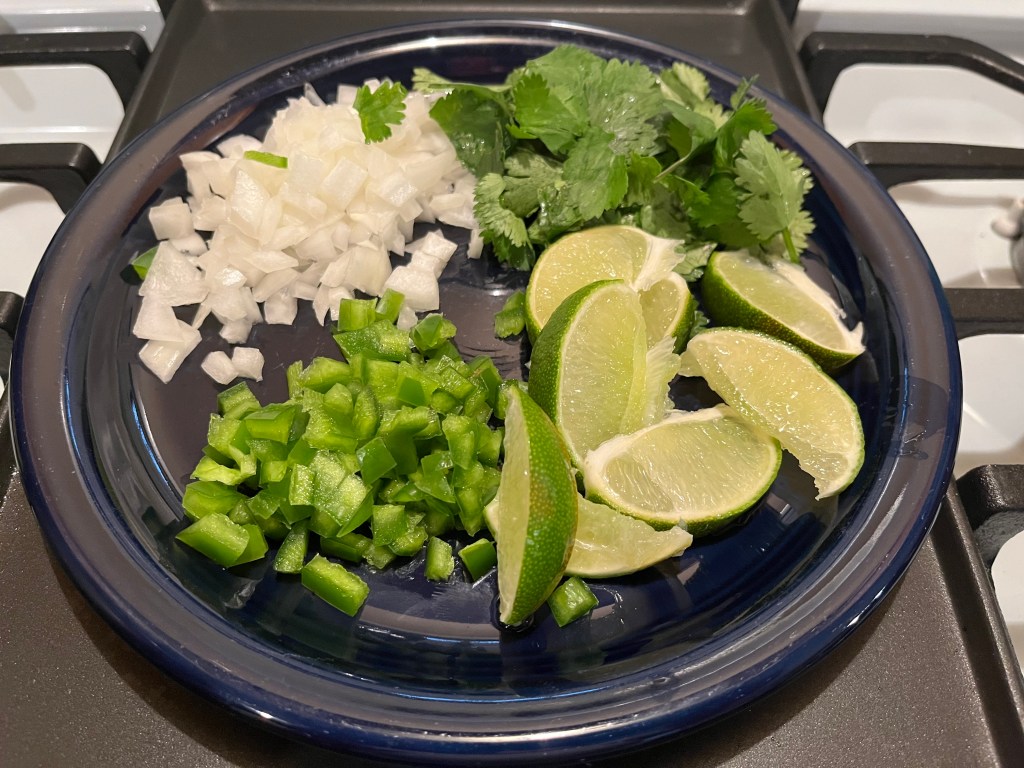
Lime, cilantro, diced jalapeño, and diced onion, for garnish
Directions:
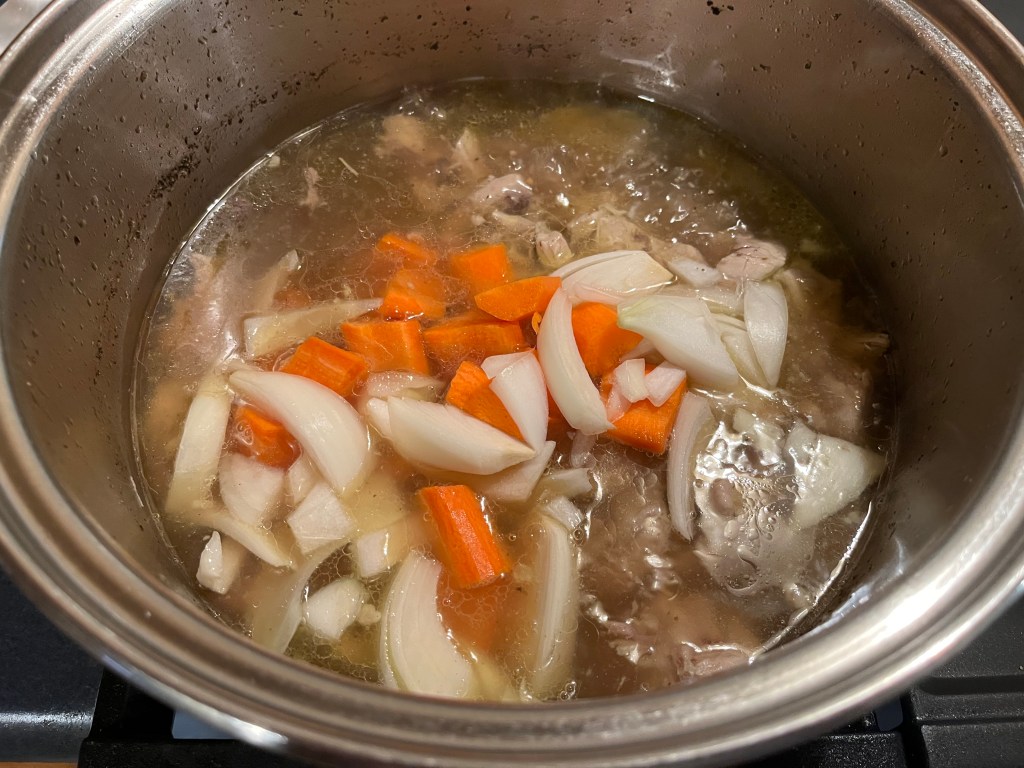
Rinse the chicken thighs under cool running water.
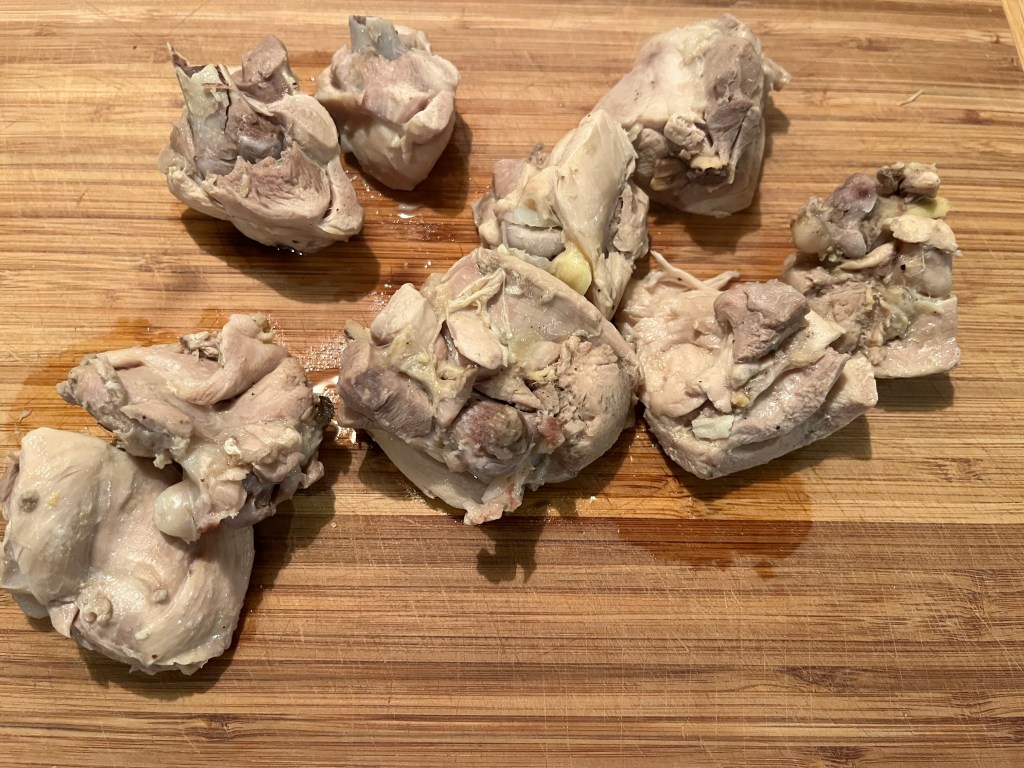
Chop the thighs into large chunks. Chopping through the bones allows the bone marrow to release into the stock as it cooks, which is a great way to add rich flavor to the broth.
Add the cut chicken to a large stock pot. Cover with chicken broth and water. Set the heat to medium/low.
Add oregano and mashed garlic cloves.
Cover and simmer for about one hour.
While the chicken is cooking, prepare the vegetables.
Chop the onion, carrots, and green beans into large pieces. Set aside.
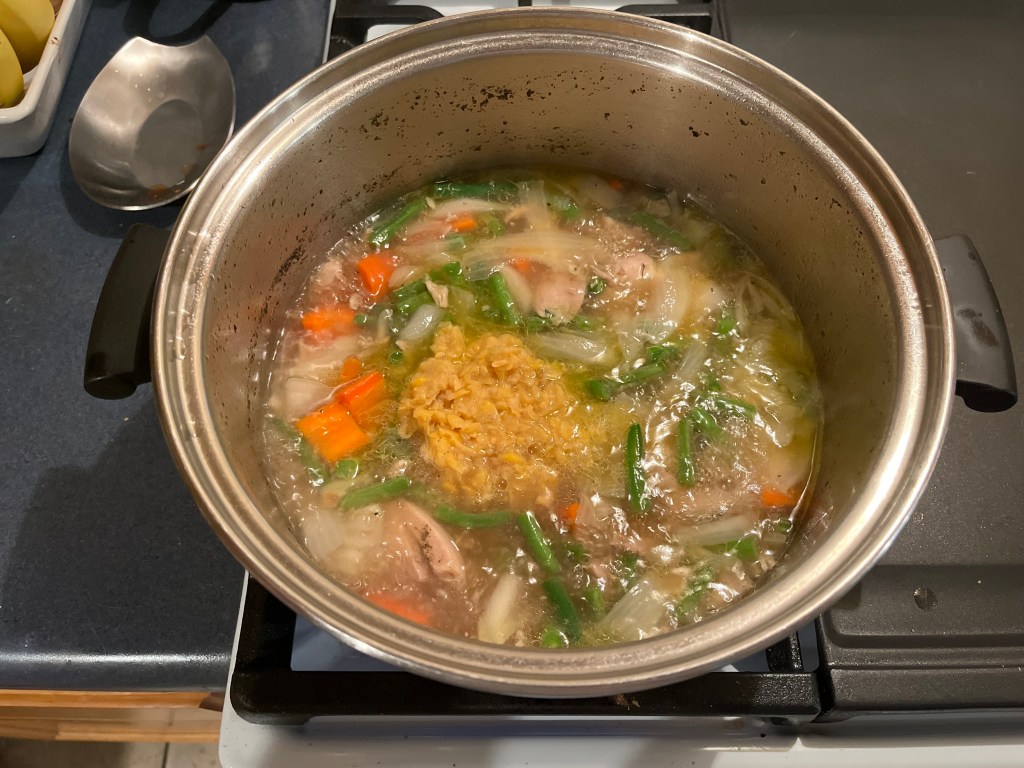
Strain the creamed corn. Save the solid pieces of corn and discard the liquid, (or drink it, like I did!)
Remove the cooked chicken to a cutting board and allow to cool for a few minutes.
Separate the bones from the meat with a knife and fork. Discard the bones.
Return the chicken to the pot. Cover and simmer at low heat for another hour.
Add the onion and carrot. Cover and simmer for 10 minutes.
Add the green beans. Cover and simmer for another 10 minutes.
Add the creamed corn. Mix gently to combine.
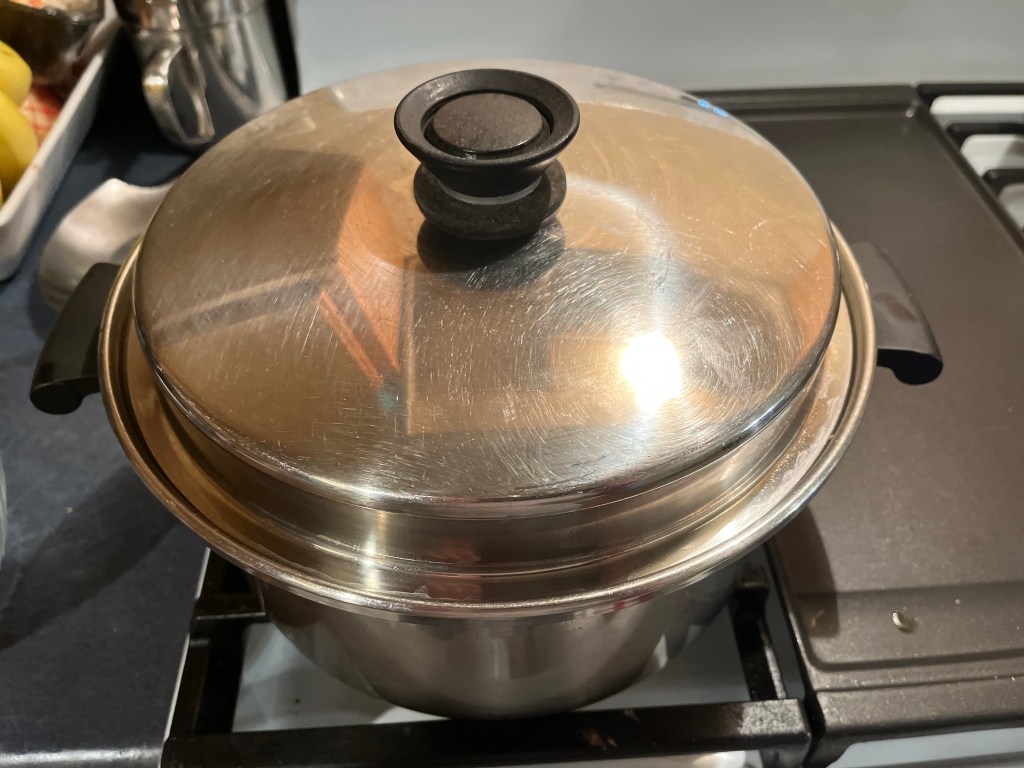
Add the chopped zucchini. Cover the pot and turn the heat off. Wait 20 minutes while the zucchini steams and softens.
Serve cut limes, cilantro, diced jalapeño, and diced onion on the side so that guests can add the items to suit their individual taste.
Chipotles are smoked chilies. Jalapeños are most commonly used but, poblano, morita and meco chiles are also used. The chilies may be smoked to a point where they are hard and dry, or they may be smoked to a point where they remain soft and pliable.
About adobo sauce:
There are many ways to prepare adobo sauce. Adobo typically has elements of sweet, tangy, bitter and salty flavors. Adobo sauces can vary in flavor, depending on the ingredients. Imagine the many different kinds of barbecue sauces. Same thing.
For this meal, I chose to lightly smoke and char the jalapeños and I made an adobo sauce from leftover tidbits in the refrigerator. The base of the sauce was a spicy ketchup that I made by adding some hot sauce to the ketchup. To that, I added a little barbecue sauce, a little soy sauce, a pinch of brown sugar, and a few dashes of liquid smoke. The finished sauce was full of flavor, but not too spicy.
Ingredients:
1 head of garlic, peeled and mashed
¾ cup olive oil
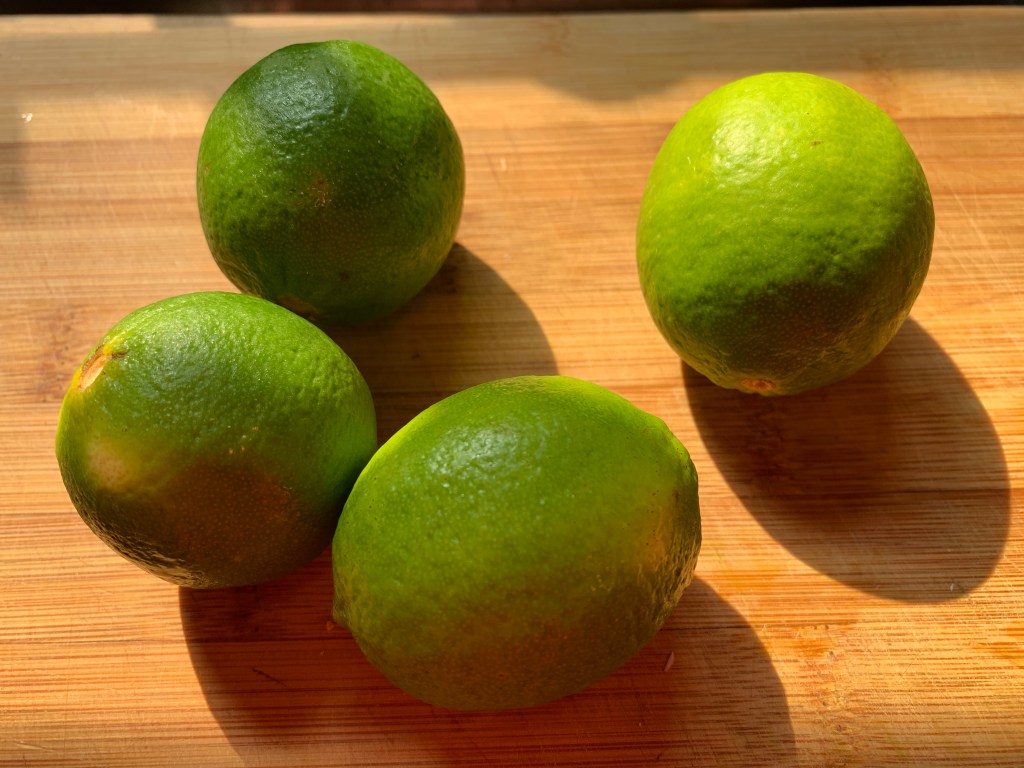
¼ cup lime juice
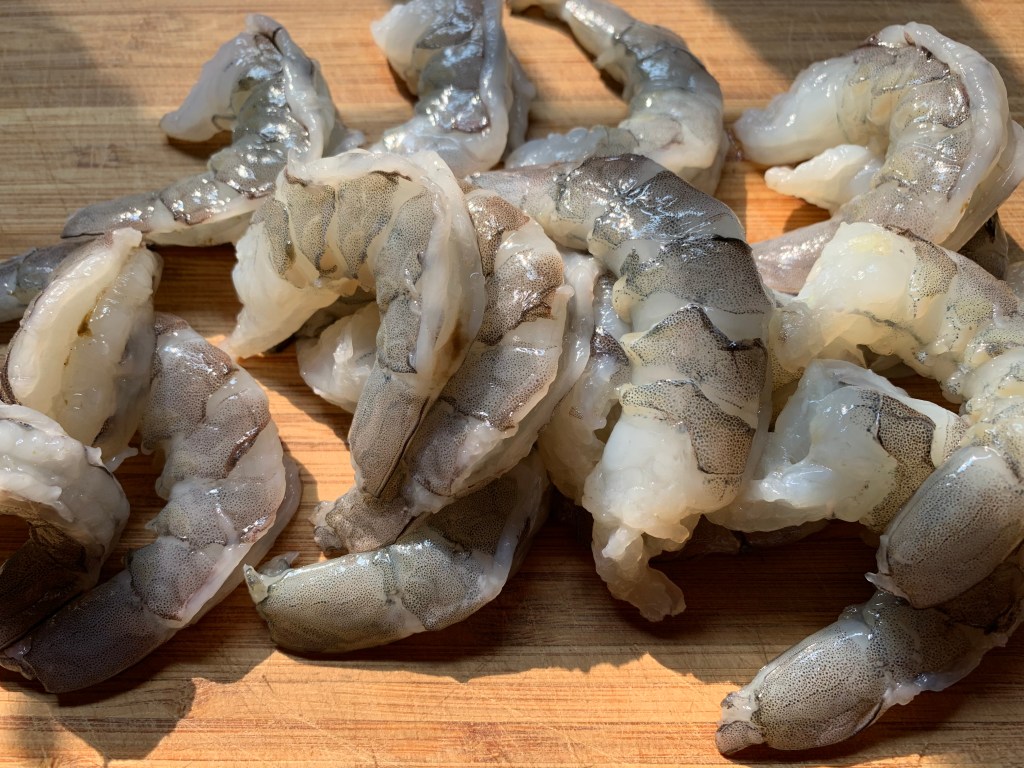
1 lb jumbo shrimp
Salt and Pepper to taste
Chipotles in adobo (about ½ cup)
Lime wedges for serving
Corn tortillas (softened in hot oil)
1 cup lettuce, chopped
Directions:
Add olive oil and garlic to a ceramic dish and bake in a 325° oven for 30 minutes.
Remove the dish from the oven and add lime juice. Return to the oven for another 10 minutes.
Remove from oven and mash the garlic to form a paste. I browned the garlic a little too much and it wouldn’t mash properly, so I removed the garlic. The oil carried the garlic flavor nicely.
Peel and devein the shrimp. Reserve the shrimp shells for shrimp stock.
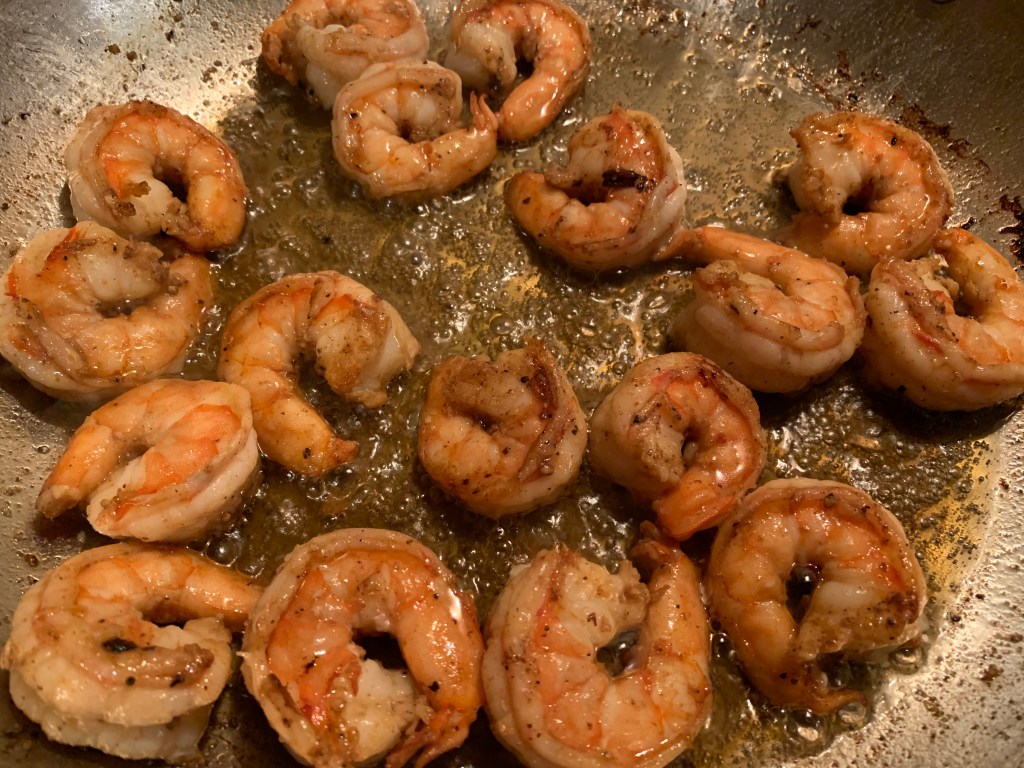
In a large skillet, add 3 tablespoons of the garlic oil and set heat to medium. Add the shrimp and a pinch of salt and pepper.
Sauté the shrimp for about 3 minutes.
Remove the shrimp and keep warm.
Add the chipotle sauce to the remaining garlic oil. Mix to combine.
Add the mixture to the skillet and cook for a minute or two. Add the shrimp to the skillet and stir briefly.
Turn out to a serving platter.
Top with diced green onions. Serve with lime wedges, lettuce, warm tortillas, and Mexican rice.
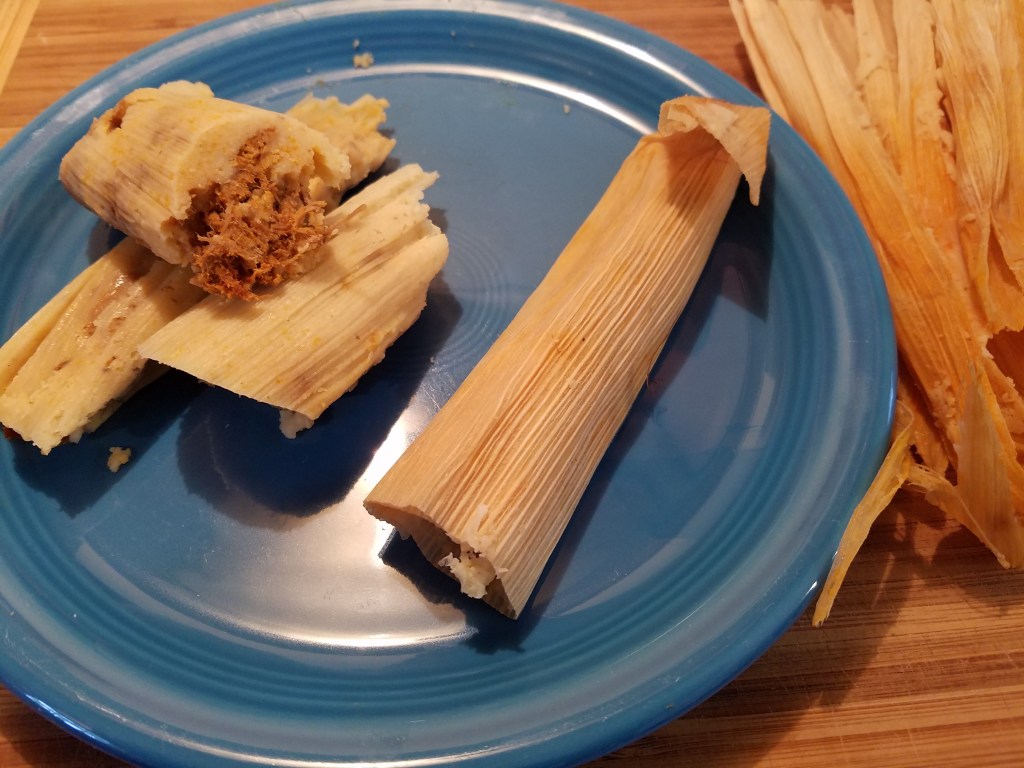
2020 has been one heck of a ride and I can’t think of a more suitable way to wrap up the year than by wrapping it up in tamales. Tamales might just be the perfect metaphor for 2020. I was fully prepared to offer a long lament about the year 2020, now that the year has finally come to an end, but I feel a greater need to close the door to the past year and move on.
Anyone who has made tamales knows that it requires time, dedication and stamina, beyond the scope of preparing a typical meal.
There comes a point in the tamale making process where it seems like it will never end and I wonder why I chose to make them, in the first place. The only thing that carries me beyond that moment of futility is a steadfast determination and a belief that I will find satisfaction, when the job is done.
I could go on and on about the agony and ecstasy of making tamales but, I don’t want to discourage anyone from making tamales. Making tamales is a rite of passage.
My method for making tamales takes two days. On the first day, I roast the meat and make the sauce. On the second day, I prepare the masa dough, assemble the tamales and then steam them.
Day one: Roast the meat and make the sauce.
Ingredients for the meat filling:
5 lb Pork butt (shoulder roast) (substitute with chicken or beef)
¼ cup cooking oil
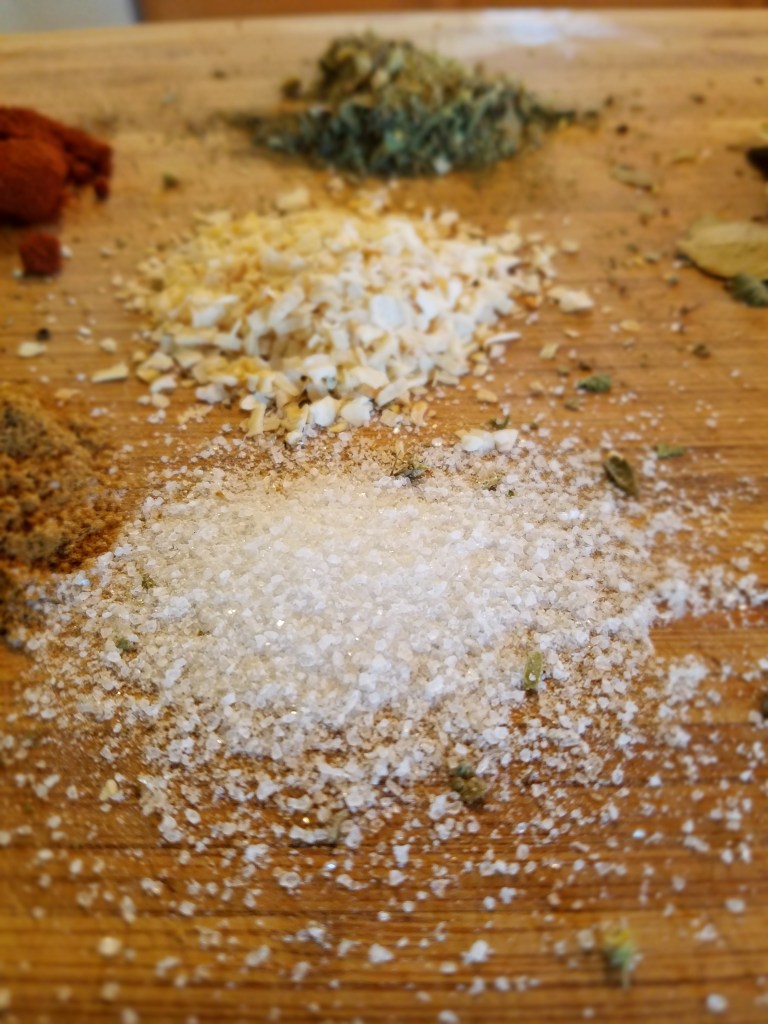
1 cinnamon stick, broken into pieces
1 Tbs coarse salt
2 tsp cumin powder
2 tsp cracked black pepper
3 or 4 bay leaves
2 Tbs dried onion flakes
2 tsp red chile powder
2 tsp dried Mexican oregano
2 cups chicken stock (or beef stock)
2 Tbs rendered bacon fat or rendered beef fat
Directions:
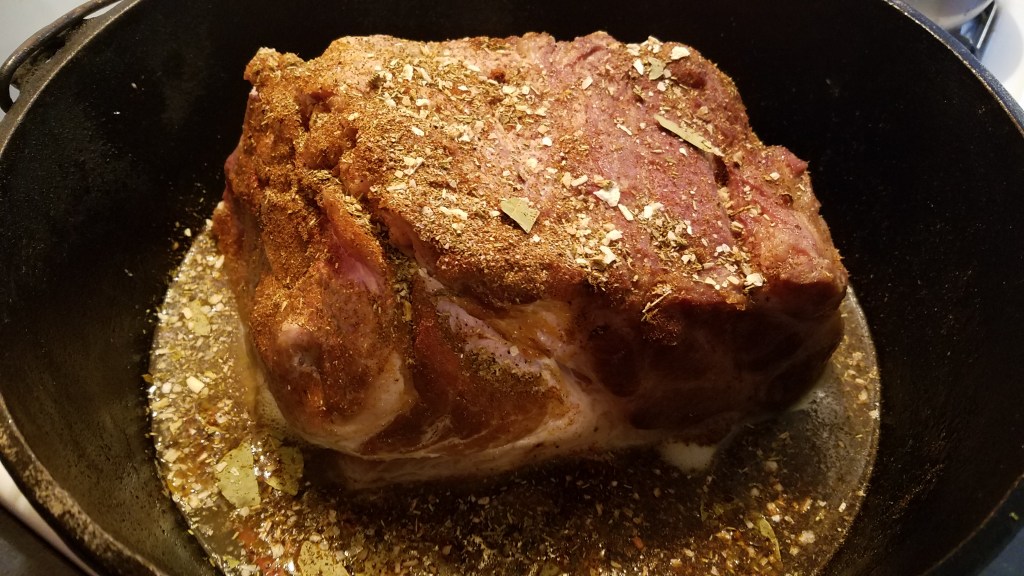
Wash the roast in cool water and pat dry. Add the oil to a large Dutch oven and set the heat to high. Sear the roast on each side and then set it aside to cool. Discard remaining oil from the Dutch oven.
Combine all of the spices (cinnamon stick, salt, cumin, black pepper, bay leaves, dried onion, chile powder and oregano) and grind them in a mortar and pestle.
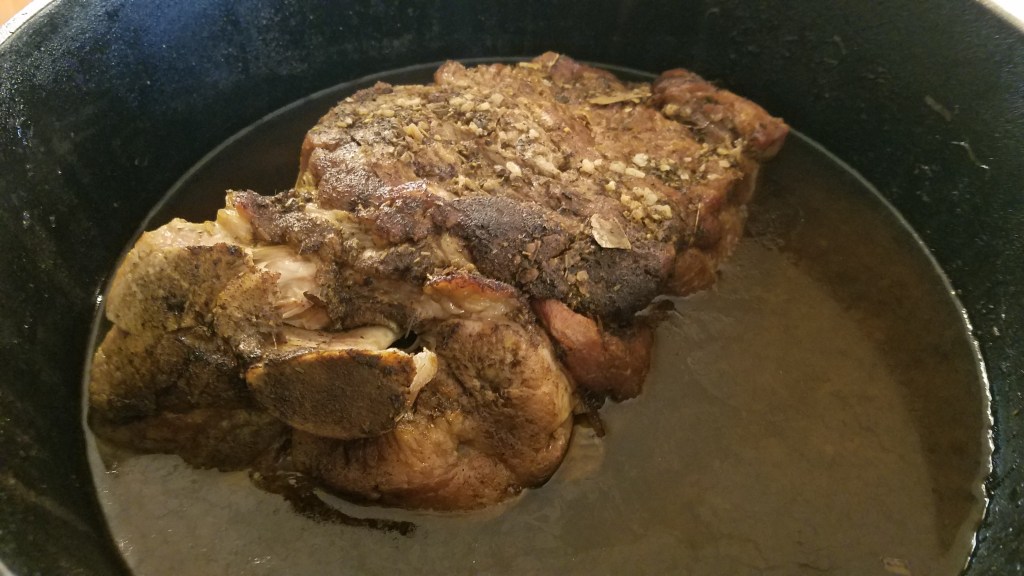
Coat the roast with the blended spices and return the roast to the Dutch oven. Add 2 cups of stock. Cover the Dutch oven and place in a 225° oven for six hours.
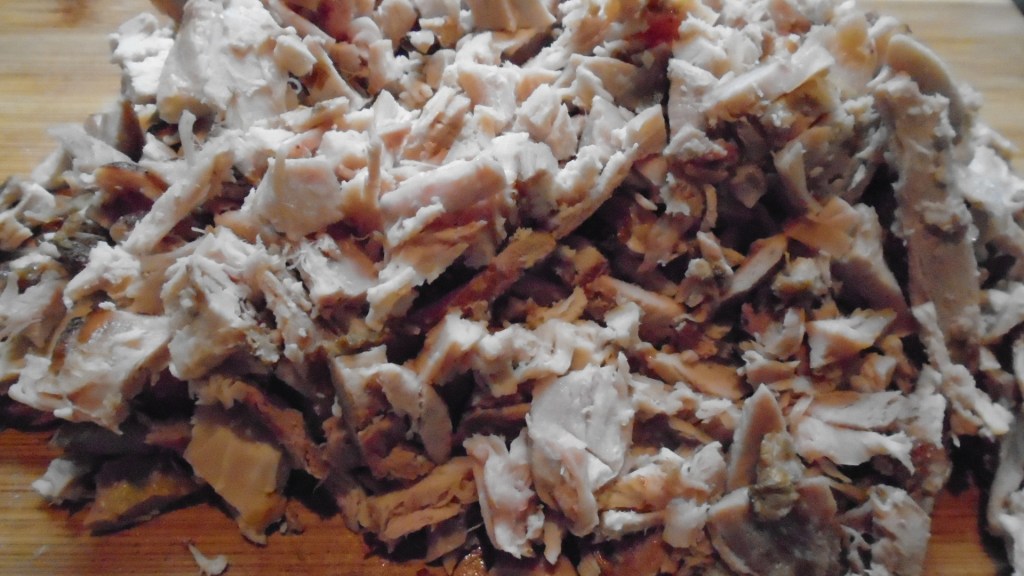
Remove the Dutch oven from the oven and let the roast rest for about 20 minutes.
Shred the roast with forks and add some of the shredded meat to a large skillet. Add a few teaspoons of rendered fat to the skillet and set the heat to medium/high. Stir the meat for several minutes and remove to a large bowl. Repeat the process until all of the shredded meat has been fried quickly in the skillet.
Ingredients for the sauce:
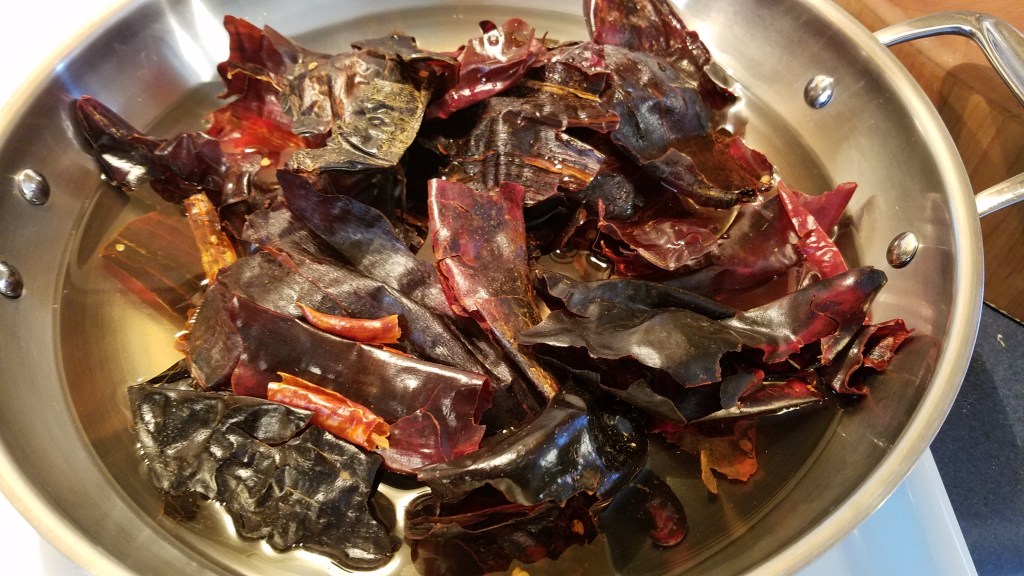
20 dried guajillo chiles, stemmed and seeded
3 chile de arbol, stemmed and seeded
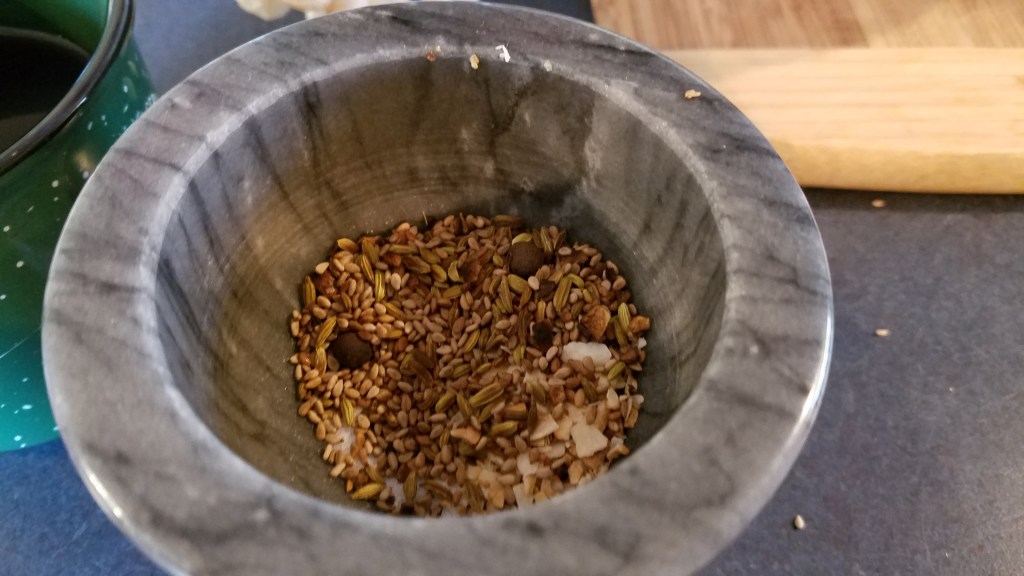
3 allspice berries
1 tsp fennel seed
1 tsp sesame seed
2 tsp dried onion flakes
1 tsp garlic powder
1 ½ tsp salt
8 oz tomato sauce
Directions:
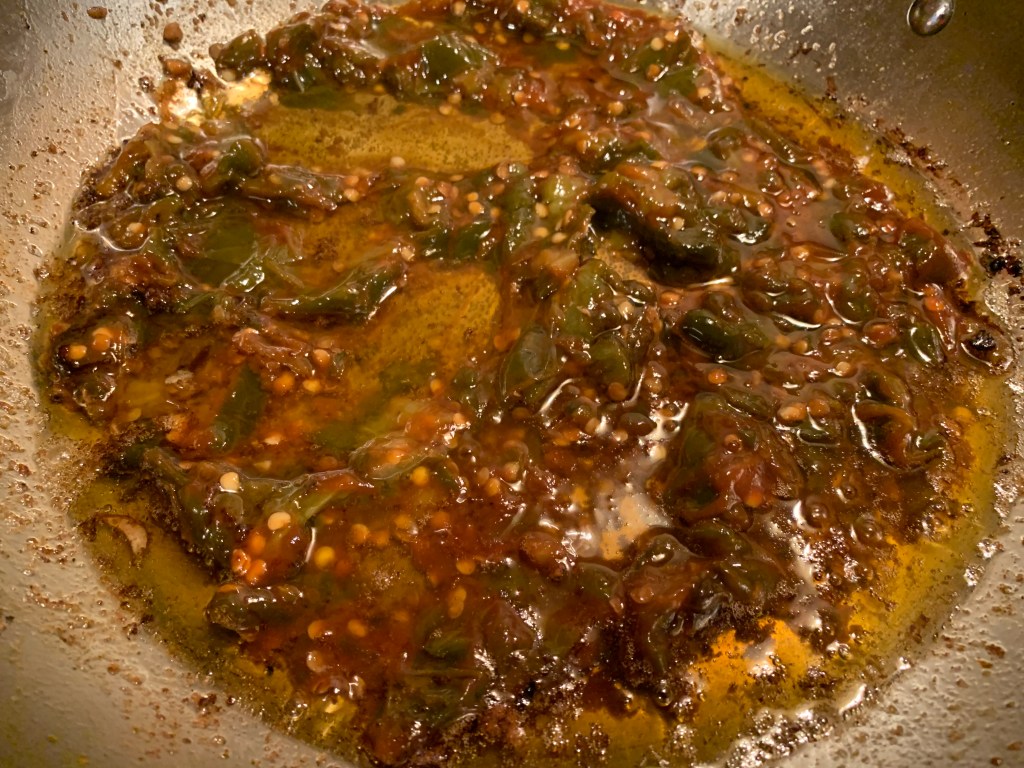
Stem and seed the chiles.
Whole, dried chiles
Discard stems and seeds
Steep the chiles in hot water for at least 30 minutes.
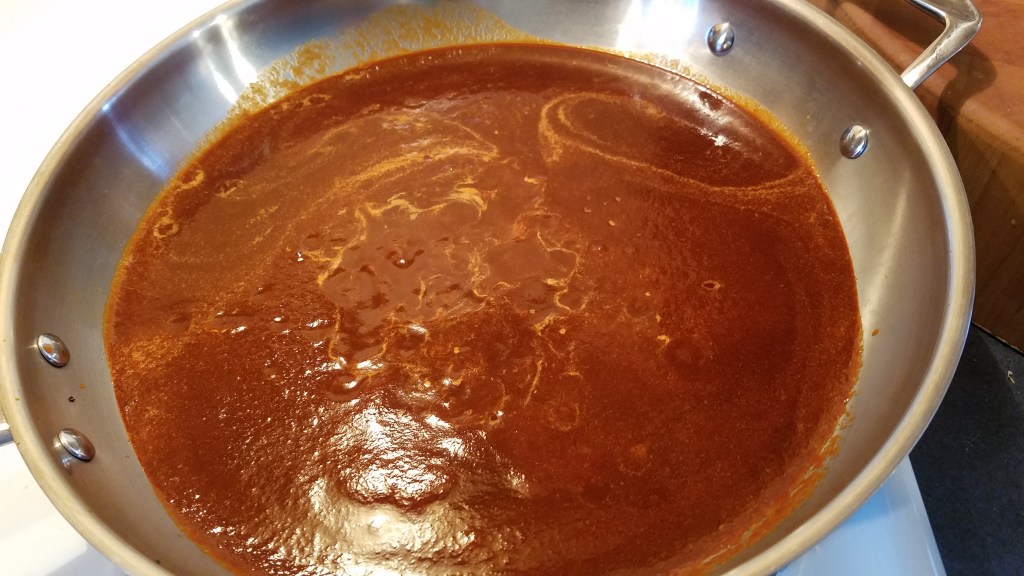
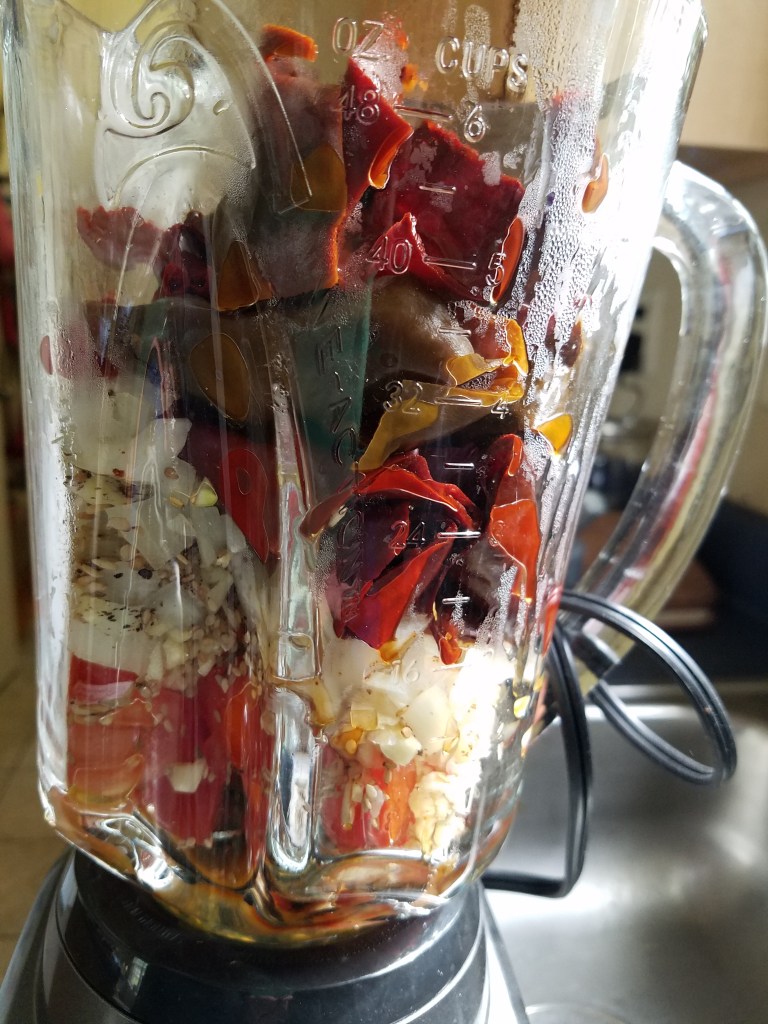
Remove the chiles and place them in a blender. Add some of the water, used during the steeping process, to the blender.
Puree the chiles and strain over a large mixing bowl to remove the pulp.
Move the sauce from the bowl to a large skillet. Set the heat to low and simmer.
While the sauce simmers, toast the allspice berries, fennel seeds, sesame seeds and dried onion in a pan, at low heat. Keep the different items apart in the skillet because the onion flake will toast quickly and will need to be removed first. Continue toasting the other spices until they become fragrant.
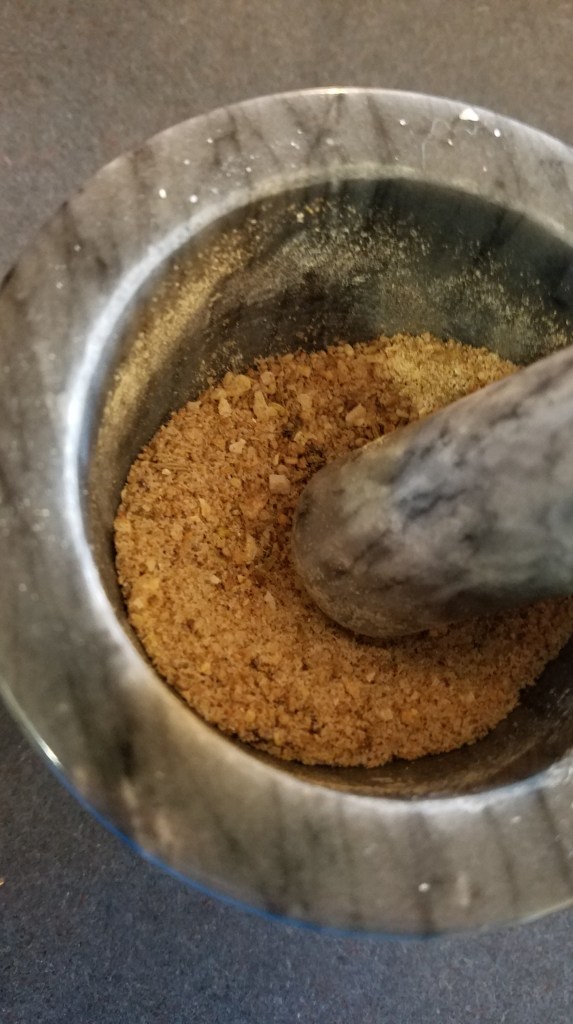
Grind the toasted spices in a mortar and pestle and add the garlic powder and salt. Add the spices to the sauce.
Add 8 ounces of tomato sauce to the sauce.
Whisk and stir the sauce at low heat for about 15 minutes. Remove the sauce to a large bowl.
Return the shredded meat to the pan and set heat to medium. Add some of the sauce and mix. Once the sauce is thoroughly mixed with the meat, remove the meat and allow to cool to room temperature. Once the meat has cooled, place it in an airtight container or sealable storage bag and refrigerate.
Day two: Prepare the masa and assemble the tamales.
For the masa:
1 package of corn masa (4 lbs)
Baking powder
Lard or vegetable shortening
Water or broth
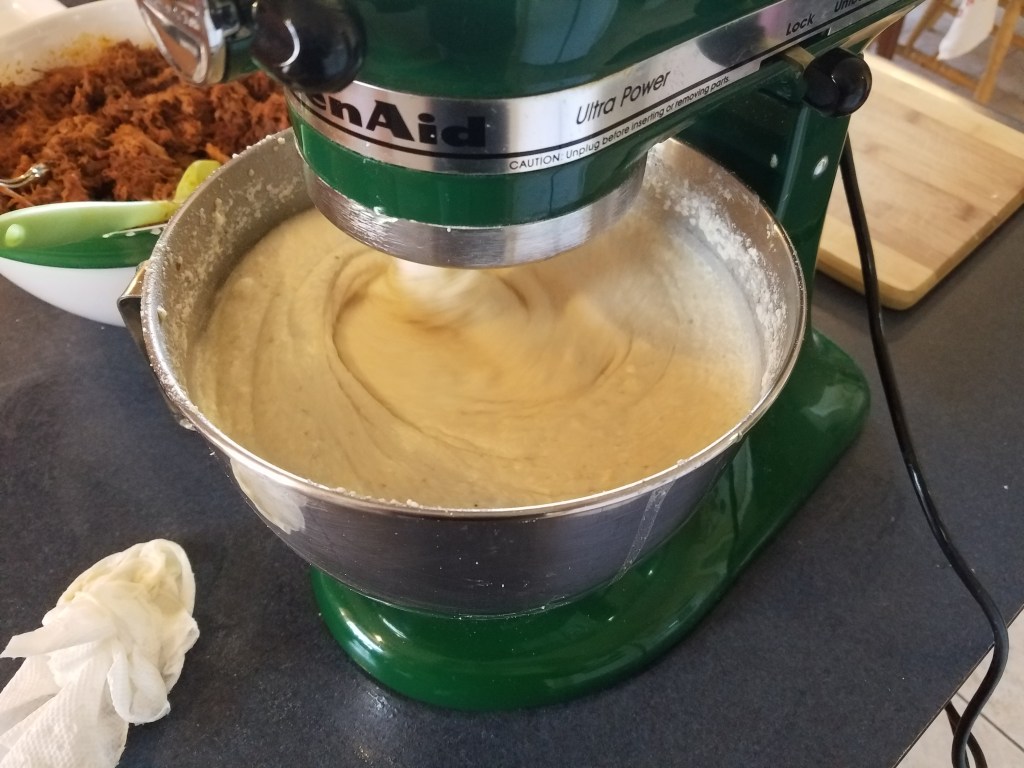
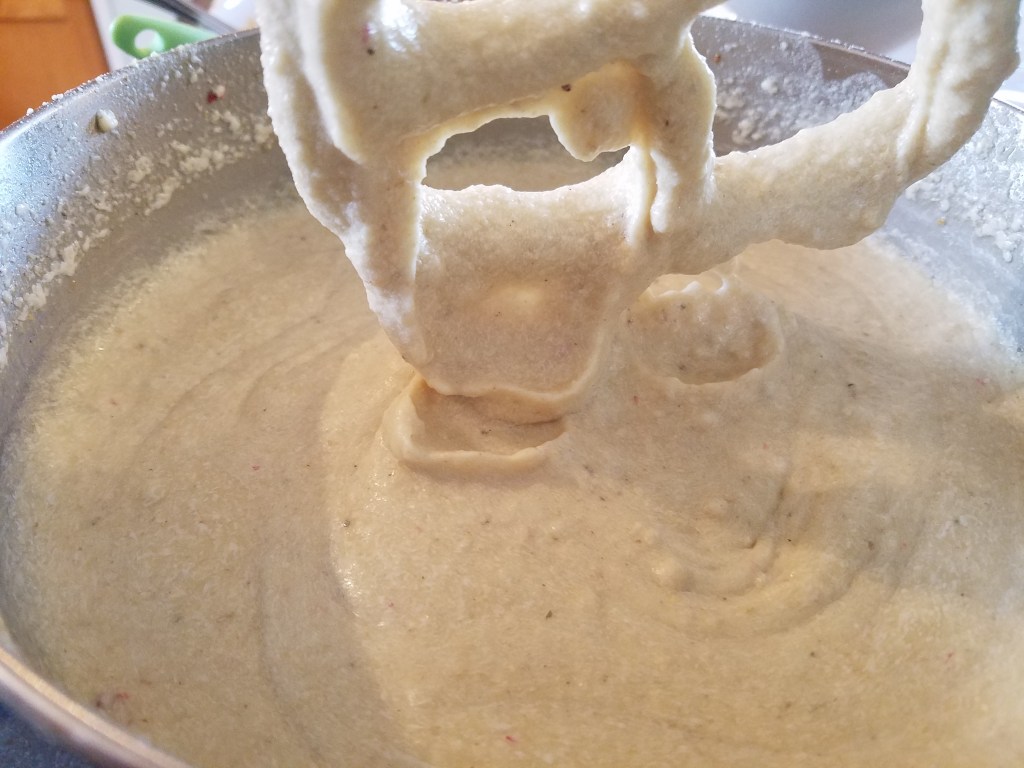
Follow the directions on the bag of masa. Most masa mixes call for the addition of baking powder, lard and water. The general idea is to add baking powder, lard and water to the masa and then mix to produce a fluffy, wet dough. I used water and added some chicken bouillon and dried Mexican safflower leaves, (azafran en flor), to give a warm color to the masa. I soaked the bullion and safflower in warm water before adding it to the masa mix.
Masa dough needs to be creamy and wet, making it easy to spread.
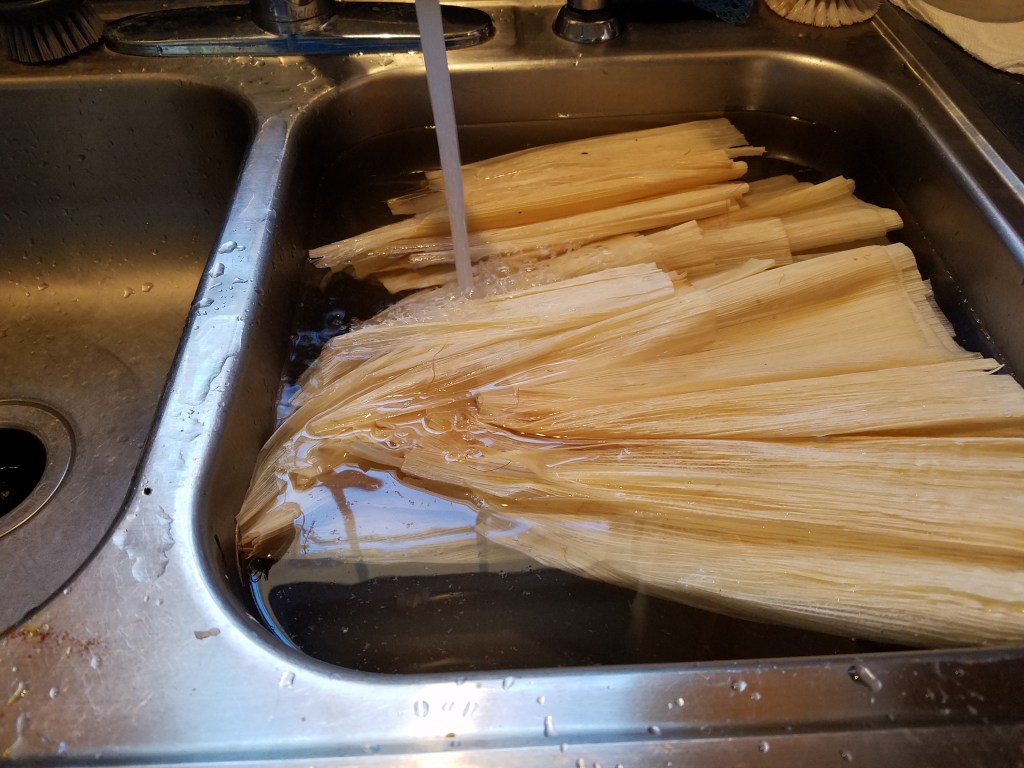
Soften corn husks by soaking them in warm water for 45 minutes to an hour. A clean sink full of hot tap water will do the trick.
Add some water to a tamale steamer and place the steamer on the stove top. Set the heat to medium and cover the steamer with a lid.
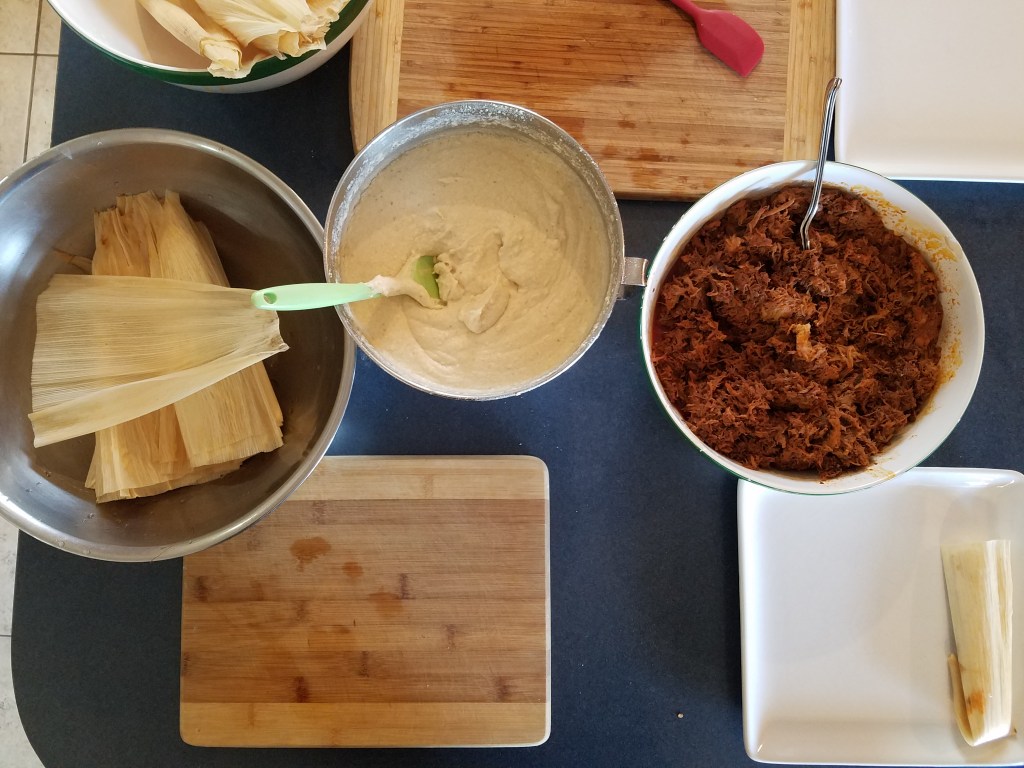
Prepare a large area to assemble the tamales. Arrange the work space so that others can help assemble tamales. Each person will need to be able to easily access the corn husks, masa and filling, and a tray for the wrapped tamales.
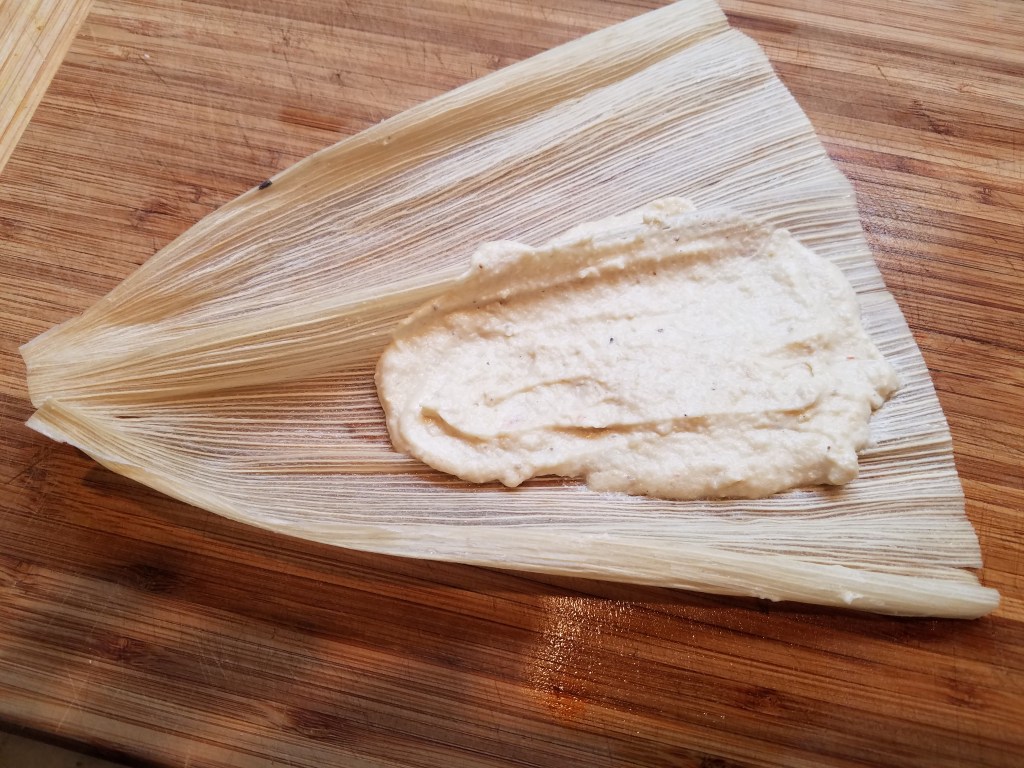
Lay a corn husk down on the work surface.
Apply about 2 tablespoons of masa to the center of the husk and smear the masa out toward the wide end of the husk. Don’t spread the masa across the entire husk. You will want to leave the edges of the husk clean.
Place about 2 tablespoons of the filling on top of the masa.
Roll the corn husk and finish by folding the pointed end over and placing the tamale on a staging tray or dish.
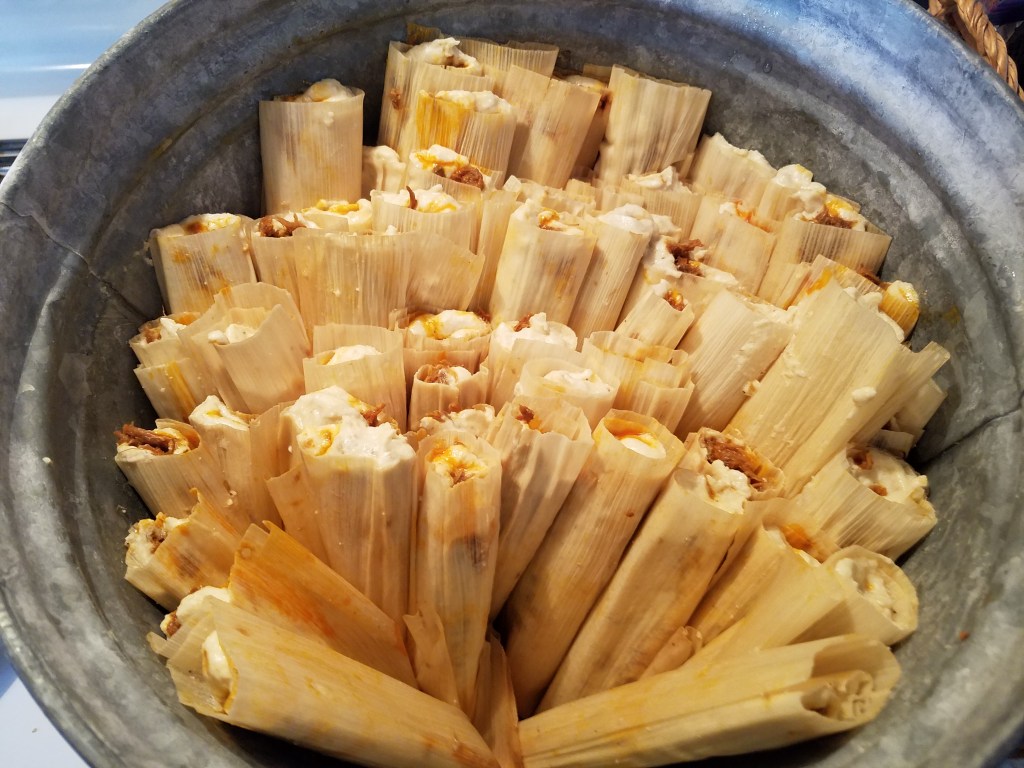
Once you have prepared a few dozen tamales, place them vertically in the steamer, with the folded ends pointed down.
Steam for an hour and then turn the heat off. Carefully remove the tamales and stack them on a tray.
Continue steaming tamales until they are all cooked.
At this point they are ready to eat or, you might want to wrap them in aluminum foil, in sets of 3 or 4, to save for later, or to send as gifts for friends and family.
I like to take packs of tamales to work and give them to co-workers.
You can freeze foil-wrapped tamales for weeks or months. To reheat, remove the foil and place in a microwave oven for about 30 seconds, or keep them in foil and warm them in a conventional oven for about 20 minutes at 350°.
Tamales can be topped with enchilada sauce, smothered in a warm cheese sauce or they can be eaten just as they are, hot or cold.
Best wishes to all of you during the upcoming year! Keep your family and friends fed with delicious food.
I’m convinced that one of the secrets to imaginative cooking is learning how to resist going to the store when you realize you are out of an essential ingredient for a dish. If necessity is the mother of invention, adversity might be the father.
Lasagna just isn’t lasagna without the lasagna pasta. That’s a fact. So, if your heart is truly set on having lasagna and you don’t have the pasta, go to the store and get some. But, if you’ve just come home from a long day at work, you might dread the thought of getting back into the car to face the teeming masses at the grocery store just to pick up a box of pasta. That is the conundrum I faced today.
I reluctantly switched gears and started to think of alternatives for dinner. I wanted to use the ricotta, because it had been in the refrigerator for a few weeks. I rummaged through the refrigerator and found some chicken thighs that I had grilled, the previous weekend. The needle of my culinary compass quickly swung from Italian to Tex-Mex, (who would have guessed?!)
I imagined how I could use cheese and mushrooms and chicken to make flautas (taquitos). It’s during these kinds of moments of brilliance when I become convinced that I’m on the verge of making a brand new, never-seen-before creation. I use the flash of inspiration and get to work.
This sort of inspiration is actually a façade, as any honest cook knows, but it is an excellent motivator! Here is what the all-knowing internet has to say about the matter: From hispanickitchen.com, “Requesón is a soft Mexican cheese similar in texture to ricotta cheese. It has a mild flavor that can be used for both sweet and savory dishes. Because this cheese doesn’t melt completely when in contact with heat, it is the perfect cheese for golden fried taquitos.”
Chicken Flautas with Ricotta Cheese and Mushrooms
Ingredients:
4 grilled chicken thighs (skin on)
1 cup of uncooked rice
1 Tbs olive oil
1 Tbs butter
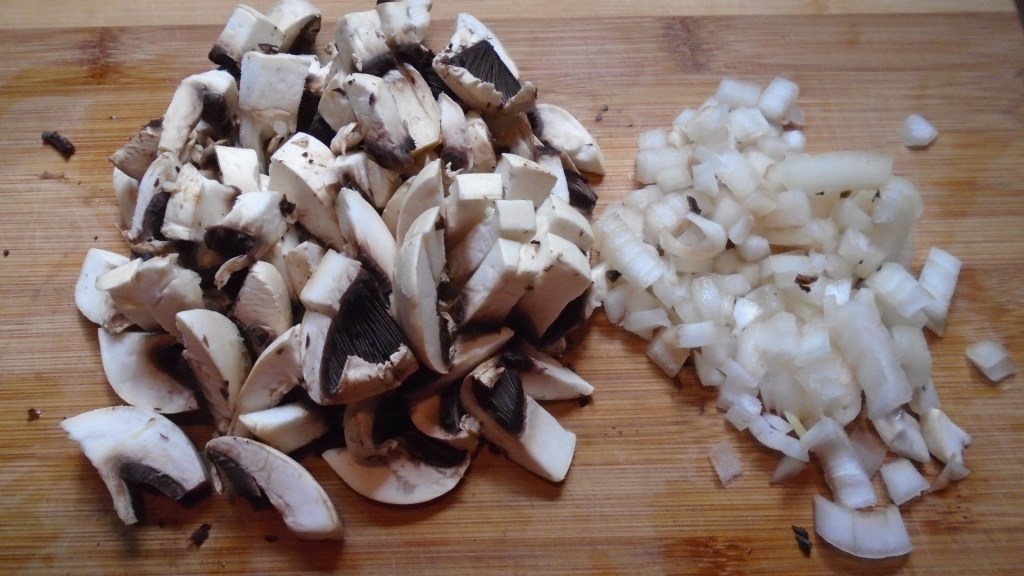
3 Tbs cup diced onion
4 large white, button mushrooms, chopped
15 oz ricotta cheese (or queso requesón, if you’re lucky enough)
1 tsp Mexican oregano
¼ cup cooking oil
12 corn tortillas
For the garnish:
1 small white onion, sliced
1 large ripe tomato, sliced
1 orange, sliced
2 cups mixed greens (spinach, lettuce, etc.)
½ cup sour cream
½ cup salsa
Cilantro leaves (as much as you like)
Directions:
Remove the skin from the chicken thighs and reserve one of the skins to flavor the rice.
Set the rice on the stove to boil. Add one of the chicken skins and cook the rice according to the directions on the package. Remove the skin before serving.
Shred and chop the chicken. Set aside.
Heat the oil and butter in a large skillet.
Add the onions and sauté until the onions begin to brown.
Add the mushrooms and stir for one minute.
Remove the onions and mushrooms to a bowl and set aside.
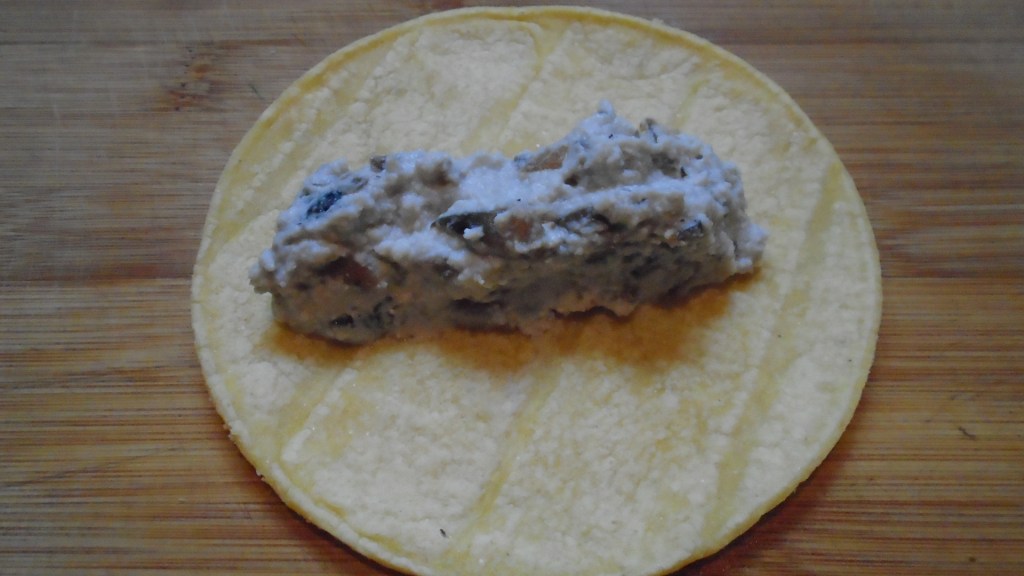
Add the ricotta cheese to the onions and mushrooms. Mix to combine.
Add the oregano and mix thoroughly.
Add the shredded chicken and mix. Set aside.
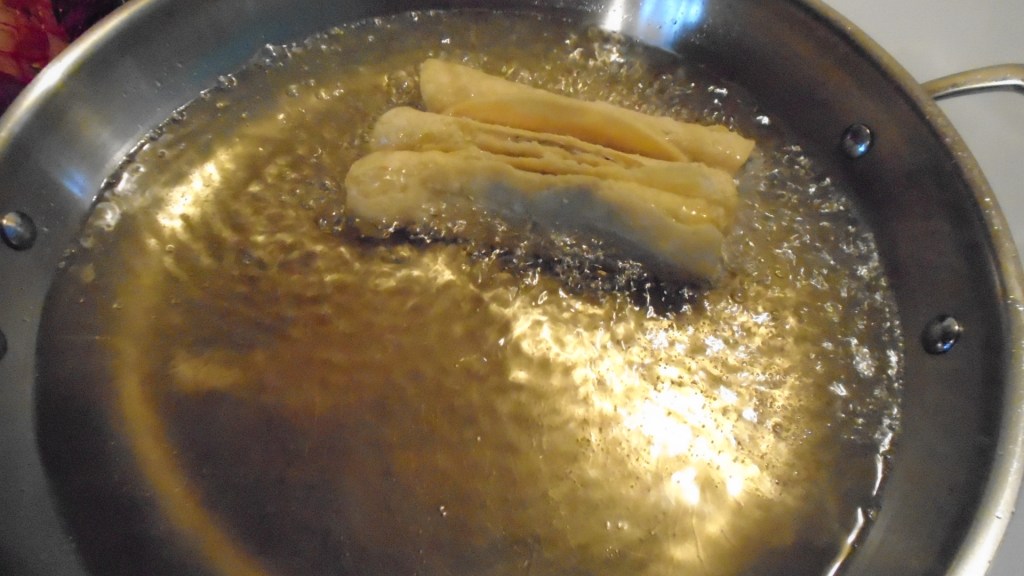
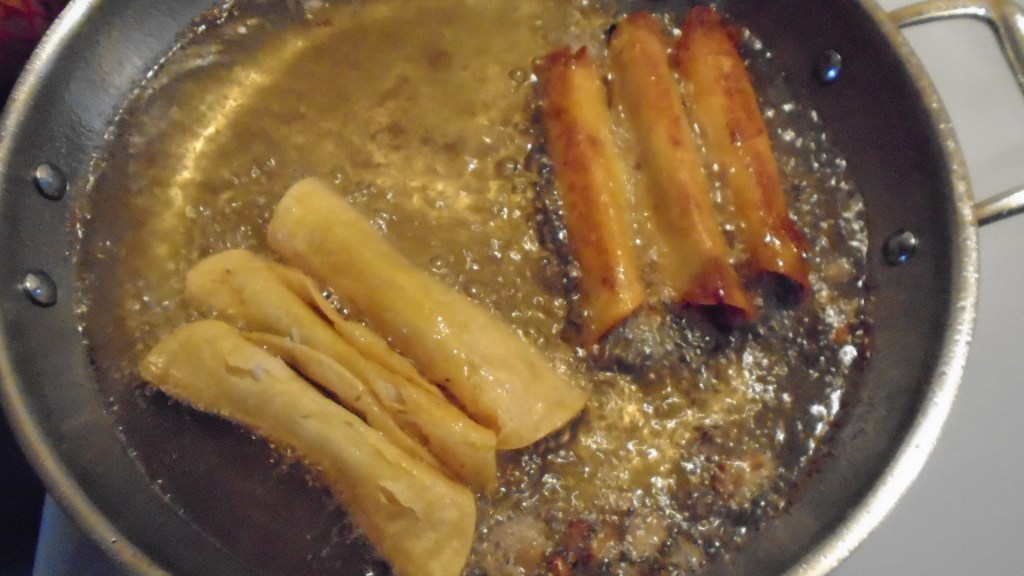
Soften the tortillas by frying in hot cooking oil. Set aside.
Prepare the flautas. Lay a tortilla on a work surface and add about 3 tablespoons of the chicken mixture. Form the chicken into a thick bead and roll the tortilla.
Skewer the tortilla with a toothpick. *Yay for toothpicks*
Assemble the rest of the tortillas and skewer them in sets of three.
Fry the rolled flautas in hot oil, turning a few times, until they are crispy and golden. Remove to a paper towel-lined plate.
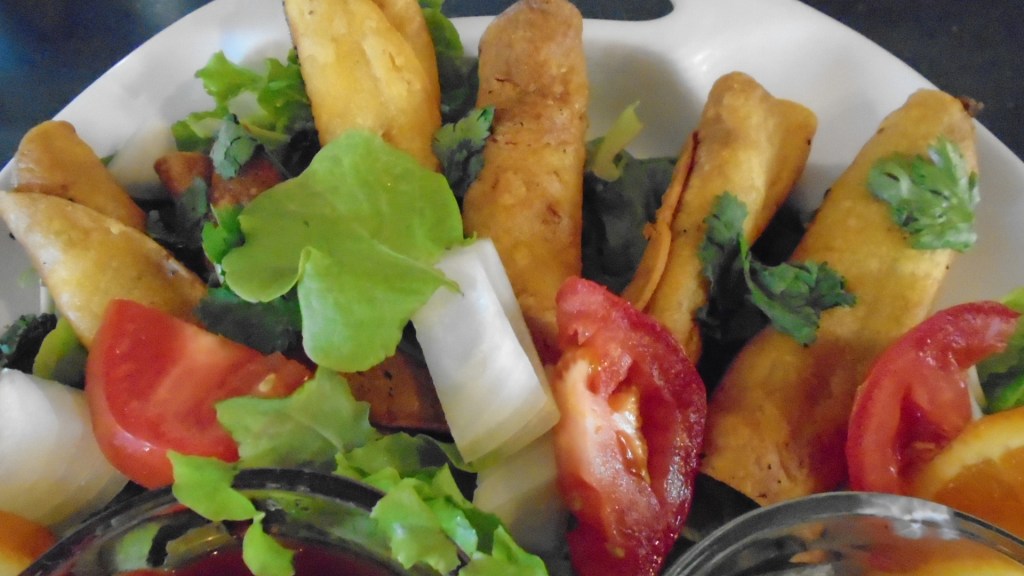
Assemble the flautas on a large platter and adorn with the garnishes.
Enjoy with a delicious red wine, which was intended to pair with the lasagna!
Camarones ala Diabla is served at many Mexican restaurants. The name of the dish translates to Shrimp of the Devil. The evocative name of the dish might entice you try it or it might make you afraid of the spicy heat that it promises to bring. I have had Camarones ala Diabla at many restaurants and I have yet to find one that truly brings the heat I want.
My tolerance for spicy food is higher than most people tolerate and I understand that restaurants cater to the general public so, when I order Camarones ala Diabla I usually tell the waiter, “muy picante, por favor”, or “mas picante”. Sadly, that usually results in more sauce, rather than a spicier sauce.
The way I see it, if you’re going to evoke the “devil” in the name of a dish you sell, you should be prepared to deliver the devilish fires of hell. Don’t hold back! I want something that sizzles and stings! ¡Yo quiero picante!
When you want something done right, sometimes you have to do it yourself!
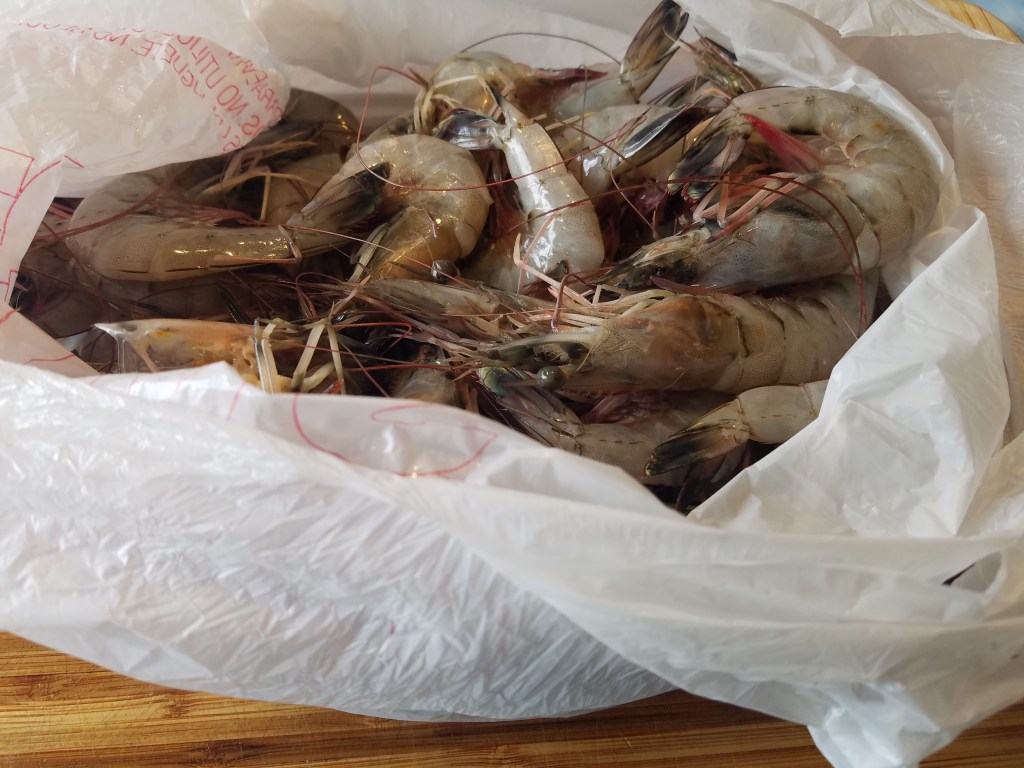
My favorite local seafood vendor, Porter Seafood, rolled into town this weekend and I stopped by to pick up 3 pounds of fresh gulf shrimp. $8.00 per pound might seem a little pricey, but it’s worth it. Whole jumbo shrimp, fresh from the gulf, is a real treat. I nearly cried for joy when I opened the bag and saw these big beauties!
Camarones ala Diabla is not very difficult to make. All you need are fresh, jumbo shrimp and a wickedly spicy chile sauce.
My recipe includes more chile de arbol than what most recipes call for and a few whole, crispy, fried jumbo shrimp, to top the dish. Yes, the whole shrimp are meant to be eaten! Whole, fried shrimp is a delicacy and it’s something that most Americans shy away from. I won’t go into the experience of eating them whole except to say that they offer rich flavor, a wide range of textures and they look absolutely awesome! If you’re even a little curious about trying whole, fried shrimp you should do it. If the thought of eating a whole shrimp turns you off, don’t do it, but understand that you are missing a sensation that is worth overcoming the initial visual shock.
Ingredients:
8 dried guajillo chiles, stems and seeds removed
8 dried chile de arbol chiles, stems removed (for a milder version, use 3 chile de arbol)
3 Roma tomatoes, chopped
2 cloves garlic, chopped
1/2 medium onion, roughly chopped
1 tsp coarse salt
2 Tbs sesame seeds, or dried, crushed pumpkin seeds, (optional)
2 dried allspice berries, crushed (optional)
3 Tbs olive oil
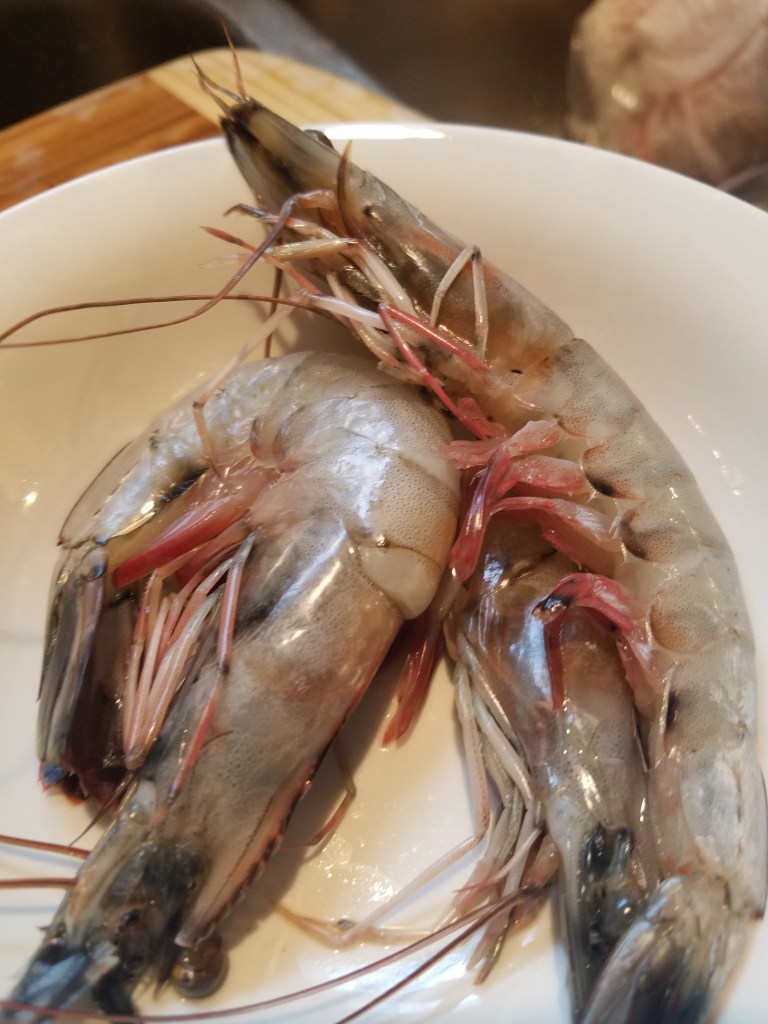
1.5 pounds large raw shrimp, peeled and deveined
Reserve 3 whole, raw jumbo shrimp (do not remove heads, tails or shells)
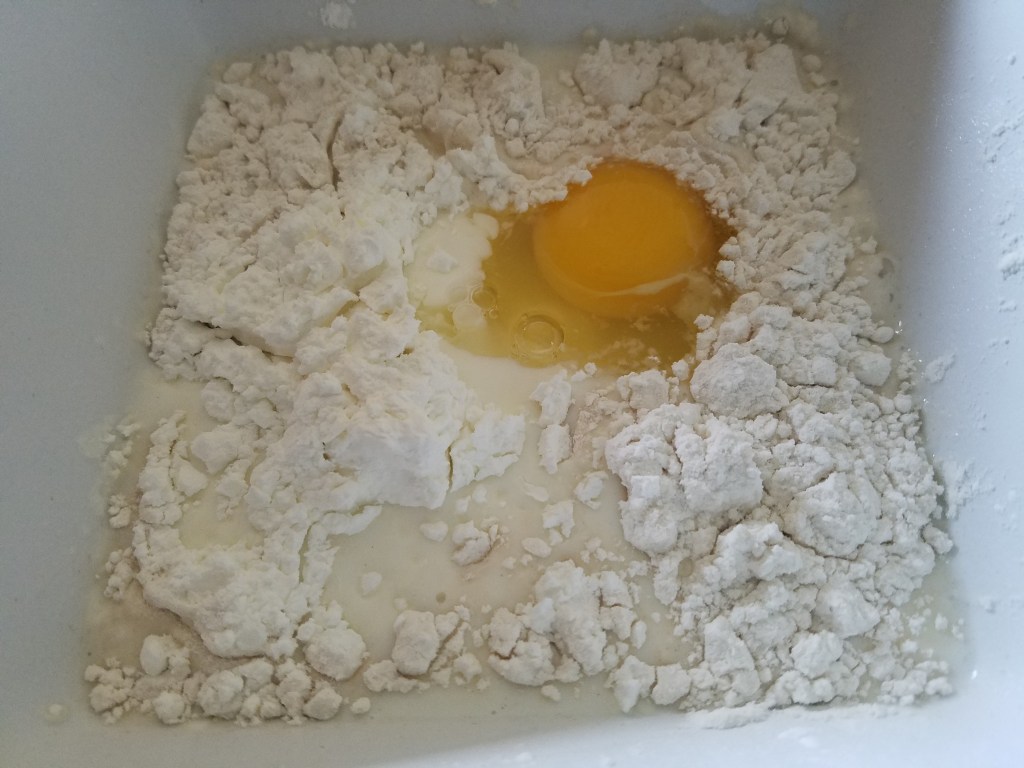
½ cup milk
½ cup flour
1 egg
2 cups cooking oil
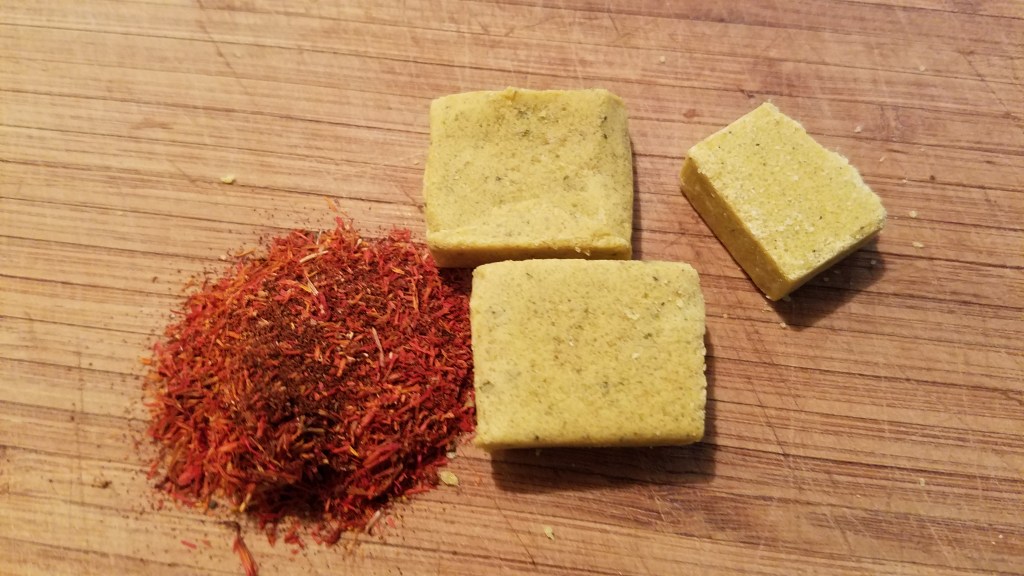
Sesame seeds or pumpkin seeds (semillas de sésamo o semillas de calabaza) add an earthy element to the sauce and the allspice berries (bayas de pimienta) add exotic flavor. The recipe is fine without these but so much better when they are added.
Directions:
Left: Guajillo chiles: *** Right: Chile de arbol
Remove the stems and seeds from the chiles. Chile de arbol are small and it’s not easy to remove the seeds. Don’t spend too much time trying. The seeds will be removed when the sauce is strained.
Steam the chiles in a covered pan or pot, filled with water. Boil the water, add the chiles, turn off the heat, cover and wait 30 minutes.
While the chiles steam, prepare the vegetables for the sauce.
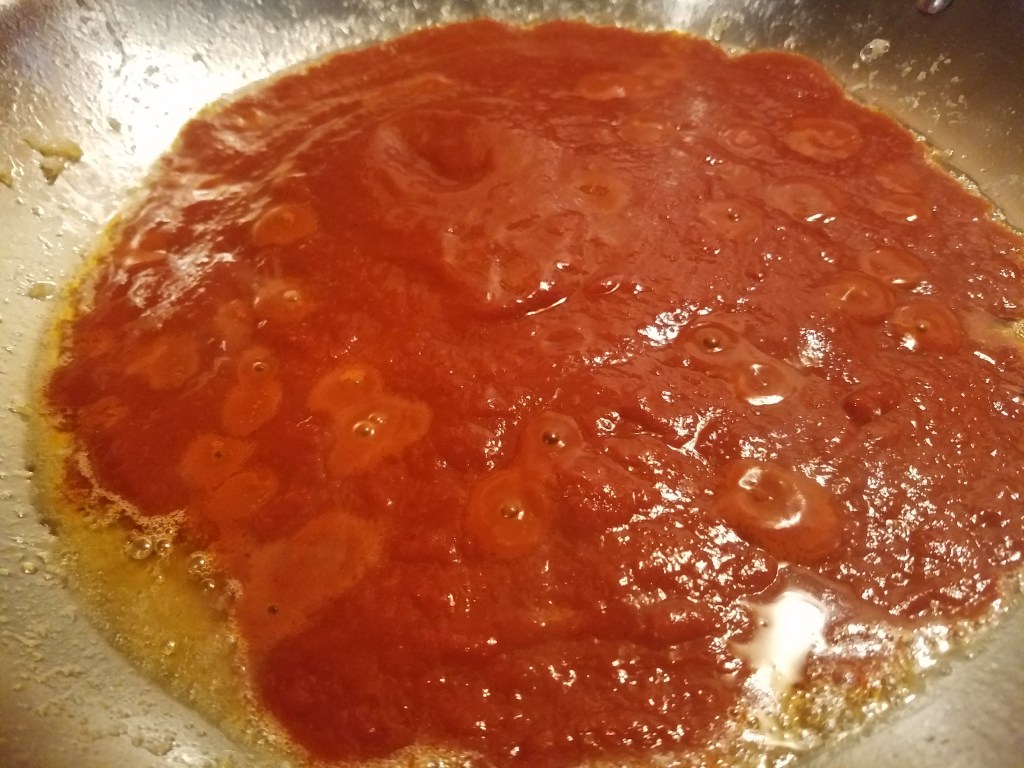
Chop the tomatoes, garlic and onion. Add these to a blender. Add the salt, sesame seeds and crushed allspice to the blender.
After the chiles have steamed, carefully remove them from the water and place them in the blender.
Blend at high speed until pureed.
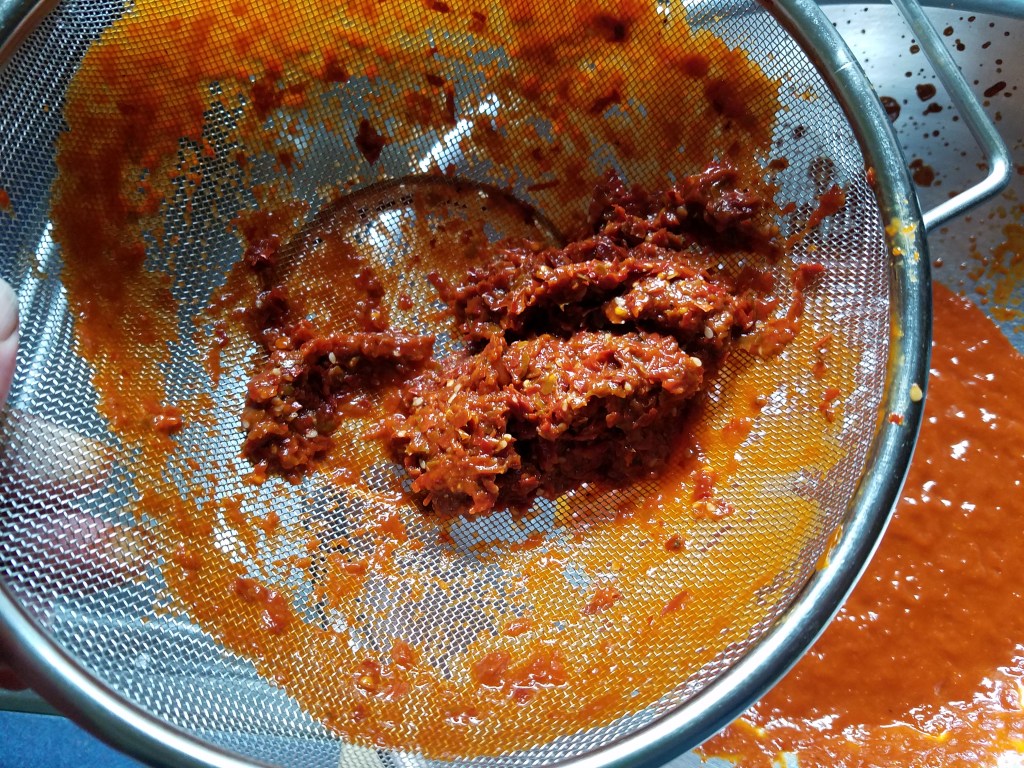
Strain the sauce and discard the pulp. This should leave about two cups of smooth sauce. Reserve until needed.
Sauce, before straining
Strained pulp
Sauce, after straining
Rinse the 3 whole shrimp under clear, cool water. Set aside to air-dry on a plate.
Mix the milk, flour and egg in a bowl. This will be used to dredge the whole shrimp. Set aside for now.
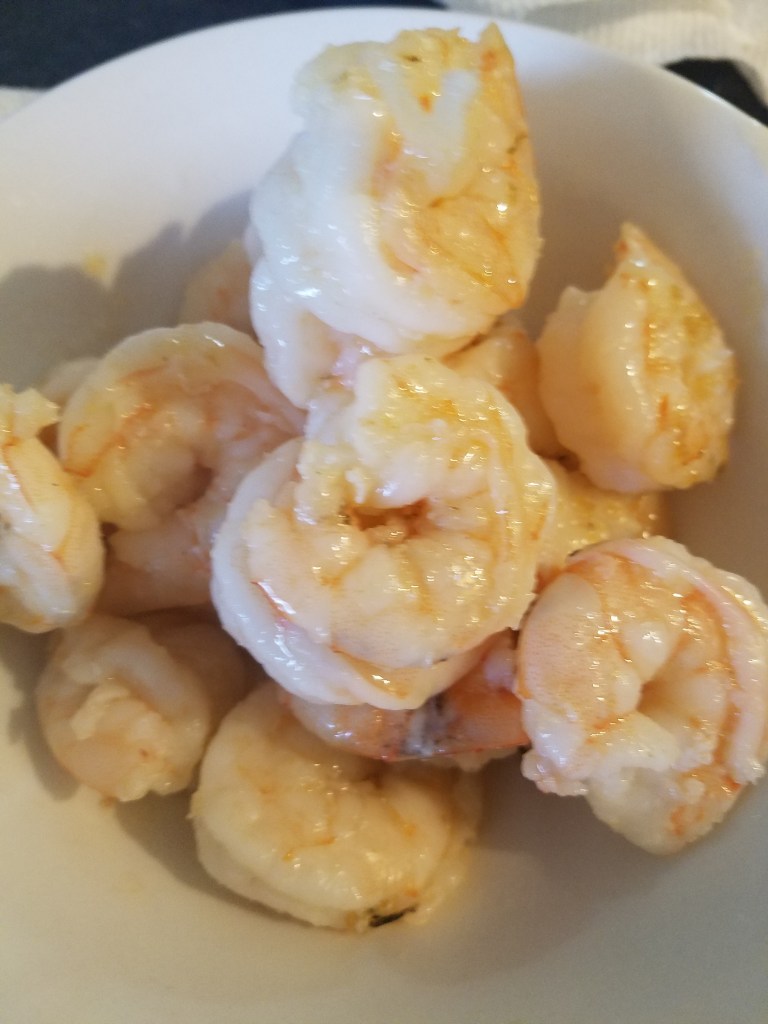
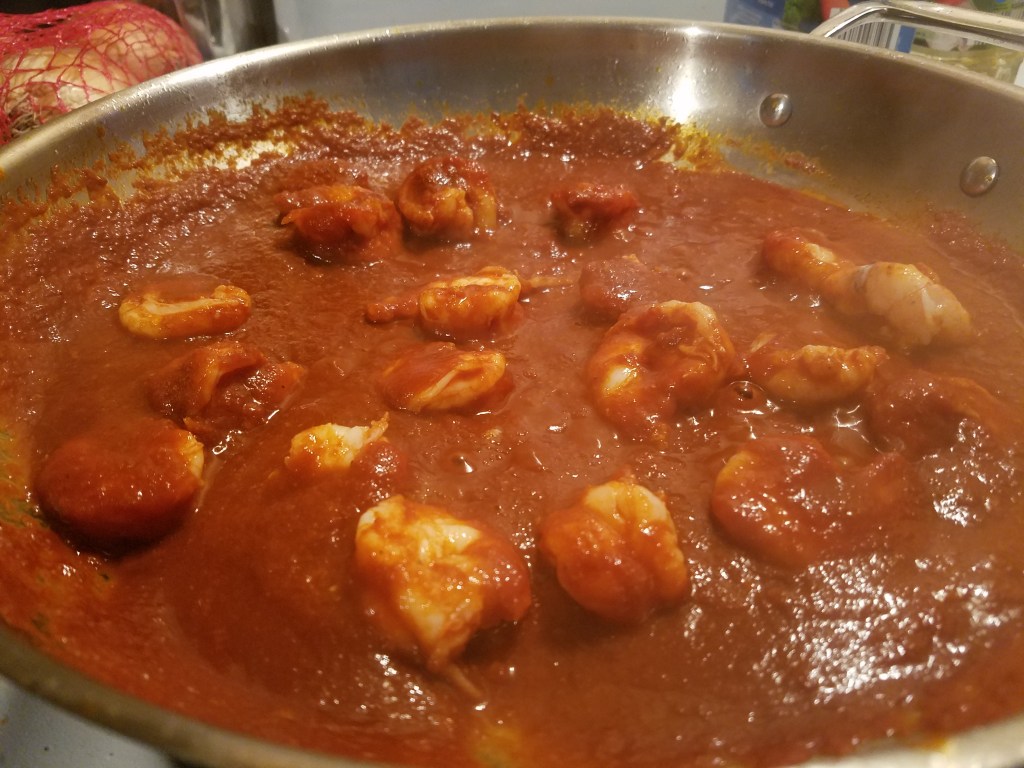
Heat a large skillet over medium-high heat. Add 3 tablespoons olive oil. Add the peeled, raw shrimp. Sautee for a few minutes, until the shrimp turn pink. Do not cook for more than a few minutes, to avoid over cooking.
Remove the shrimp and set aside.
Add the sauce to the pan. Once the sauce is bubbling hot, return the shrimp to the pan and stir for a minute. Remove to a serving platter and keep warm.
Heat a skillet over medium-high heat. Add 2 cups of cooking oil.
Once the oil is hot (350°), dredge the whole shrimp, one at a time, in the milk, flour and egg batter. Carefully lay the shrimp into the hot oil, one at a time. Fry the shrimp for one minute and then turn them over to fry on the other side for two minutes. Turn once more and fry for another minute.
Sorry, no pictures of this. I was having too much fun!
Carefully remove the shrimp and lay them across the top of the Camarones ala Diabla.
Serve with the usual Mexican fare…tortillas, lime wedges, rice and beans…
Sometimes I get a grandiose idea and I get all fired up and I spend hours and hours focusing on my goal until the plan reaches fruition. And then there’s all those other days, when the grandiose idea fizzles like a flat soda.
Welcome to Flat Soda Day.
My idea was inspired by a craving for gorditas. Gorditas, which translates to “little chubbies”, are puffy corn tortillas stuffed with meats and sauces, or whatever else you might want to put in them. When made properly, gorditas are wonderfully crispy, warm, corn flavored pockets full of savory bliss. Like so many Mexican dishes, they instantly make me feel at home when I eat them, regardless of where I eat them.
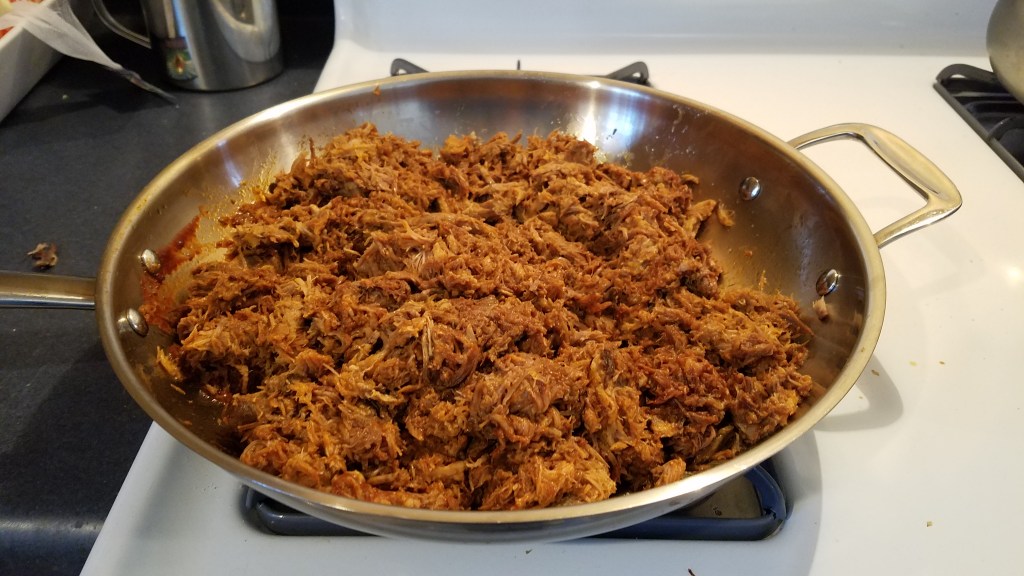
Step number one for gorditas: prepare carnitas. Carnitas, which translates to “little meats”, is typically made with pork shoulder and is slowly roasted and then shredded. I tend to think of carnitas as the little brother of barbacoa. Carnitas are more gentle in flavor than bold, beefy barbacoa but, carnitas are probably more versatile.
In fact, carnitas are so versatile that I completely abandoned the notion of making gorditas and I decided to use them in burritos. That’s ok. I had some carnitas left over and made gorditas a few days later.
I usually roast a pork shoulder when making carnitas. The fat ratio in a pork shoulder is precisely what is needed for good carnitas. This time, I had a pork loin, which is very lean. I also had a few small pieces of leftover beef ribeye in the refrigerator. The fat content of the ribeye was just what the lean pork needed. I added a little lard, to further bump the fat content up, and then I roasted the meat for about 6 hours at low temperature.
Ingredients:
1 Tbs cumin
1 Tbs oregano
2 tsp paprika
2 lbs pork loin
1 cup orange juice
1/4 cup cooking oil
1 onion, chopped
1 jalapeño, sliced
1 ½ Tbs lard
¾ lb beef ribeye (cooked to medium rare)
Directions:
Combine the cumin, oregano, paprika and oil in a small bowl. Mix together.
Coat the pork loin with the spices and oil.
Combine the remaining ingredients in a large Dutch oven. Add the pork loin to the Dutch oven. Cover and cook at 250° for 6 hours. Remove from oven. Shred the meat with two forks.
Heat a cast iron skillet. Add shredded meat to the skillet and sear for a few minutes, or until the meat begins to char. Turn the meat and sear for another minute. Remove meat.
Serve in any number of dishes. Burritos, enchiladas, gorditas, flautas, chalupas, tacos…