Chipotles are smoked chilies. Jalapeños are most commonly used but, poblano, morita and meco chiles are also used. The chilies may be smoked to a point where they are hard and dry, or they may be smoked to a point where they remain soft and pliable.
About adobo sauce:
There are many ways to prepare adobo sauce. Adobo typically has elements of sweet, tangy, bitter and salty flavors. Adobo sauces can vary in flavor, depending on the ingredients. Imagine the many different kinds of barbecue sauces. Same thing.
For this meal, I chose to lightly smoke and char the jalapeños and I made an adobo sauce from leftover tidbits in the refrigerator. The base of the sauce was a spicy ketchup that I made by adding some hot sauce to the ketchup. To that, I added a little barbecue sauce, a little soy sauce, a pinch of brown sugar, and a few dashes of liquid smoke. The finished sauce was full of flavor, but not too spicy.
Ingredients:
1 head of garlic, peeled and mashed
¾ cup olive oil
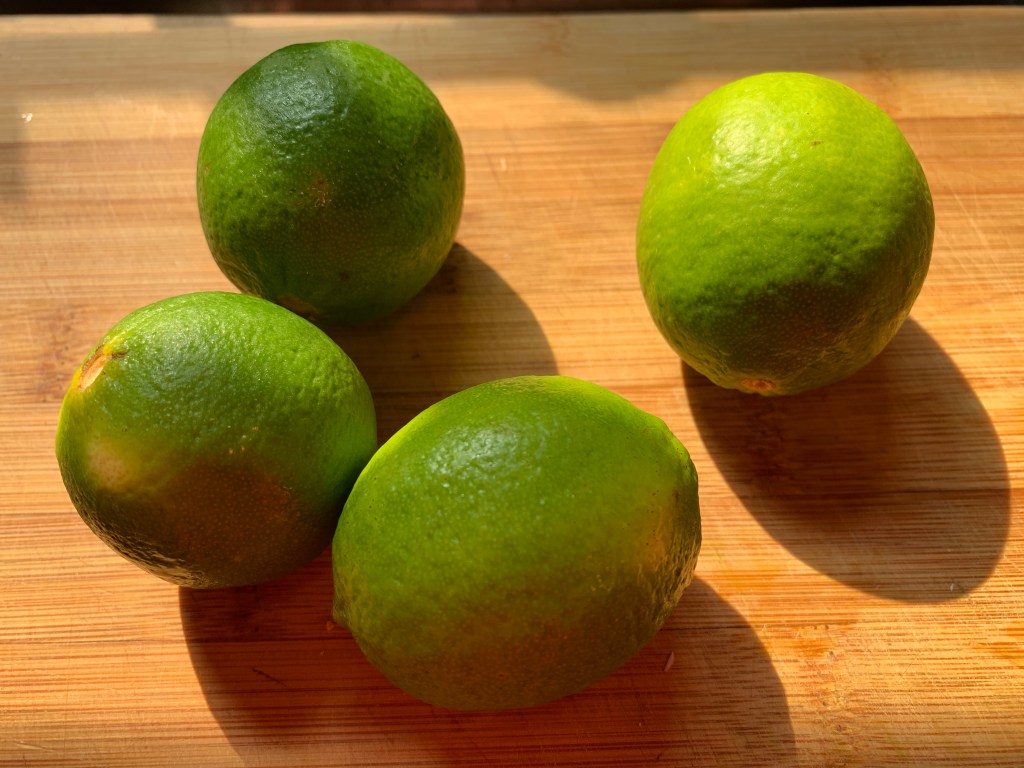
¼ cup lime juice
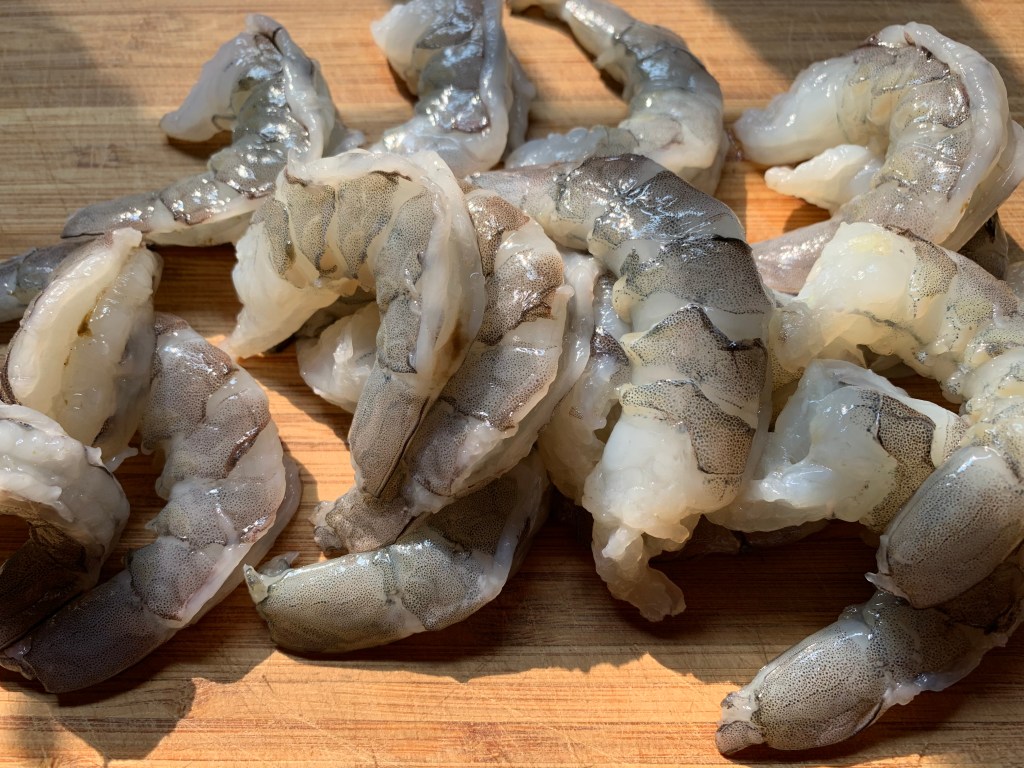
1 lb jumbo shrimp
Salt and Pepper to taste
Chipotles in adobo (about ½ cup)
Lime wedges for serving
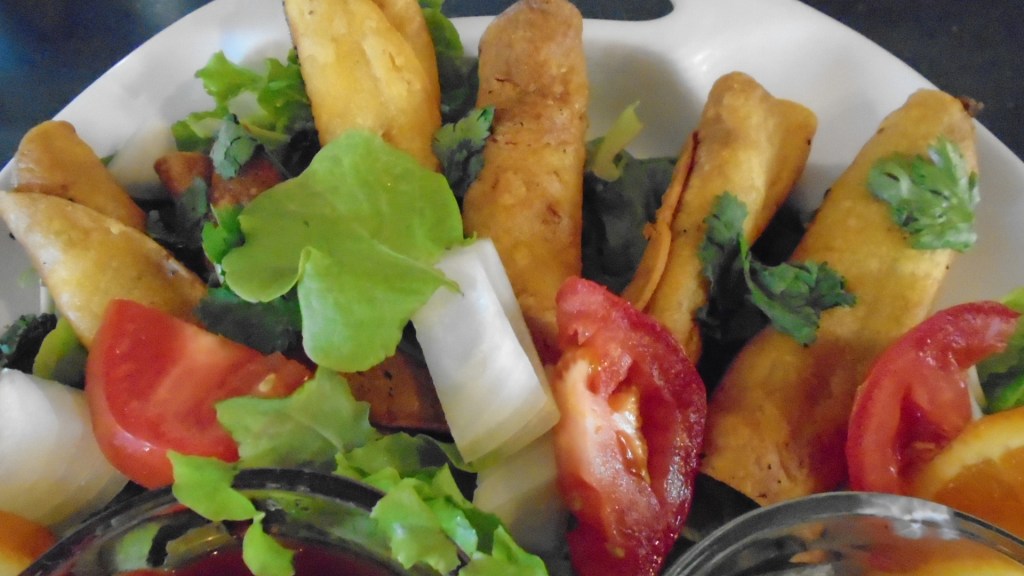
Corn tortillas (softened in hot oil)
1 cup lettuce, chopped
Directions:
Add olive oil and garlic to a ceramic dish and bake in a 325° oven for 30 minutes.
Remove the dish from the oven and add lime juice. Return to the oven for another 10 minutes.
Remove from oven and mash the garlic to form a paste. I browned the garlic a little too much and it wouldn’t mash properly, so I removed the garlic. The oil carried the garlic flavor nicely.
Peel and devein the shrimp. Reserve the shrimp shells for shrimp stock.
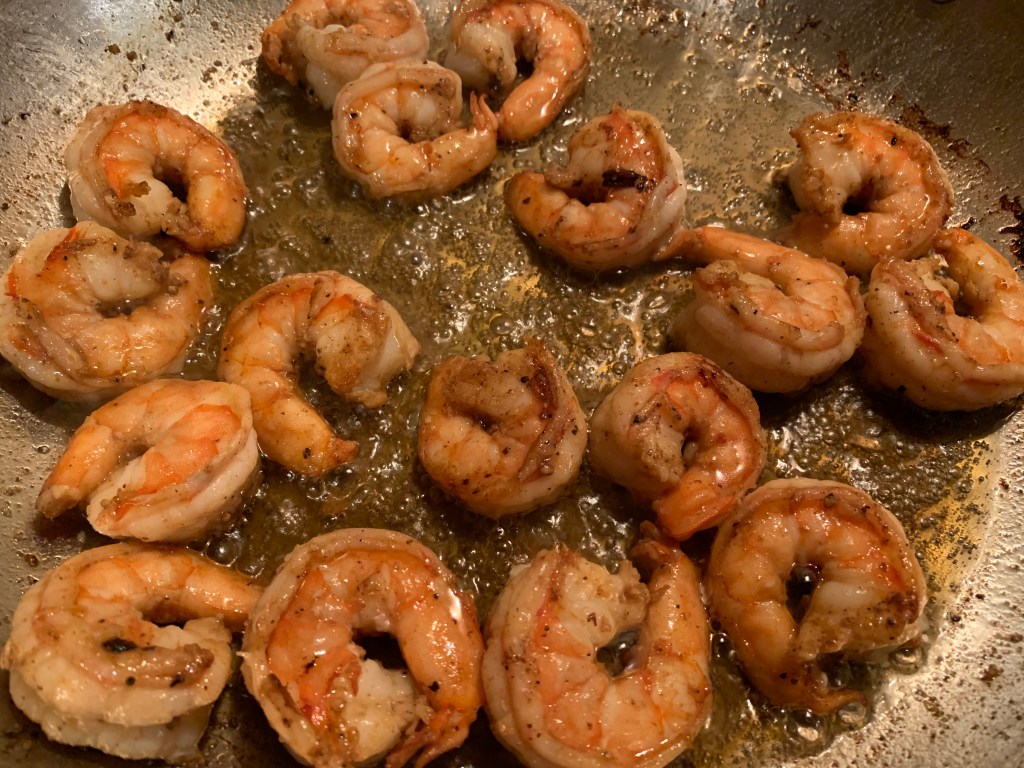
In a large skillet, add 3 tablespoons of the garlic oil and set heat to medium. Add the shrimp and a pinch of salt and pepper.
Sauté the shrimp for about 3 minutes.
Remove the shrimp and keep warm.
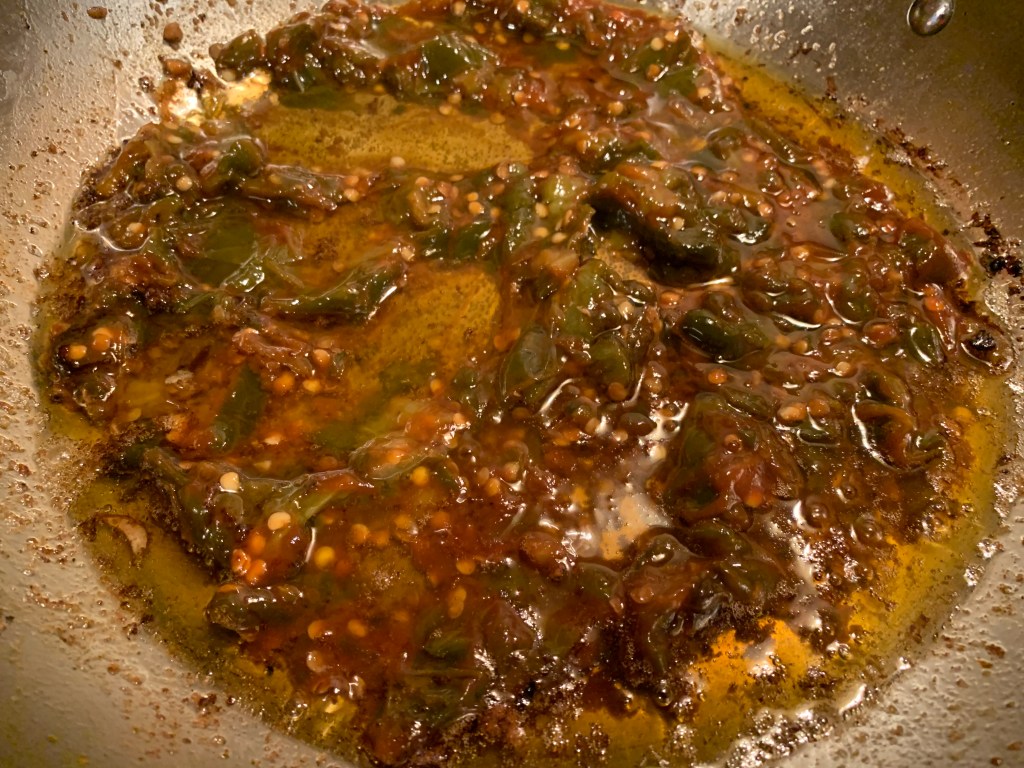
Add the chipotle sauce to the remaining garlic oil. Mix to combine.
Add the mixture to the skillet and cook for a minute or two. Add the shrimp to the skillet and stir briefly.
Turn out to a serving platter.
Top with diced green onions. Serve with lime wedges, lettuce, warm tortillas, and Mexican rice.
Just a quick post to let everyone know that I haven’t fallen off the edge of the earth!
Inspiration has been in short supply for the last several weeks. Too much work and not enough play, I suppose. I need to remedy that!
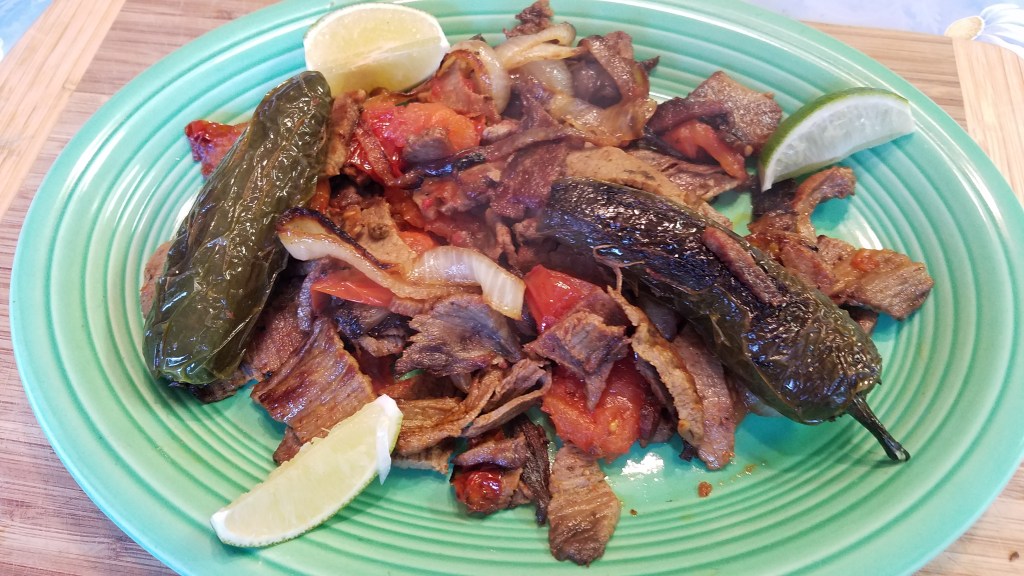
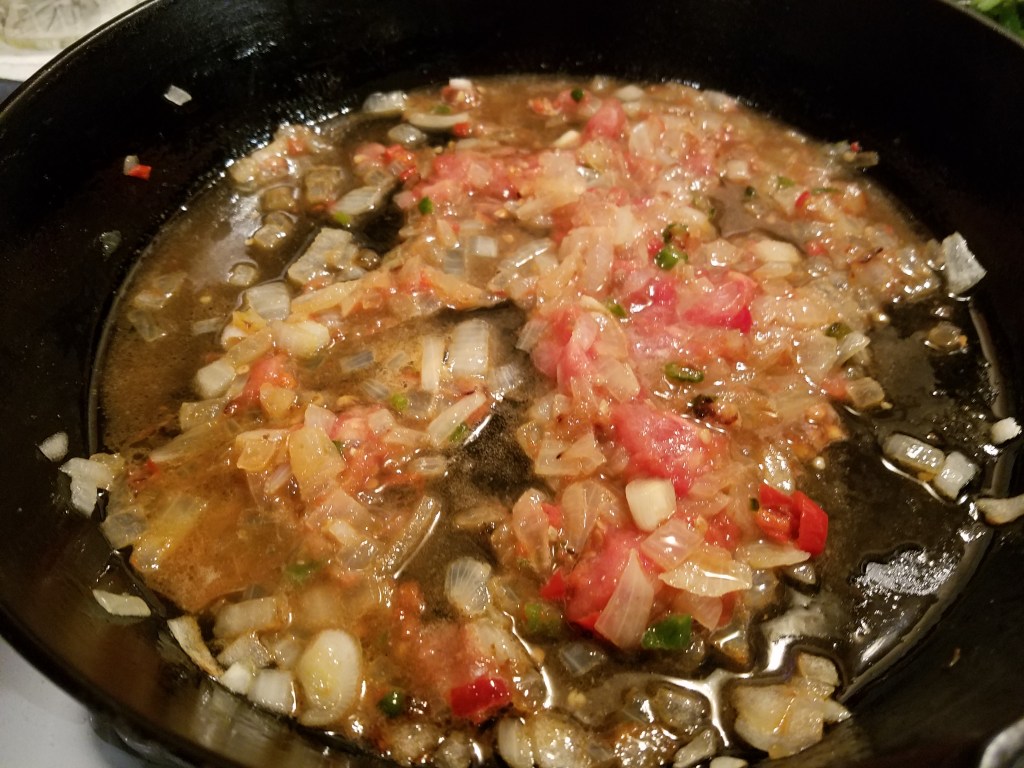
Today’s menu is inspired by Carne Asada, which translates to grilled meat. Sabrosa simply means tasty. So this is a tasty carne asada with beef brisket. Carne asada can be found in all of the Latin American countries. The choice of meat varies, region by region. The carne asada of my youth was a Tex-Mex version, usually made with marinated skirt steak, grilled over high heat, to produce of wonderful char on the meat.
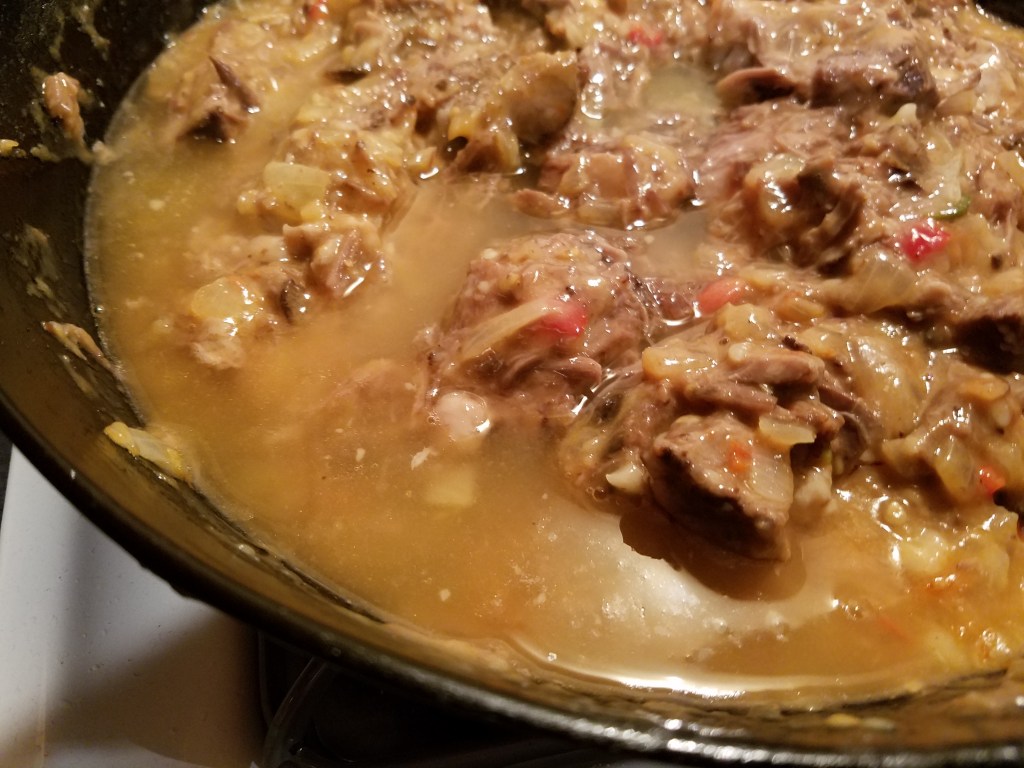
Today’s carne asada is a result of looking for ways to use leftover smoked brisket. The ten pound brisket provide my family with several meals, most of which were centered around warm slices of soft, smoky beef, covered with homemade barbecue sauce, but this time I changed things up a bit.
No recipe, this time, except to say that I sautéed onion, garlic and tomatoes and I charred a few jalapeños in a skillet. I smothered the brisket with the vegetables and served it family style. Black beans and warm, soft, corn tortillas finished the deal.
Enjoy life. Spend time with friends and family. Savor every moment!
It’s been two weeks since my wife and I returned from our 4-day trip to New Orleans and I still haven’t managed to submit a post about the adventure. I think I’m still reeling from the experience and, even though the trip is still fresh in my mind, I’m finding it difficult to write about. We had a wonderful time in New Orleans. It’s a fantastic city with so much to offer. I’m sure I will find time to share the details…someday!
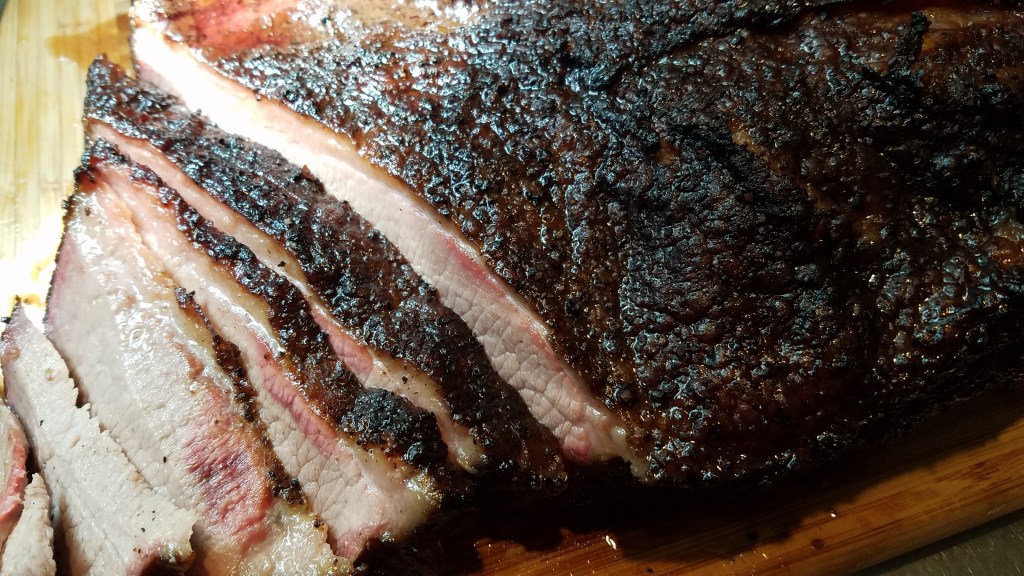
Today was devoted to the joy of barbecue and smoking a brisket. I try to make smoked brisket at least once a year and it’s always worth the effort.
Smoking a brisket is no easy feat, at least for me. It takes between 12 to 16 hours to cook, which makes for a very long day. I started this morning at 3:30 with a cup of chicory coffee, warmed up from yesterday’s cold pot. Outdoor temperature was about 80° but the humidity was near 100°! It was so humid that the newspaper I used for the charcoal chimney starter was limp and soggy by the time I was putting a match to it. It took 3 attempts and about 30 minutes just to light the coals!
I bought a new offset smoker yesterday and I decided to break it in with a brisket. I didn’t know if I was being foolish or confident. Fortunately, the brisket came out just fine.
By 4:00 p.m. I was pulling off the cooked brisket and life was good.
We served the brisket with homemade Texas-style barbecue sauce, potato salad and a refreshing cucumber salad. And for desert, homemade cheesecake, compliments of my wife.
This was the sort of Sunday meal that will keep me inspired throughout the upcoming work week!
Odds and ends. Bits and pieces. Those little leftovers from previous meals that were too good to throw away but too small to make a meal, on their own.
Go ahead, take them out of the fridge and set them on the table. Imagine how they can be used to make a brand new meal.
The ingredients are like colors on a painter’s palette, or notes and chords, waiting to be arranged to make music. These are the elements of creation!
Some of my favorite meals have started this way.
Reinventing leftovers can be rewarding in many ways. There is satisfaction in knowing that good food won’t be wasted and there is the feeling of exuberance that comes from self-expression and creative thinking.
I made this dish way back in April, 2020, during a time when I was sheltering at home, in an attempt to stem the tide of the pandemic. If there was ever a time to think frugally, it was then. People were hoarding toilet paper, disinfectants and many store shelves were empty. What a time!
1 cup sautéed vegetables (onions, tomatoes and mushrooms)
3 10” flour tortillas
1 Tbs olive oil
16 oz grated cheddar cheese
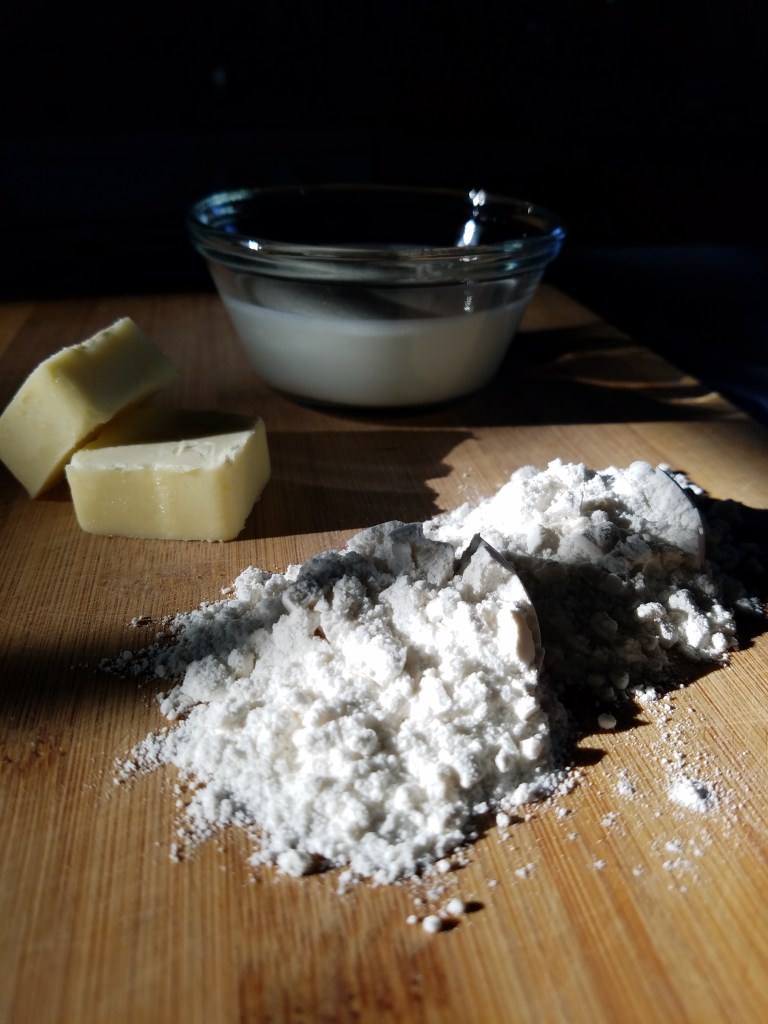
2 Tbs butter
2 Tbs flour,
1/3 cup milk
1 tsp hot sauce
¼ cup sliced, pickled jalapeños
¼ cup diced green onions
¼ cup chili-garlic sauce
½ cup sour cream
½ cup chopped iceberg lettuce
2 Roma tomatoes
Directions:
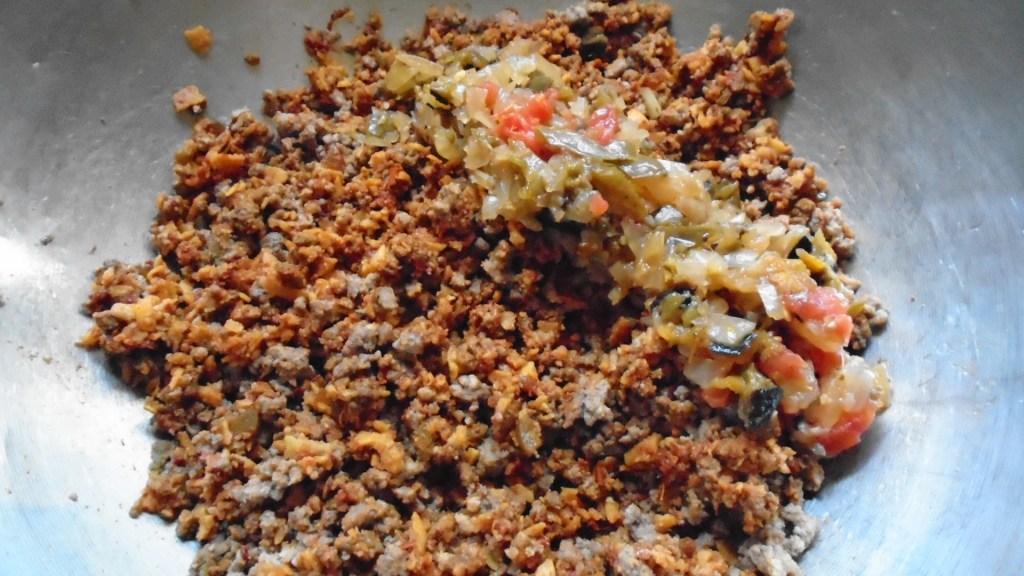
Chop the enchiladas into tiny pieces with a kitchen knife.
Add the chopped enchiladas to a large mix bowl and add the cooked ground beef.
Chop the sautéed onions, tomatoes and mushrooms.
Add the chopped vegetables to the mixing bowl.
Mix everything together thoroughly.
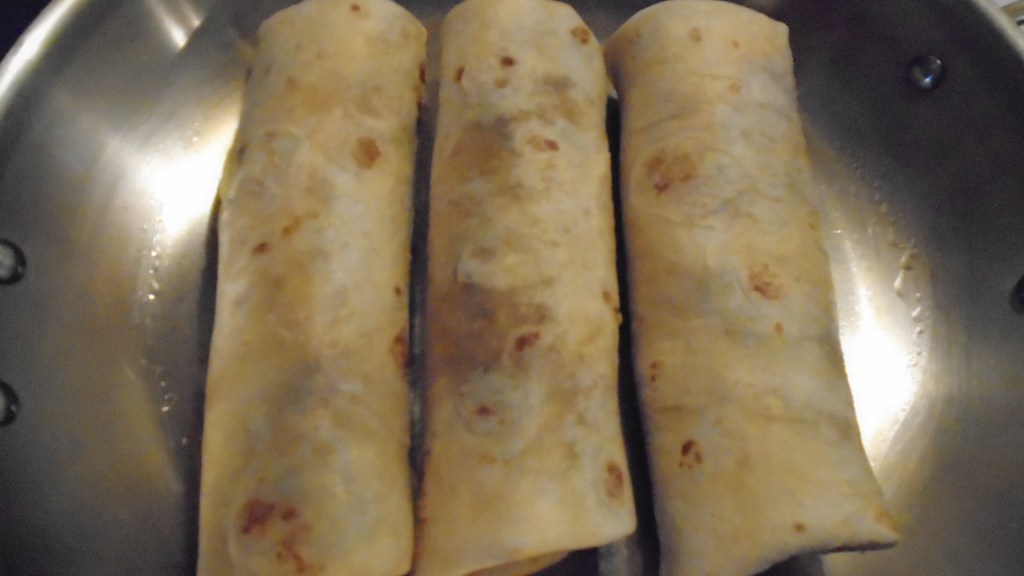
Divide the mixture into thirds and assemble the burritos.
Add olive oil to a large skillet and set heat to low/medium.
Carefully lay the burritos in the pan, seam side down.
Sear the burritos on all sides until they are light, golden brown.
Remove the burritos to serving plates and keep in a warm place.
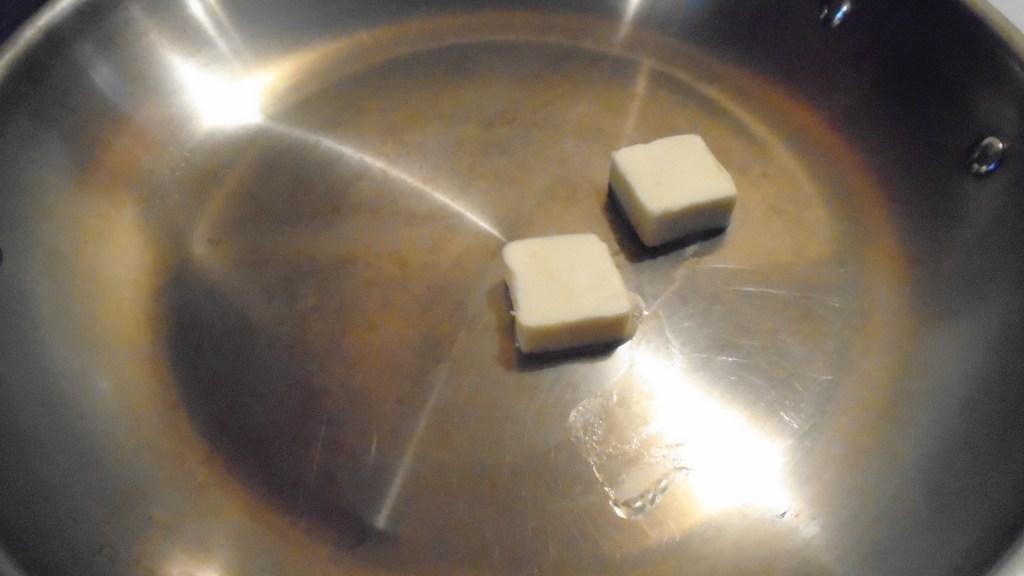
Add 2 tablespoons of butter to the skillet and set the heat to low.
Once the butter melts, add the flour and whisk, to form a paste.
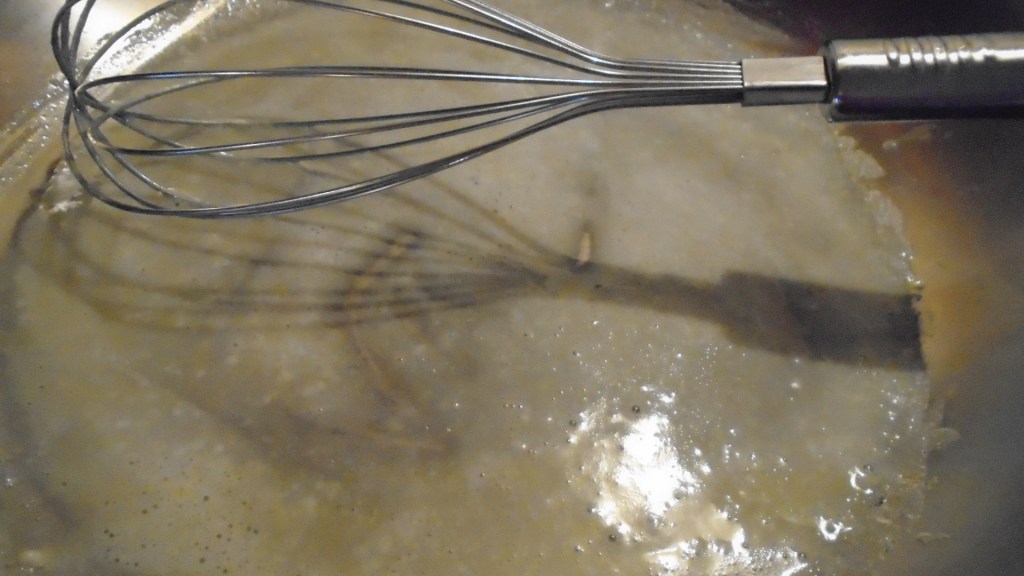
Simmer the butter and flour, while whisking, for about one minute.
Add the milk and whisk to combine.
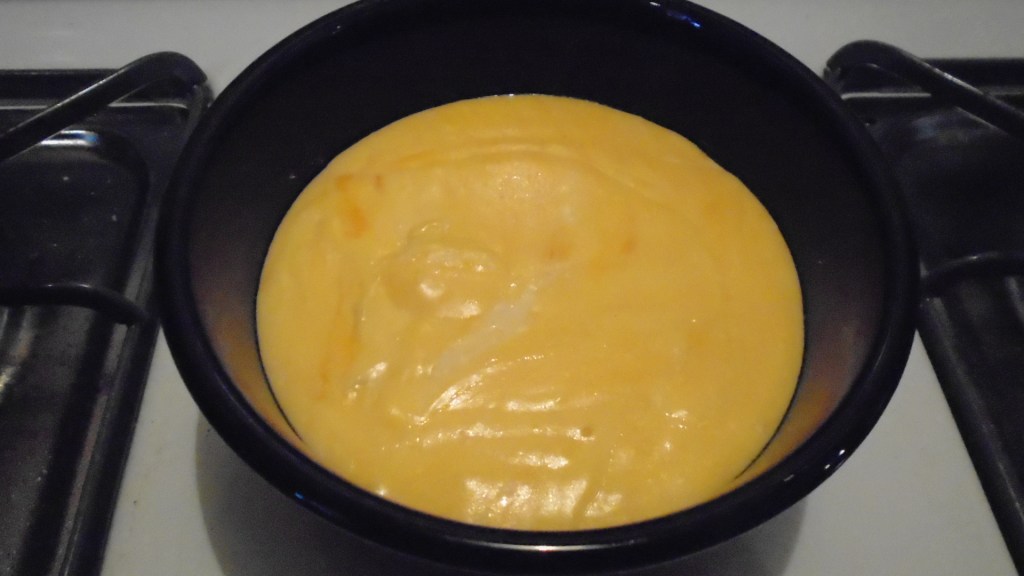
Gently fold in the grated cheese and turn the heat off. Mix until the cheese sauce is smooth. Avoid over-mixing the sauce, to prevent the sauce from breaking.
Once the cheese sauce is warm and blended, cover each burrito with the sauce.
For a mild burrito, top with green onions.
For a spicier burrito, top with chili-garlic sauce and jalapeños.
Serve with sliced tomato, chopped lettuce and sour cream.
2020 has been one heck of a ride and I can’t think of a more suitable way to wrap up the year than by wrapping it up in tamales. Tamales might just be the perfect metaphor for 2020. I was fully prepared to offer a long lament about the year 2020, now that the year has finally come to an end, but I feel a greater need to close the door to the past year and move on.
Anyone who has made tamales knows that it requires time, dedication and stamina, beyond the scope of preparing a typical meal.
There comes a point in the tamale making process where it seems like it will never end and I wonder why I chose to make them, in the first place. The only thing that carries me beyond that moment of futility is a steadfast determination and a belief that I will find satisfaction, when the job is done.
I could go on and on about the agony and ecstasy of making tamales but, I don’t want to discourage anyone from making tamales. Making tamales is a rite of passage.
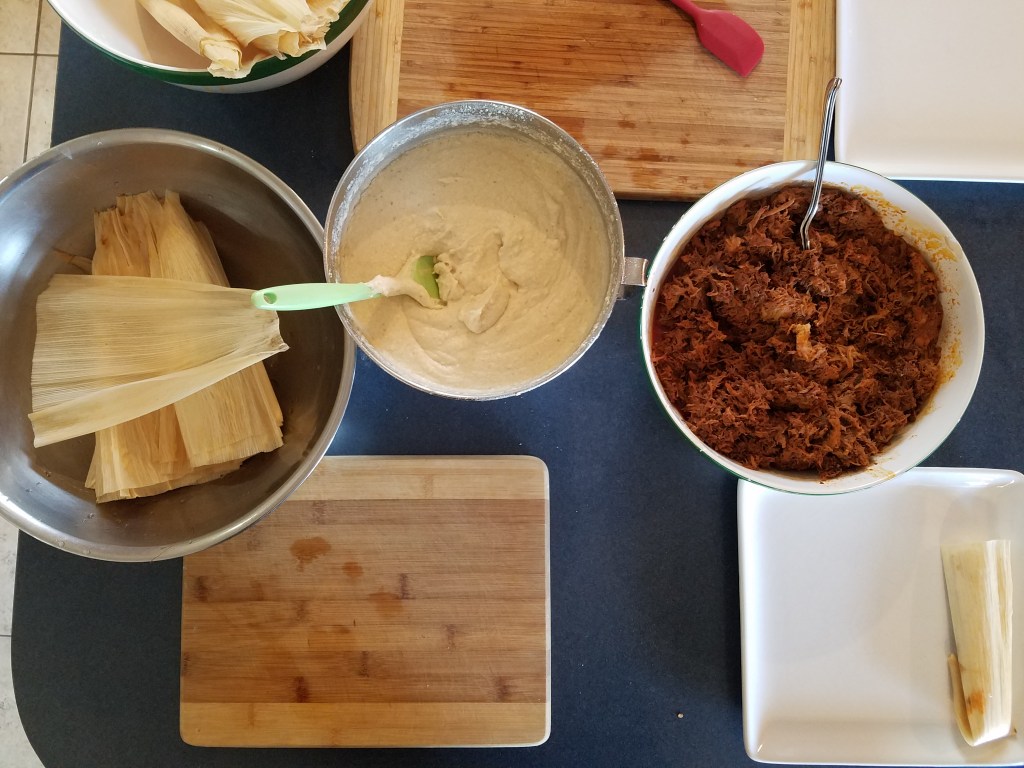
My method for making tamales takes two days. On the first day, I roast the meat and make the sauce. On the second day, I prepare the masa dough, assemble the tamales and then steam them.
Day one: Roast the meat and make the sauce.
Ingredients for the meat filling:
5 lb Pork butt (shoulder roast) (substitute with chicken or beef)
¼ cup cooking oil
1 cinnamon stick, broken into pieces
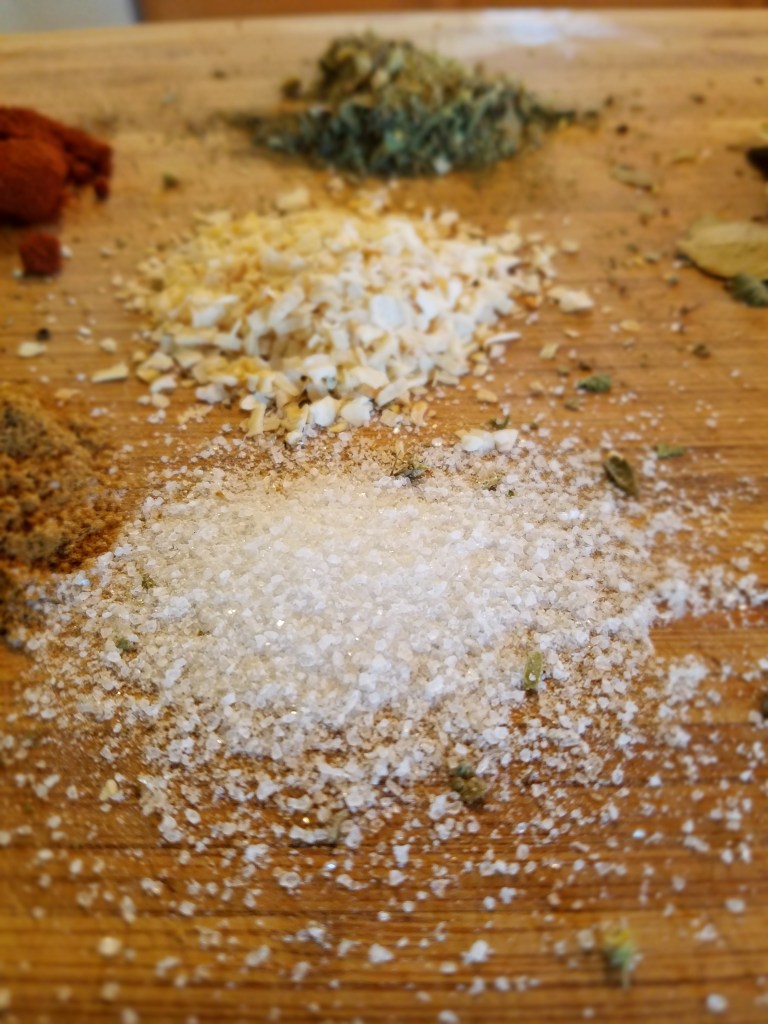
1 Tbs coarse salt
2 tsp cumin powder
2 tsp cracked black pepper
3 or 4 bay leaves
2 Tbs dried onion flakes
2 tsp red chile powder
2 tsp dried Mexican oregano
2 cups chicken stock (or beef stock)
2 Tbs rendered bacon fat or rendered beef fat
Directions:
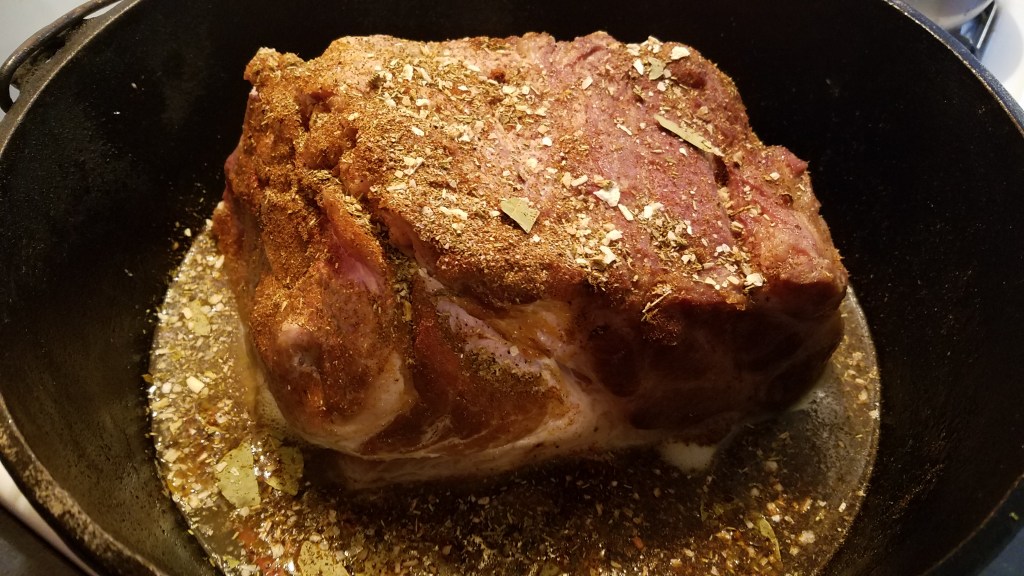
Wash the roast in cool water and pat dry. Add the oil to a large Dutch oven and set the heat to high. Sear the roast on each side and then set it aside to cool. Discard remaining oil from the Dutch oven.
Combine all of the spices (cinnamon stick, salt, cumin, black pepper, bay leaves, dried onion, chile powder and oregano) and grind them in a mortar and pestle.
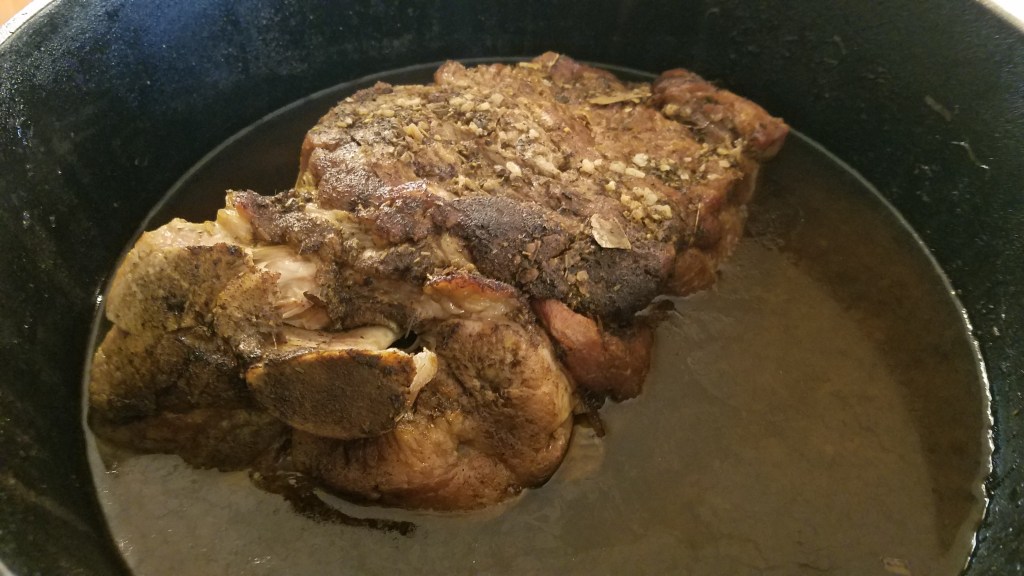
Coat the roast with the blended spices and return the roast to the Dutch oven. Add 2 cups of stock. Cover the Dutch oven and place in a 225° oven for six hours.
Remove the Dutch oven from the oven and let the roast rest for about 20 minutes.
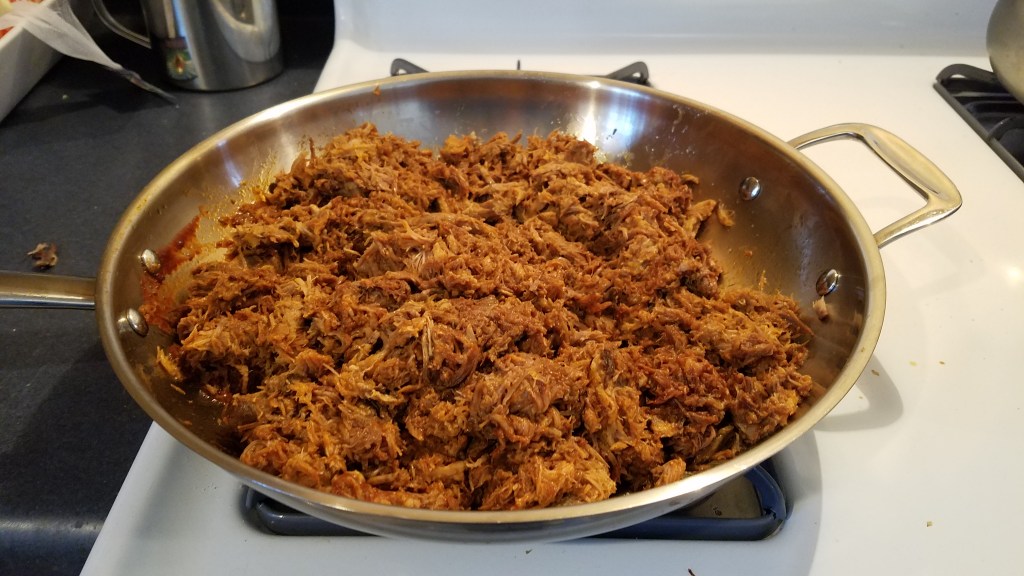
Shred the roast with forks and add some of the shredded meat to a large skillet. Add a few teaspoons of rendered fat to the skillet and set the heat to medium/high. Stir the meat for several minutes and remove to a large bowl. Repeat the process until all of the shredded meat has been fried quickly in the skillet.
Ingredients for the sauce:
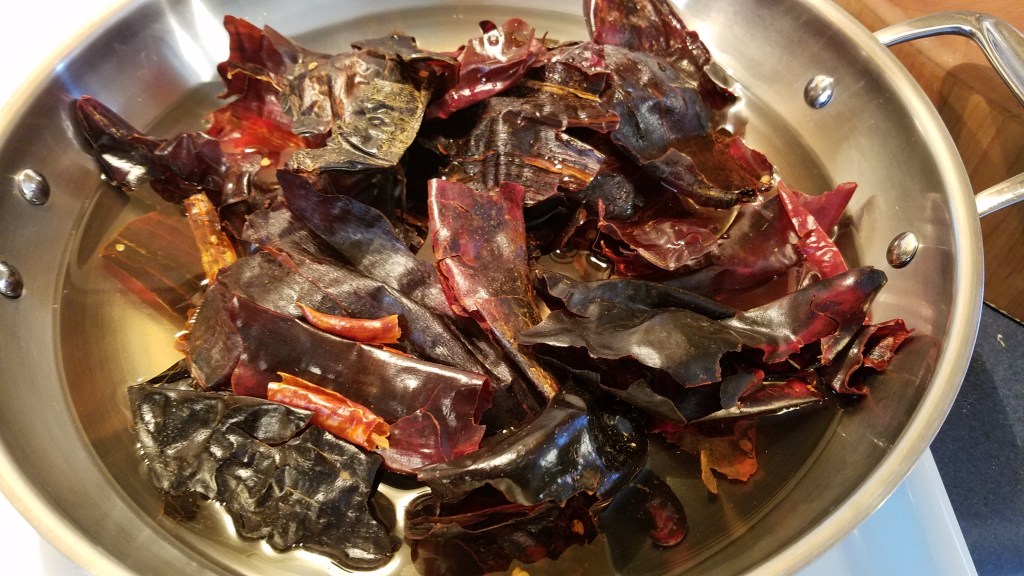
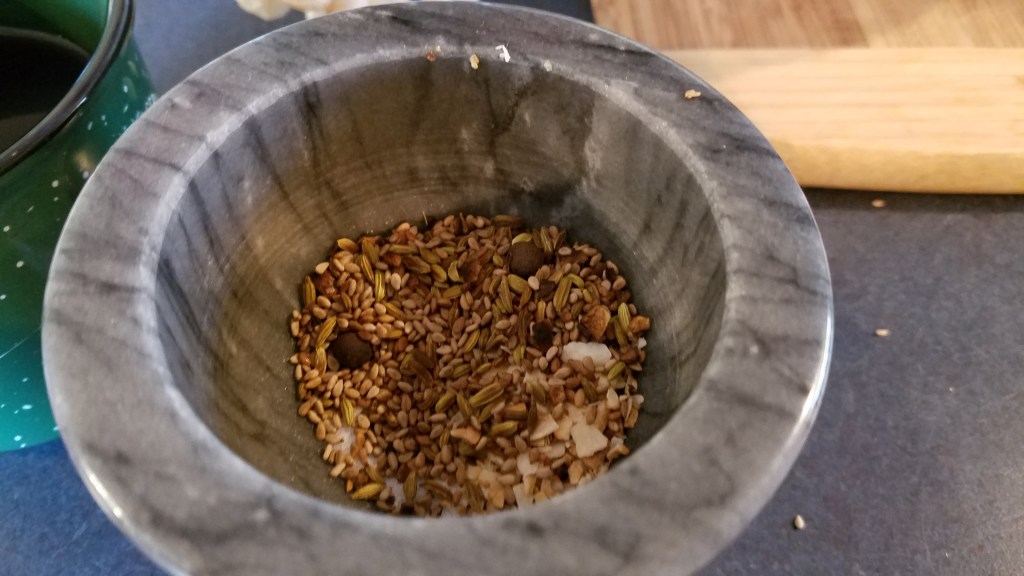
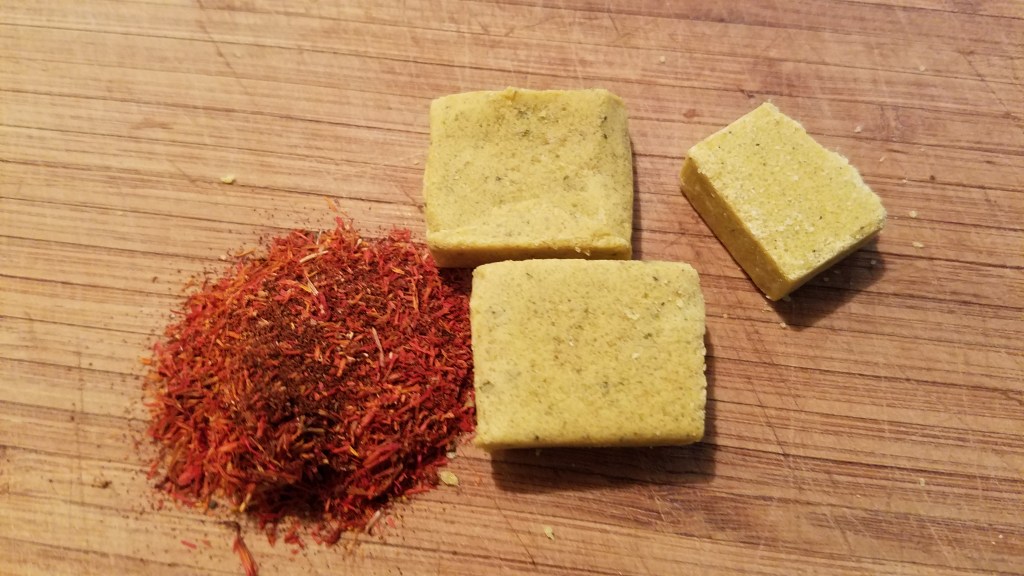
20 dried guajillo chiles, stemmed and seeded
3 chile de arbol, stemmed and seeded
3 allspice berries
1 tsp fennel seed
1 tsp sesame seed
2 tsp dried onion flakes
1 tsp garlic powder
1 ½ tsp salt
8 oz tomato sauce
Directions:
Stem and seed the chiles.
Whole, dried chiles
Discard stems and seeds
Steep the chiles in hot water for at least 30 minutes.
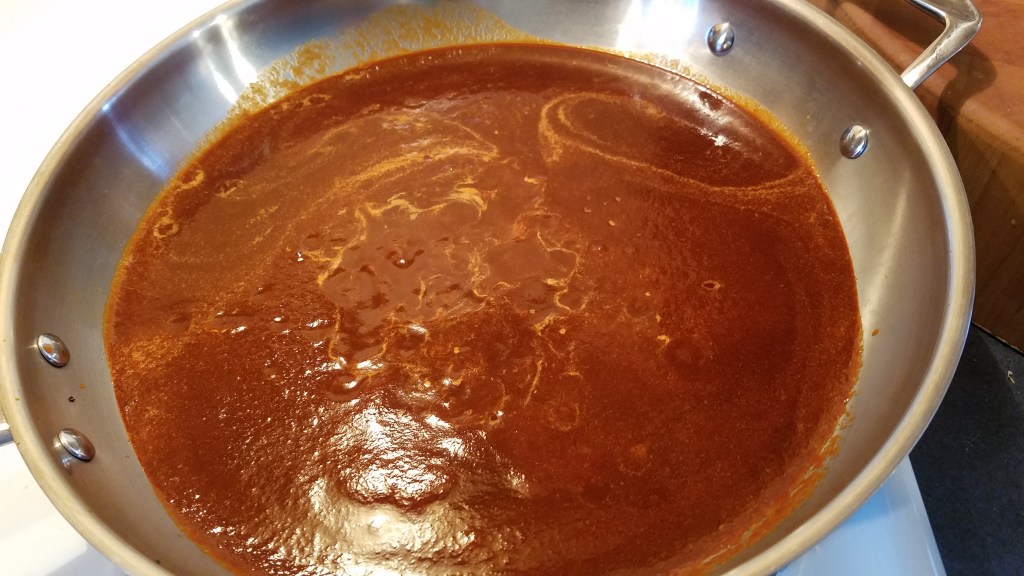
Remove the chiles and place them in a blender. Add some of the water, used during the steeping process, to the blender.
Puree the chiles and strain over a large mixing bowl to remove the pulp.
Move the sauce from the bowl to a large skillet. Set the heat to low and simmer.
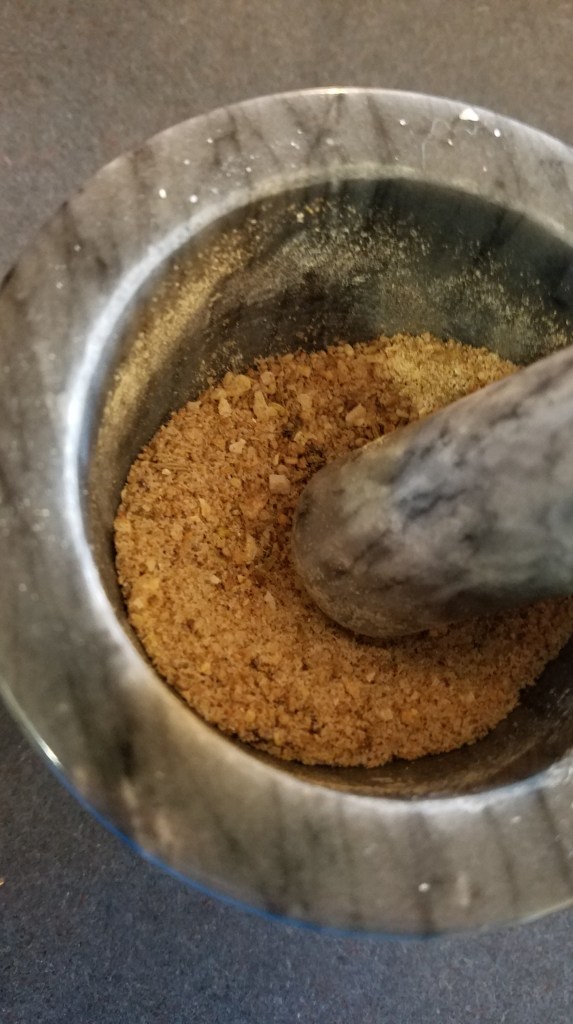
While the sauce simmers, toast the allspice berries, fennel seeds, sesame seeds and dried onion in a pan, at low heat. Keep the different items apart in the skillet because the onion flake will toast quickly and will need to be removed first. Continue toasting the other spices until they become fragrant.
Grind the toasted spices in a mortar and pestle and add the garlic powder and salt. Add the spices to the sauce.
Add 8 ounces of tomato sauce to the sauce.
Whisk and stir the sauce at low heat for about 15 minutes. Remove the sauce to a large bowl.
Return the shredded meat to the pan and set heat to medium. Add some of the sauce and mix. Once the sauce is thoroughly mixed with the meat, remove the meat and allow to cool to room temperature. Once the meat has cooled, place it in an airtight container or sealable storage bag and refrigerate.
Day two: Prepare the masa and assemble the tamales.
For the masa:
1 package of corn masa (4 lbs)
Baking powder
Lard or vegetable shortening
Water or broth
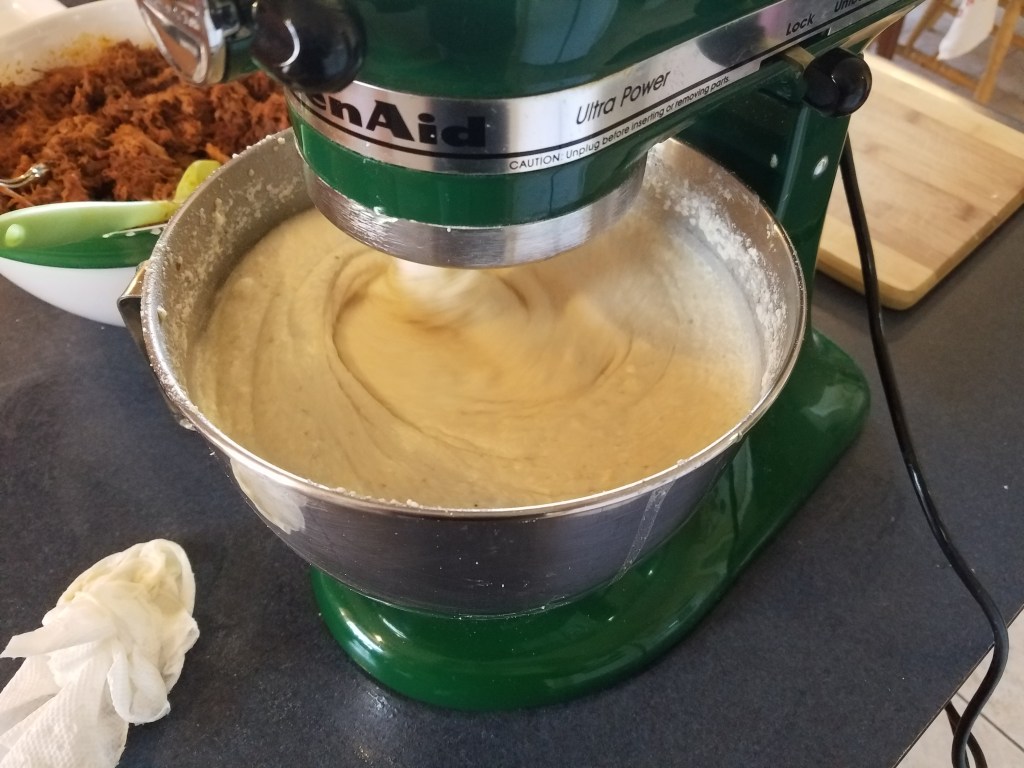
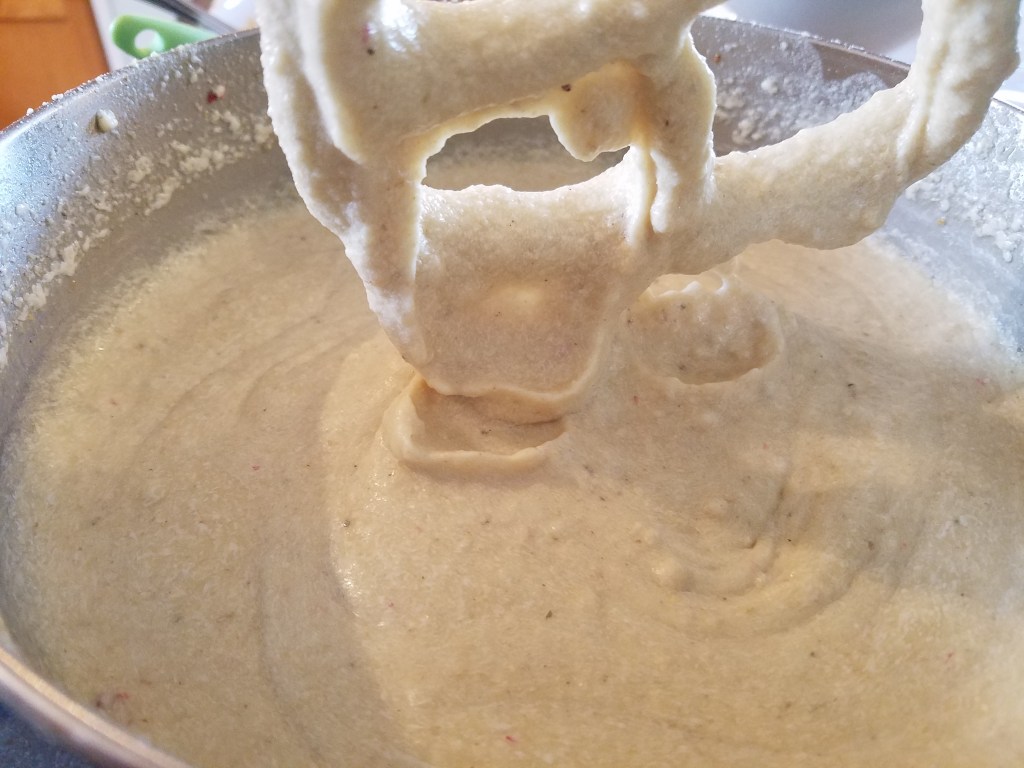
Follow the directions on the bag of masa. Most masa mixes call for the addition of baking powder, lard and water. The general idea is to add baking powder, lard and water to the masa and then mix to produce a fluffy, wet dough. I used water and added some chicken bouillon and dried Mexican safflower leaves, (azafran en flor), to give a warm color to the masa. I soaked the bullion and safflower in warm water before adding it to the masa mix.
Masa dough needs to be creamy and wet, making it easy to spread.
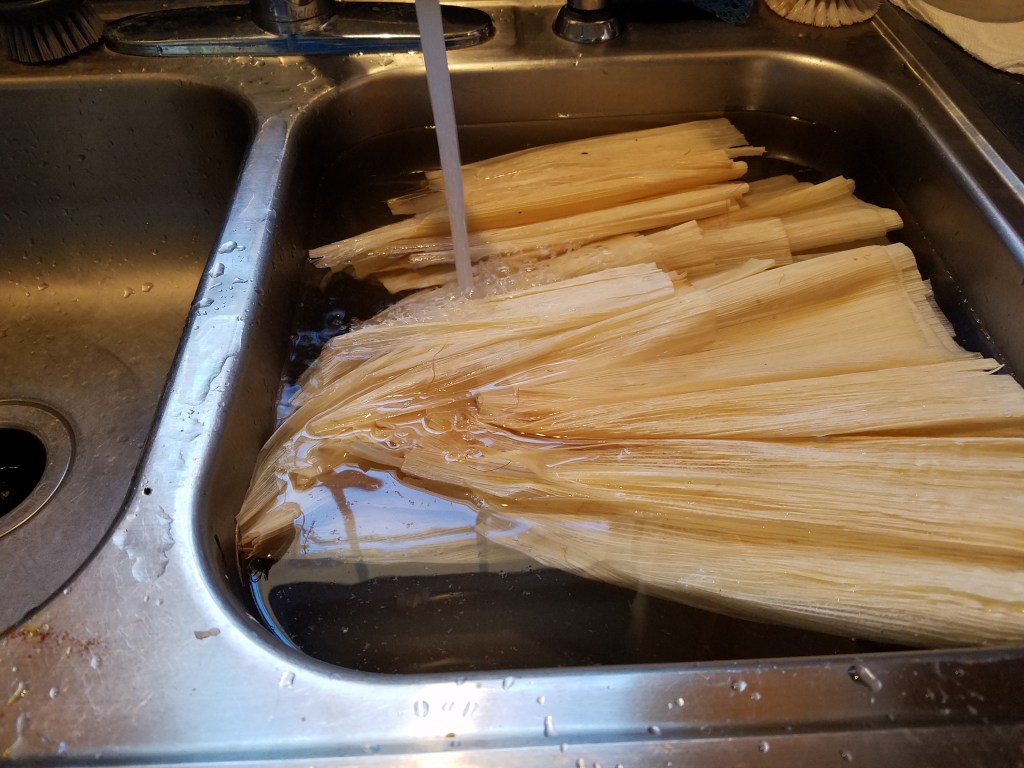
Soften corn husks by soaking them in warm water for 45 minutes to an hour. A clean sink full of hot tap water will do the trick.
Add some water to a tamale steamer and place the steamer on the stove top. Set the heat to medium and cover the steamer with a lid.
Prepare a large area to assemble the tamales. Arrange the work space so that others can help assemble tamales. Each person will need to be able to easily access the corn husks, masa and filling, and a tray for the wrapped tamales.
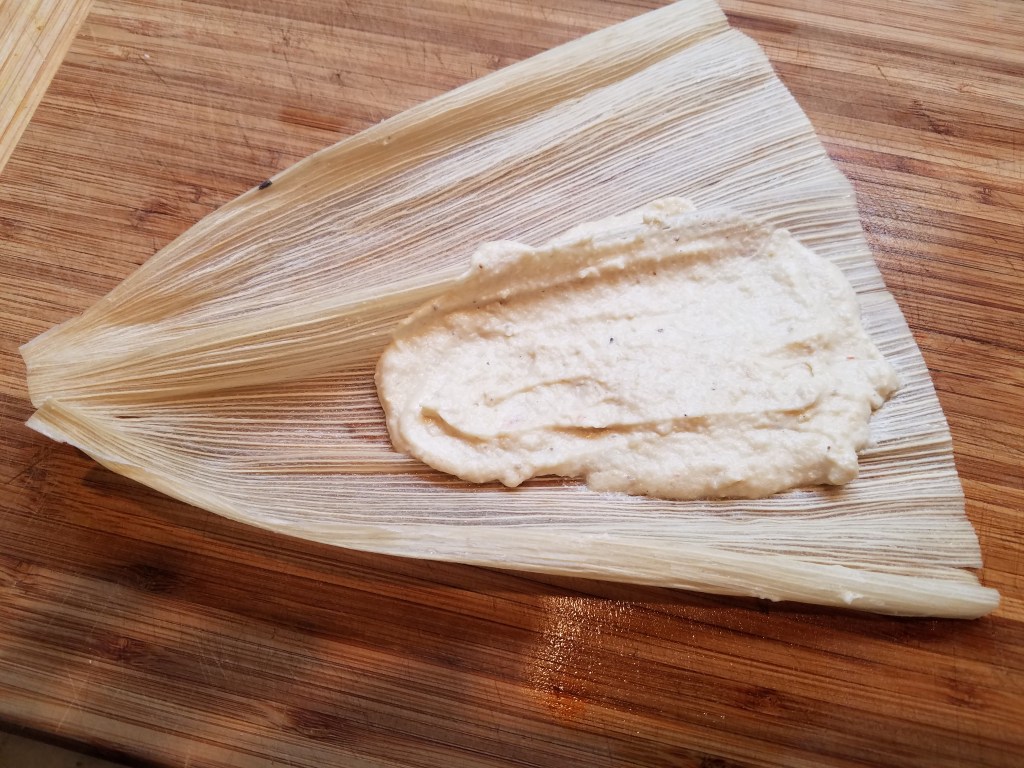
Lay a corn husk down on the work surface.
Apply about 2 tablespoons of masa to the center of the husk and smear the masa out toward the wide end of the husk. Don’t spread the masa across the entire husk. You will want to leave the edges of the husk clean.
Place about 2 tablespoons of the filling on top of the masa.
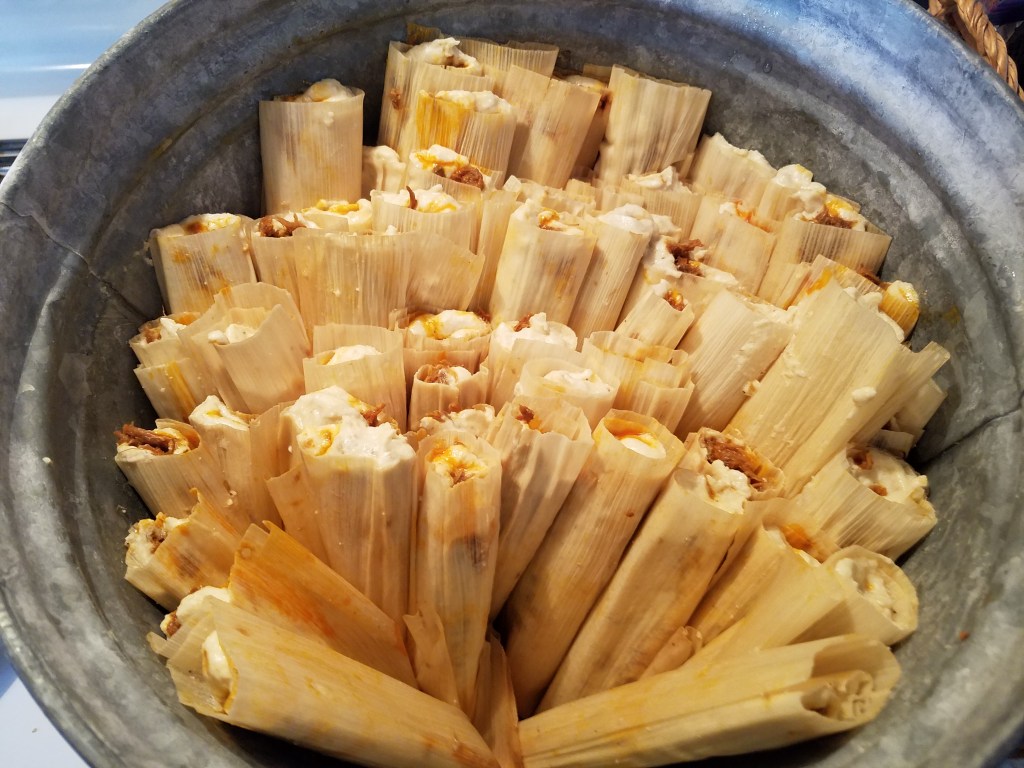
Roll the corn husk and finish by folding the pointed end over and placing the tamale on a staging tray or dish.
Once you have prepared a few dozen tamales, place them vertically in the steamer, with the folded ends pointed down.
Steam for an hour and then turn the heat off. Carefully remove the tamales and stack them on a tray.
Continue steaming tamales until they are all cooked.
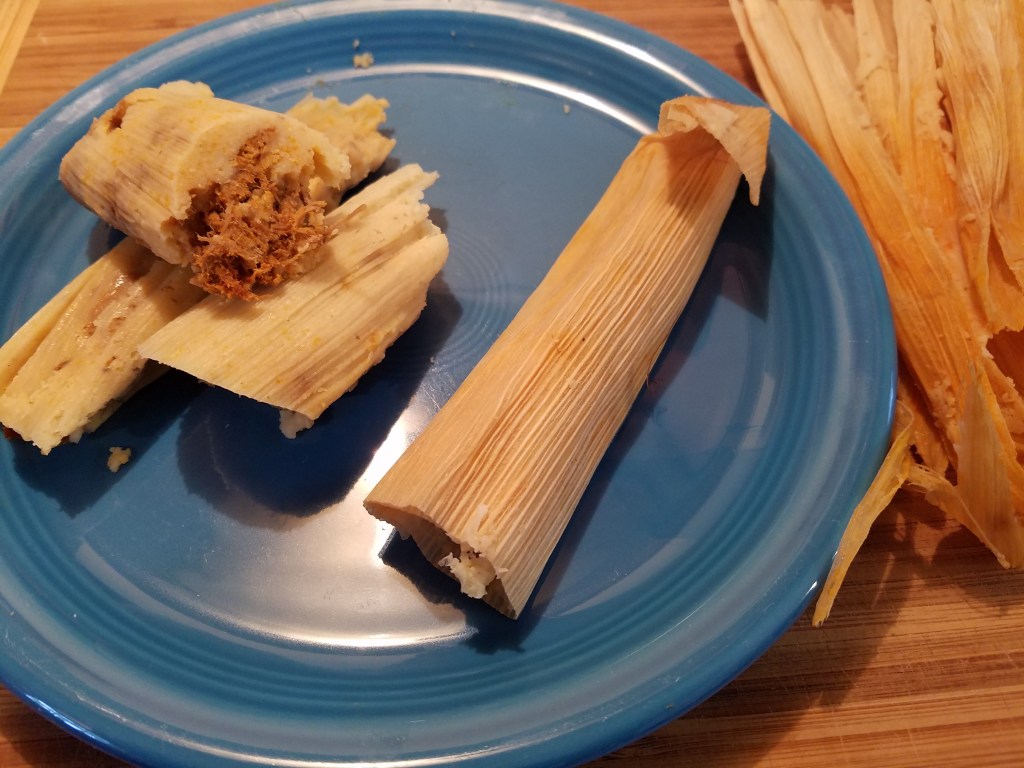
At this point they are ready to eat or, you might want to wrap them in aluminum foil, in sets of 3 or 4, to save for later, or to send as gifts for friends and family.
I like to take packs of tamales to work and give them to co-workers.
You can freeze foil-wrapped tamales for weeks or months. To reheat, remove the foil and place in a microwave oven for about 30 seconds, or keep them in foil and warm them in a conventional oven for about 20 minutes at 350°.
Tamales can be topped with enchilada sauce, smothered in a warm cheese sauce or they can be eaten just as they are, hot or cold.
Best wishes to all of you during the upcoming year! Keep your family and friends fed with delicious food.
This is what’s known in the biz as a two-fer. Yes, I know I just posted a chicken flautas recipe but these two recipes were made four months apart, so I feel vindicated and clever for presenting another fun-filled flautas episode. Consider it and encore, or maybe a sequel. Either way, flautas deserve attention and they should be enjoyed as often as you can make them, or eat them.
Juxtaposing these two different approaches to flautas illustrates the versatility of Mexican cuisine. You can wrap anything you want into a corn tortilla, fry it and call it a flauta. Amazing!
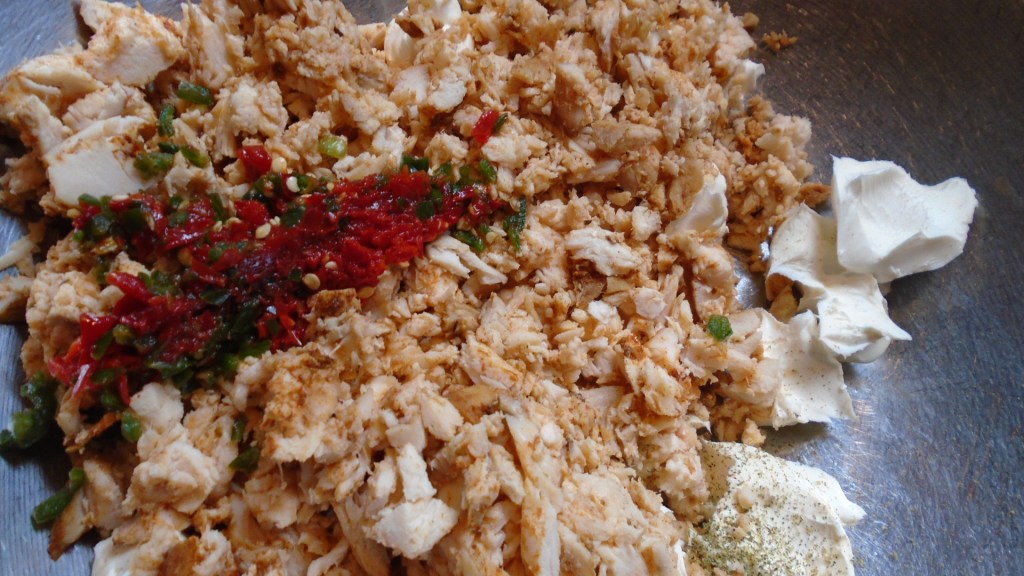
Once again, for this recipe, I had the benefit of starting with chicken that had previously been cooked.
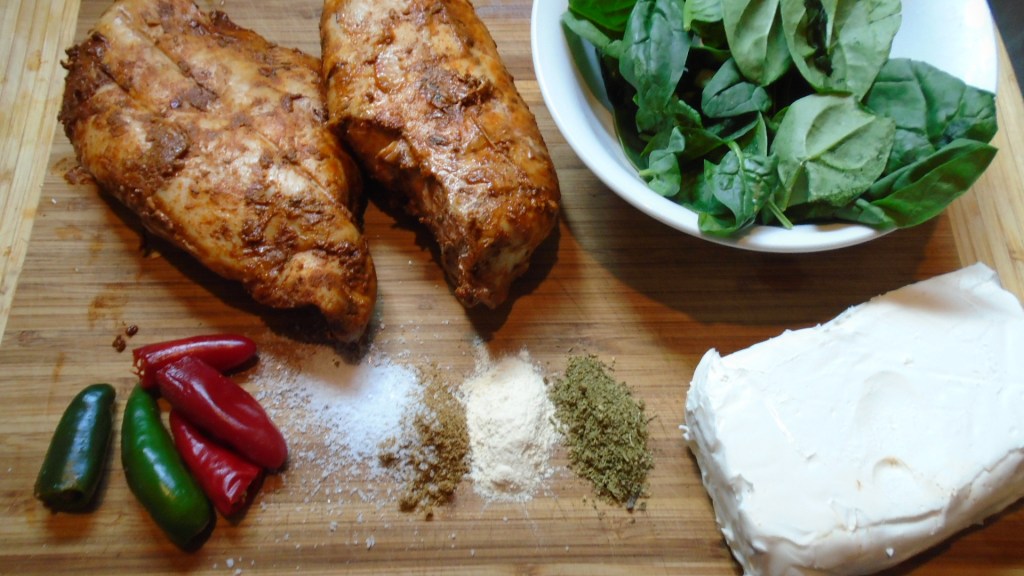
Ingredients:
3 cups chicken, cooked and shredded
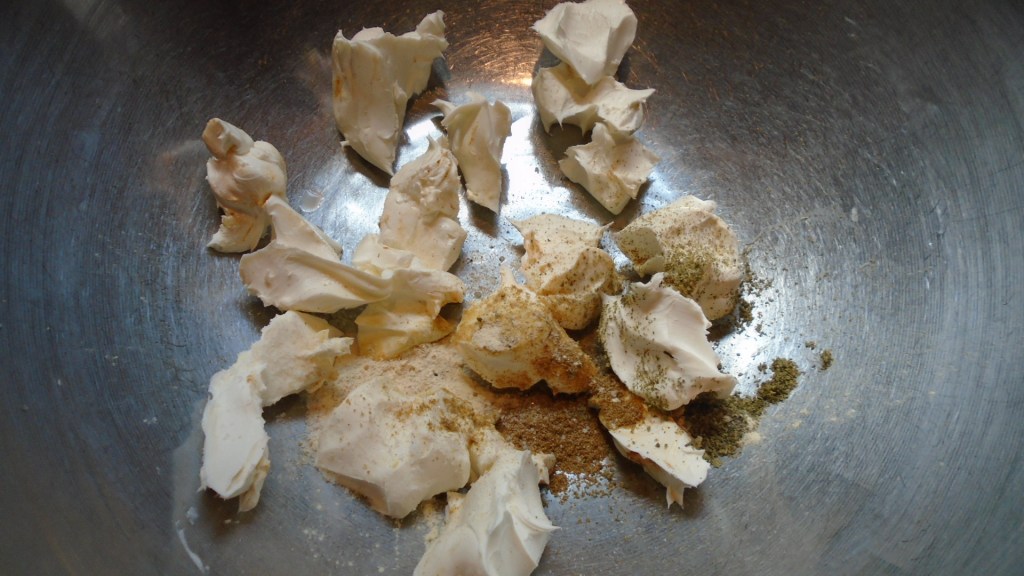
8 oz cream cheese softened
1 ½ tsp cumin
1 tsp salt
1 tsp garlic powder
1/2 tsp Mexican oregano
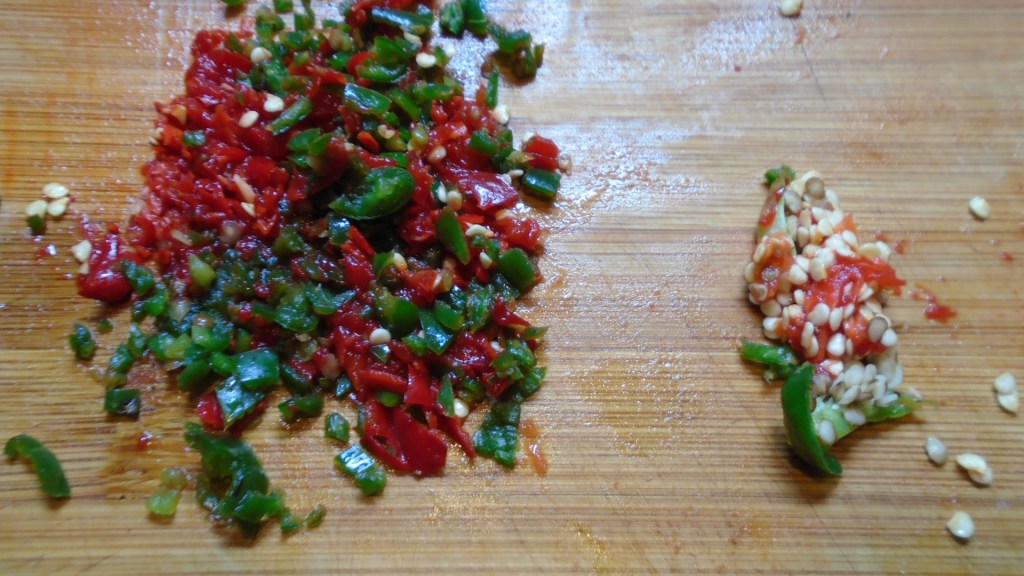
Red and green chiles (about ¼ cup)
1 1/2 cups spinach chopped
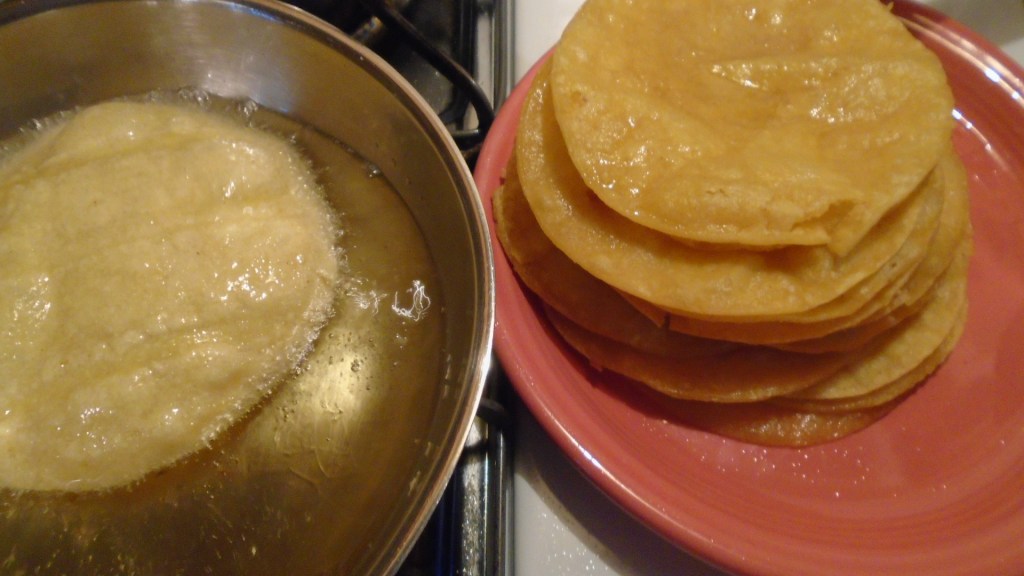
6 corn tortillas
cooking oil for frying
Directions:
Soften the tortillas by adding them to hot oil for several seconds. Set the tortillas aside.
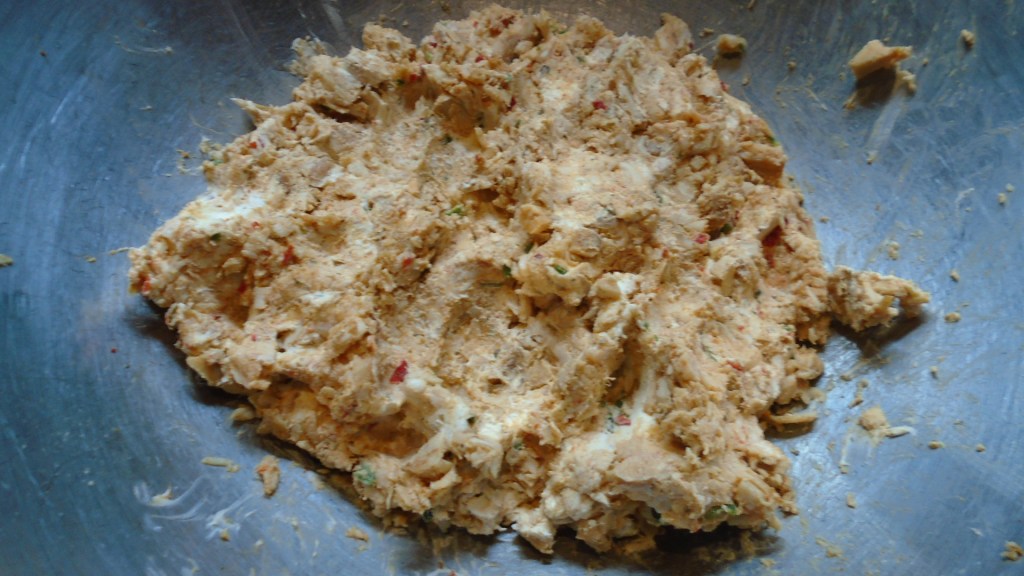
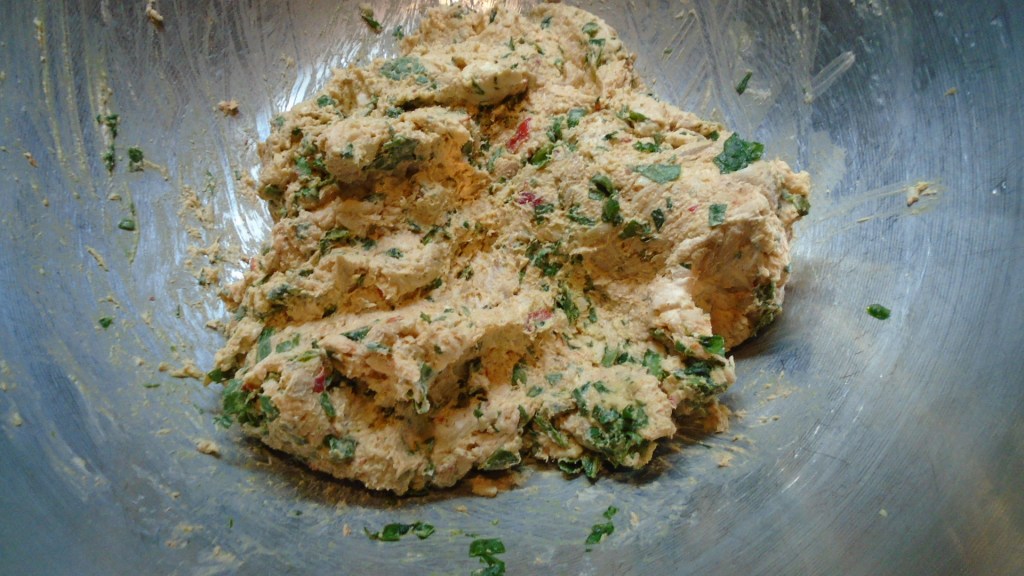
In a large bowl mix together the shredded chicken, cream cheese, cumin, salt, garlic powder, oregano, chiles and spinach. Add salt and pepper to taste.
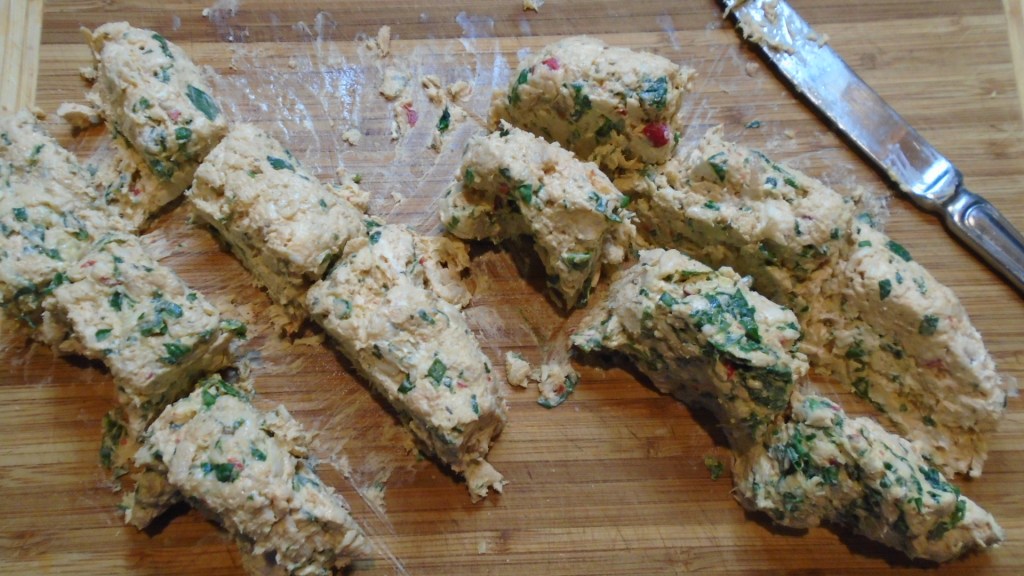
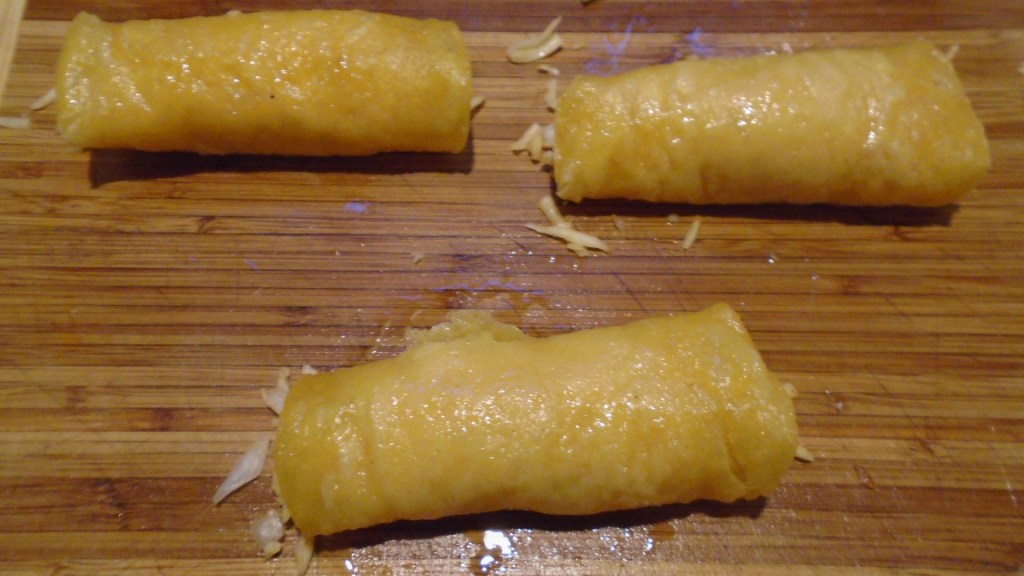
Form the mixture into long logs, or snakes, if you like. Portion the mix by cutting them into sections. This makes it easy when it comes to rolling up the flautas.
Assemble the flautas by adding a portion of the mix and rolling them up in the softened tortillas. Skewer two flautas together with a toothpick, to hold them together while they fry.
Pour enough cooking oil into a skillet to about ½” in height. Set the heat to medium.
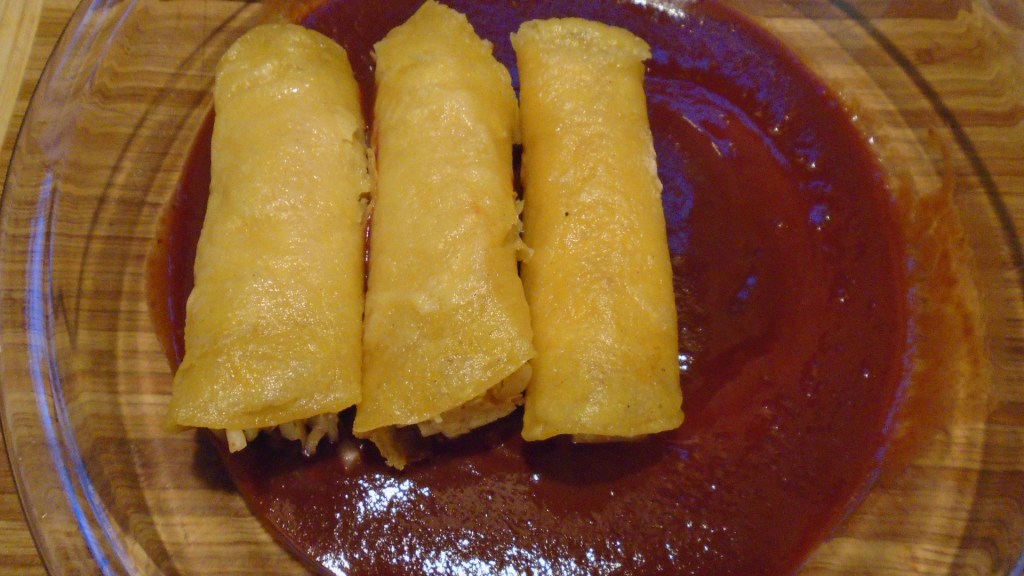
Cook the flautas in the hot oil, gently turning with tongs once or twice until they are golden brown on both sides.
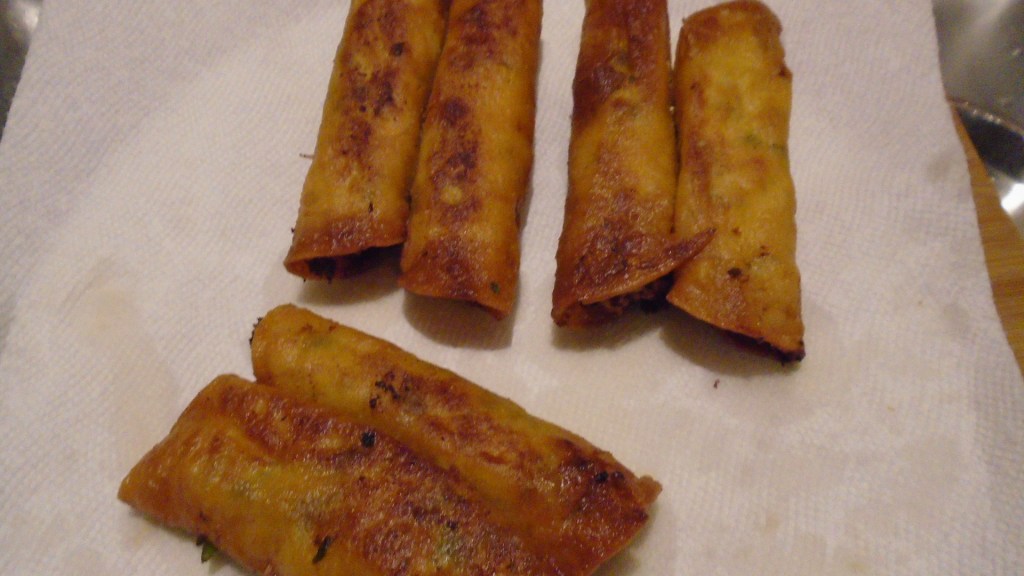
Remove the flautas to a paper towel-lined plate.
Serve warm.
But wait, there’s more!
Flautas are wonderful crispy treat but I think of them as an appetizer. Here’s an easy way to incorporate them into a full-fledged Mexican feast.
Cheese Enchiladas in Red Sauce
Ingredients:
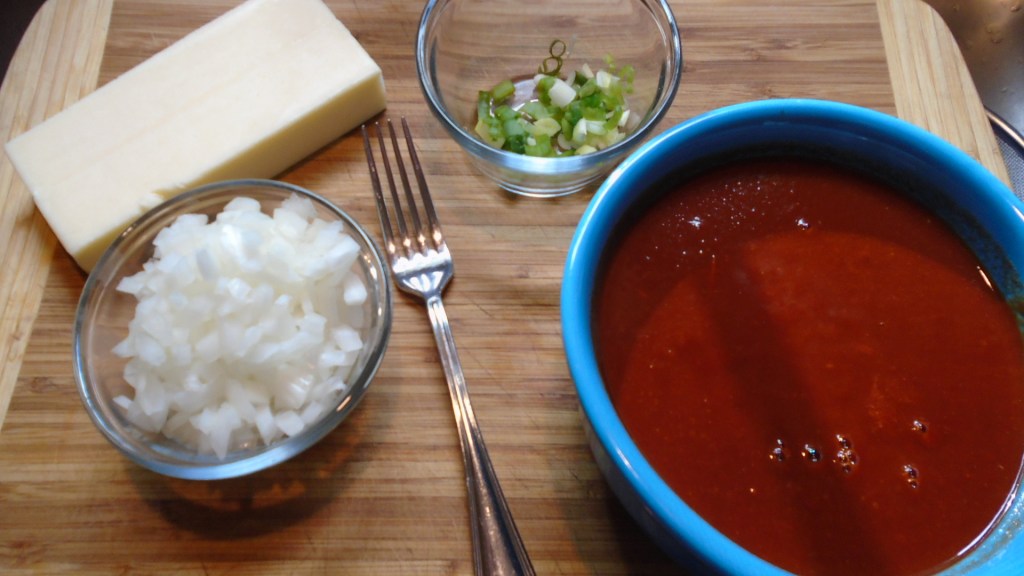
1 1/2 cups Colby-Jack cheese
1 cup onion, diced
6 corn tortillas, softened in hot oil
2 cups prepared red enchilada sauce
cooking oil for frying
chopped green onions for garnish
I used homemade red enchilada sauce but the store-bought variety will work, too.
Directions:
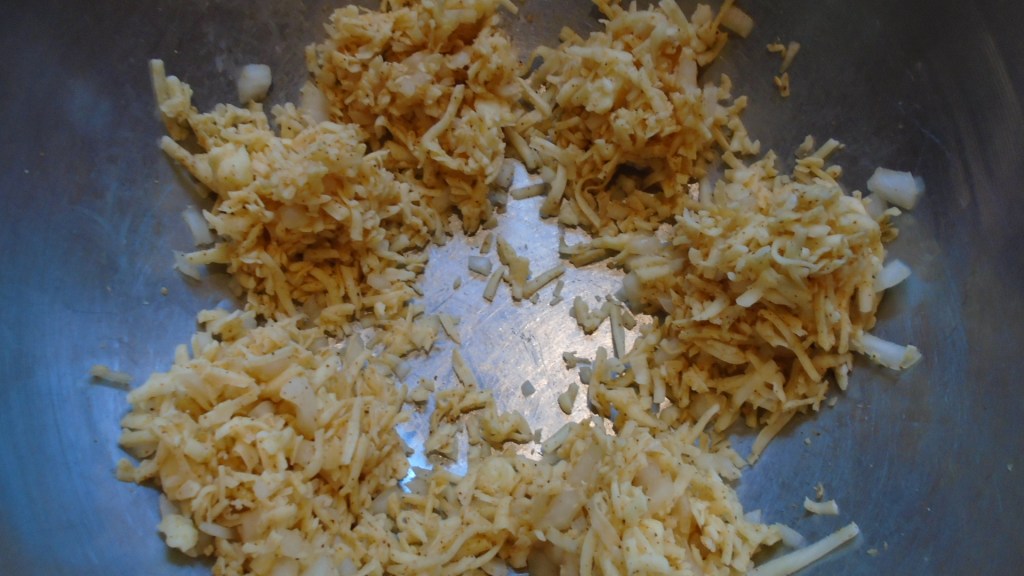
Mix the grated cheese and diced onion in a large bowl. In the same bowl, separate the mixture into six equal portions.
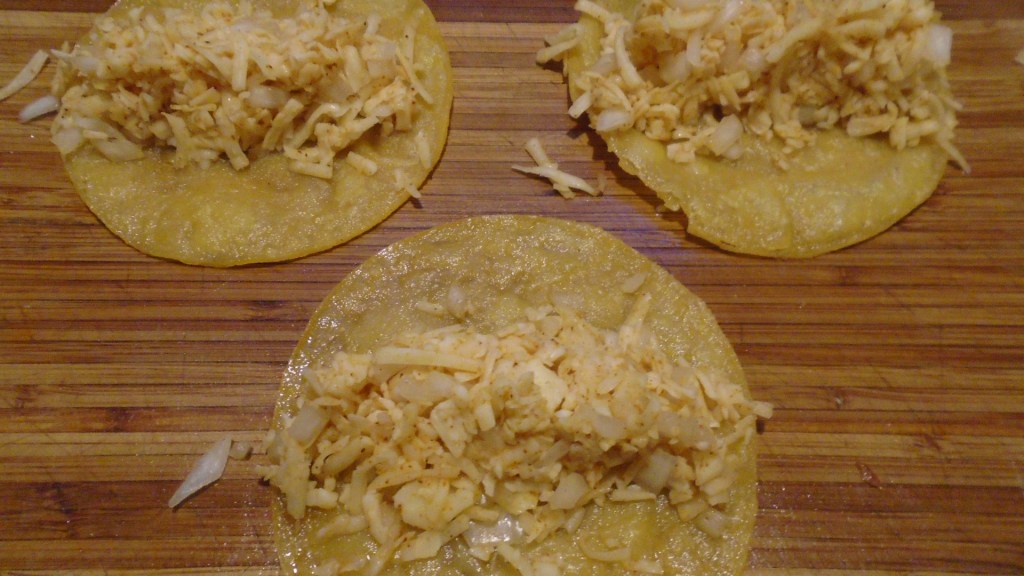
Pour some enchilada sauce into a 8” or 9” glass pie pan. Pour just enough sauce to cover the bottom of the pan.
Roll the enchiladas, just as you rolled the flautas. Place the enchiladas, seam side down, into the pie pan.
Cover the enchiladas with the remaining sauce.
Bake at 300° for 20 to 30 minutes. Remove from the oven and let the enchiladas rest for 5 minutes, before serving.
Serve with Mexican rice and guacamole salad, or sour cream.
I’m convinced that one of the secrets to imaginative cooking is learning how to resist going to the store when you realize you are out of an essential ingredient for a dish. If necessity is the mother of invention, adversity might be the father.
Lasagna just isn’t lasagna without the lasagna pasta. That’s a fact. So, if your heart is truly set on having lasagna and you don’t have the pasta, go to the store and get some. But, if you’ve just come home from a long day at work, you might dread the thought of getting back into the car to face the teeming masses at the grocery store just to pick up a box of pasta. That is the conundrum I faced today.
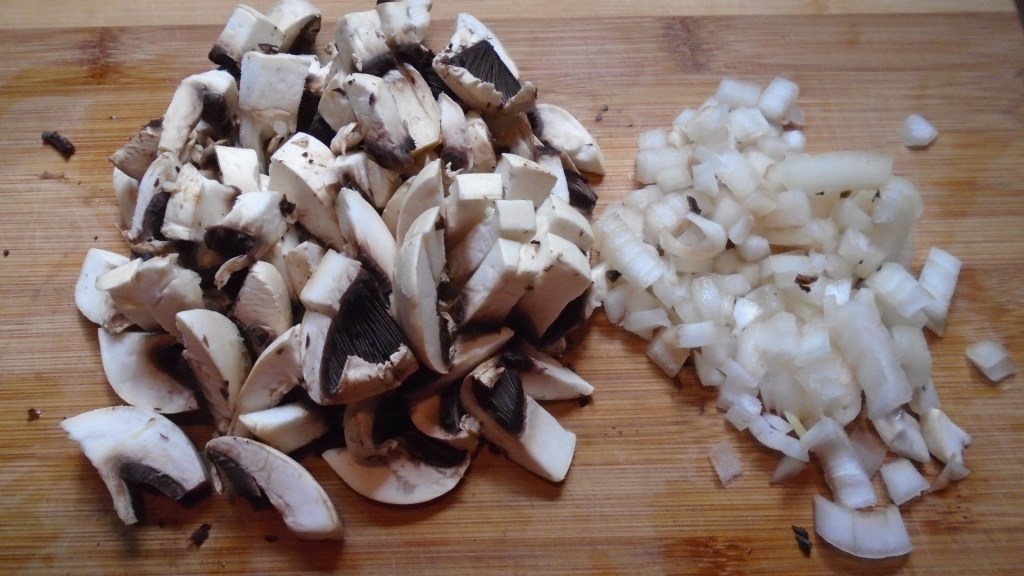
I reluctantly switched gears and started to think of alternatives for dinner. I wanted to use the ricotta, because it had been in the refrigerator for a few weeks. I rummaged through the refrigerator and found some chicken thighs that I had grilled, the previous weekend. The needle of my culinary compass quickly swung from Italian to Tex-Mex, (who would have guessed?!)
I imagined how I could use cheese and mushrooms and chicken to make flautas (taquitos). It’s during these kinds of moments of brilliance when I become convinced that I’m on the verge of making a brand new, never-seen-before creation. I use the flash of inspiration and get to work.
This sort of inspiration is actually a façade, as any honest cook knows, but it is an excellent motivator! Here is what the all-knowing internet has to say about the matter: From hispanickitchen.com, “Requesón is a soft Mexican cheese similar in texture to ricotta cheese. It has a mild flavor that can be used for both sweet and savory dishes. Because this cheese doesn’t melt completely when in contact with heat, it is the perfect cheese for golden fried taquitos.”
Chicken Flautas with Ricotta Cheese and Mushrooms
Ingredients:
4 grilled chicken thighs (skin on)
1 cup of uncooked rice
1 Tbs olive oil
1 Tbs butter
3 Tbs cup diced onion
4 large white, button mushrooms, chopped
15 oz ricotta cheese (or queso requesón, if you’re lucky enough)
1 tsp Mexican oregano
¼ cup cooking oil
12 corn tortillas
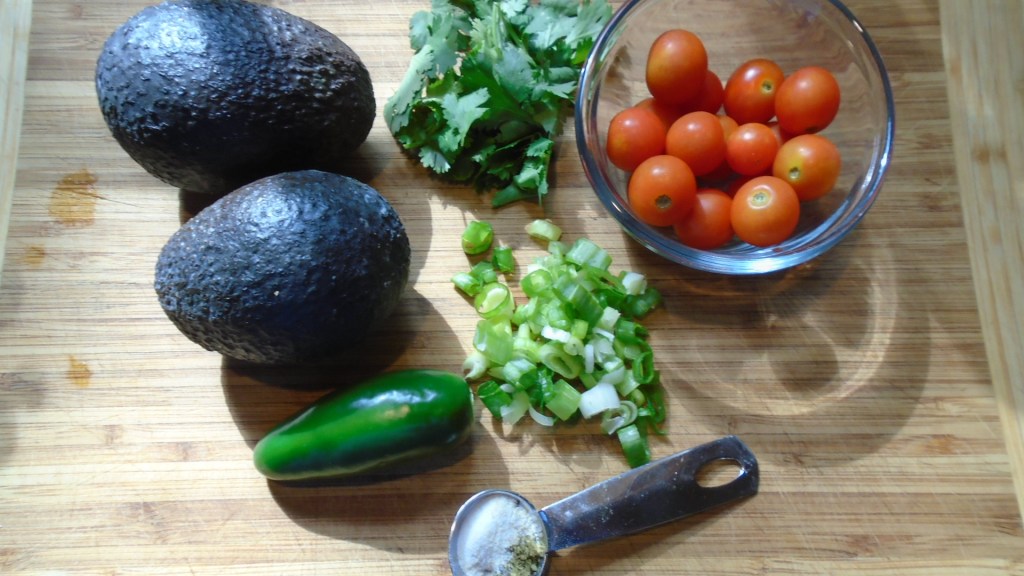
For the garnish:
1 small white onion, sliced
1 large ripe tomato, sliced
1 orange, sliced
2 cups mixed greens (spinach, lettuce, etc.)
½ cup sour cream
½ cup salsa
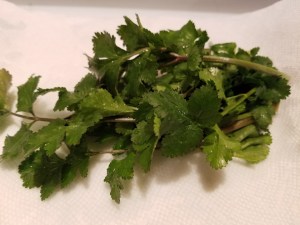
Cilantro leaves (as much as you like)
Directions:
Remove the skin from the chicken thighs and reserve one of the skins to flavor the rice.
Set the rice on the stove to boil. Add one of the chicken skins and cook the rice according to the directions on the package. Remove the skin before serving.
Shred and chop the chicken. Set aside.
Heat the oil and butter in a large skillet.
Add the onions and sauté until the onions begin to brown.
Add the mushrooms and stir for one minute.
Remove the onions and mushrooms to a bowl and set aside.
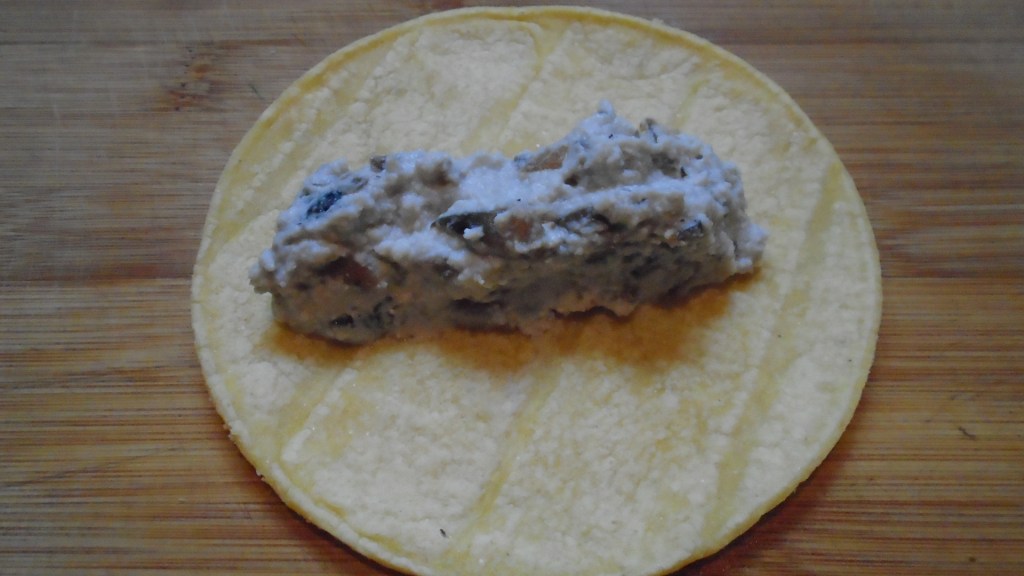
Add the ricotta cheese to the onions and mushrooms. Mix to combine.
Add the oregano and mix thoroughly.
Add the shredded chicken and mix. Set aside.
Soften the tortillas by frying in hot cooking oil. Set aside.
Prepare the flautas. Lay a tortilla on a work surface and add about 3 tablespoons of the chicken mixture. Form the chicken into a thick bead and roll the tortilla.
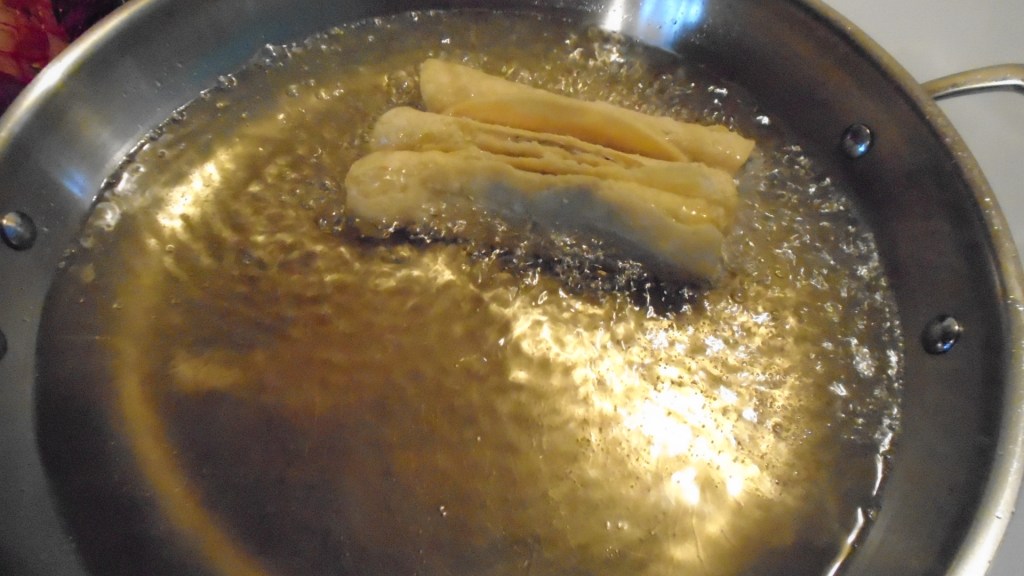
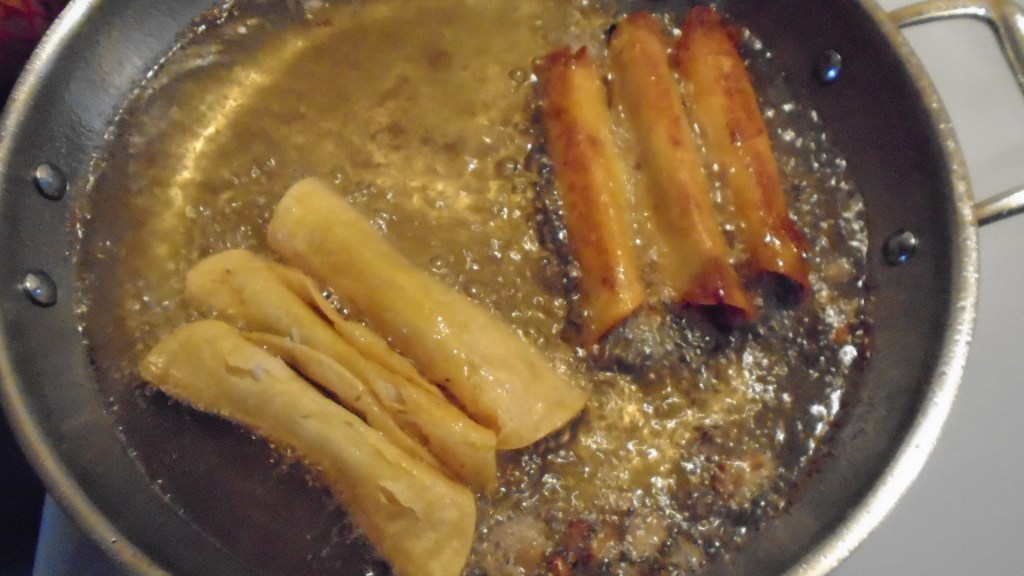
Skewer the tortilla with a toothpick. *Yay for toothpicks*
Assemble the rest of the tortillas and skewer them in sets of three.
Fry the rolled flautas in hot oil, turning a few times, until they are crispy and golden. Remove to a paper towel-lined plate.
Assemble the flautas on a large platter and adorn with the garnishes.
Enjoy with a delicious red wine, which was intended to pair with the lasagna!
My love affair with Carne Guisada began in Dallas. Oak Cliff, to be precise. I was working with a small sheetrock repair crew, renovating a small house in Oak Cliff. Growing up in a relatively comfortable suburb of Dallas made me apprehensive about the “big city life” in parts of Dallas and Oak Cliff was notoriously the most dangerous part of the big city.
I worked at the site for a few days, replacing sheetrock walls, when one day, we decided to go out for lunch. None of us were familiar with Oak Cliff, but we drove around until we stumbled upon a strip of storefronts on a busy street and saw what appeared to be a taquería, nestled in the midst.
As it turned out, the place was more like a soup kitchen than a restaurant and there wasn’t any room for tables or chairs. A long counter filled with chafing trays stretched from one end of the storefront to the other and three Hispanic men stood behind the counter, serving customers. I stood in front of the counter and stared at trays of steaming soups and stews, none of which were labeled in any way. It became clear that this wasn’t a place where I could order tacos or burritos and I felt lost as I gazed at the mysterious food in the trays. I caught the eye of one of the servers and asked, in my broken, pitiful, Spanish, “What is that?”, pointing to a steaming brown stew. The server gave me a quizzical look and replied, “Carne guisada.” I had heard of carne guisada but I didn’t remember ever having it, so I nodded my head and he ladled some into a large styrofoam take out cup. We paid for our lunches and headed back to the job site to eat.
The carne guisada was decadently rich and smooth. The beef was full of flavor and soft. Carne guisda remains one of my favorite comfort foods and this recipe makes use of left over roast beef, which cuts the cooking time down drastically.
About Oak Cliff…
Oak Cliff is a neighborhood of Dallas and is home to hundreds of thousands of people. Oak Cliff has a long, storied history, including racial prejudice, forced desegregation of schools and poverty. The neighborhood experienced “white-flight”, as white residents fled to neighboring suburbs during the Great Depression, and low income housing was introduced to the area, to provide housing for the many black residents who had lost their jobs. During the latter half of 20th century, the area transitioned into a predominantly black neighborhood and has now become a predominantly Hispanic neighborhood.
Despite the economic challenges and cultural shifts, a sense of unity and pride can still be found within the community. An odd symbiotic, yet strained relationship exists amongst residents and business owners that is unique to the Dallas / Ft. Worth area.
The spirit of a community lives in its food and its music. The cuisine of Oak Cliff is a reflection of many different cultures. You can find soul food, Tex-Mex and good ol’ American classics at every turn. As for the music, I suggest listening to one of Oak Cliff’s greatest musical prodigies, Stevie Ray Vaughn. Stevie Ray Vaughn’s music unleashes the very heart and soul of Texas.
Ingredients:
1 lb left over roast beef
1 Tbs rendered beef fat (reserved from the roast)
½ onion, diced
2 jalapeños, seeded and chopped
1 tomato, chopped (I used a frozen tomato, from this year’s garden)
2 Tbs flour
1 cup chicken (or beef) stock
1 tsp garlic powder
1 tsp cumin powder
Salt and pepper to taste
1 cup additional stock or water
Fried or mashed potatoes
Flour tortillas
½ cup grated cheddar cheese
Cilantro leaves for garnish
Directions:
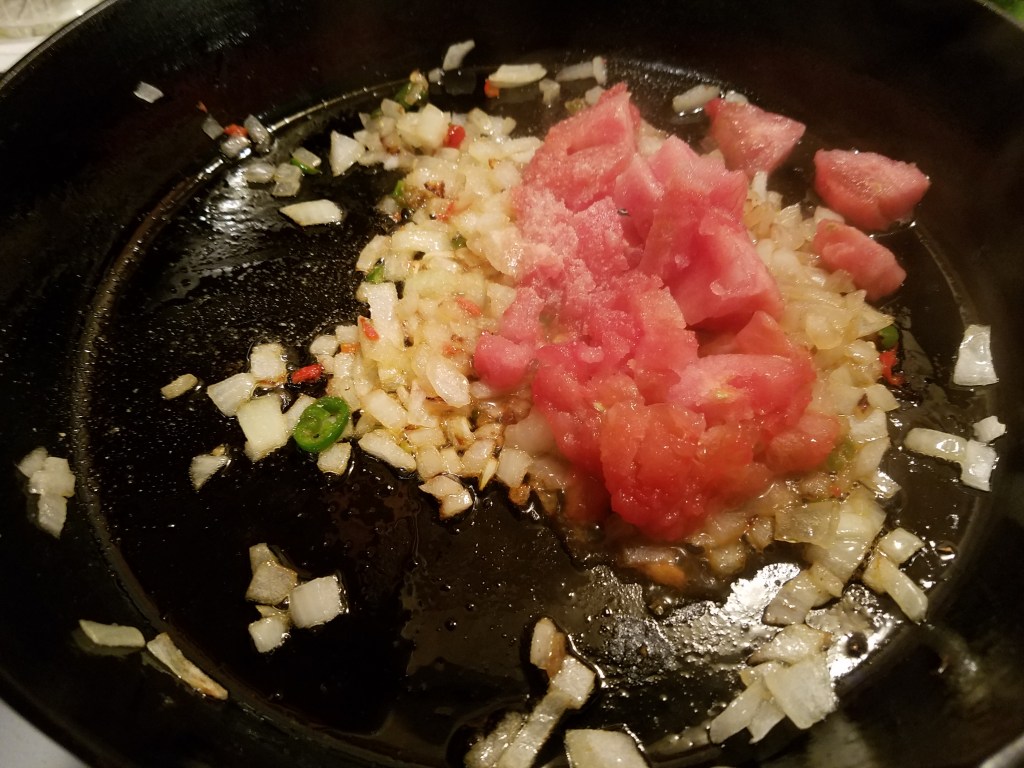
Assemble ingredients and prepare vegetables. Rinse the frozen tomato under warm water for a few seconds. Peel and discard the tomato skin. Chop the tomato, onions and jalapeño and set aside.
In a large skillet, add the rendered beef fat. Vegetable oil may be substituted. Set heat to medium and add the onions and chiles.
Stir occasionally, until the onions begin to brown and become soft.
Add the chopped tomatoes. Stir occasionally for about 5 minutes.
Make a slurry from the flour and about 3 tablespoons of the chicken or beef stock.
Add the slurry to the skillet and whisk for a few minutes.
Add the remaining stock. Add garlic powder, cumin, salt and pepper. Stir and simmer for five minutes.
Turn the heat up to medium high and simmer for another two minutes, or until the sauce thickens.
Add chopped roast beef and mix.
Add additional water or stock and simmer for ten minutes.
Serve with fried potatoes (or traditional mashed potatoes), flour tortillas, cheese and cilantro.
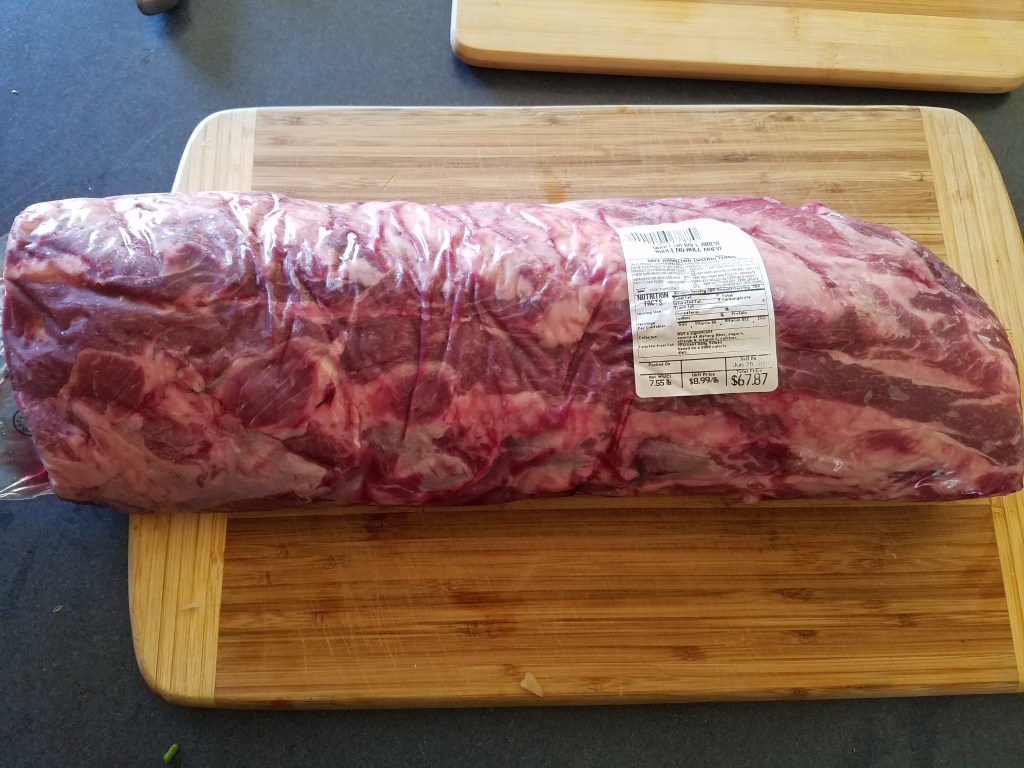
June, 2020. It seems like years ago to me now. Beef prices rose quickly in May and I nearly cut beef out of my diet entirely as a result. That is, until my self-imposed deprivation finally got the best of me and I splurged on a big ribeye roast!
I consider the economy of my food choices when I shop so, when I saw the price of the large roast I took a deep breath and began portioning it in my mind. I figured I could get 10 thick steaks from the cut of beef and the thought of having 10 delicious, grilled steaks at $7.50 each made me realize that this might be a wise choice.
As I hefted the 7 ½ pound roast from the butcher’s case I took a look at the label on the package. “WHOLE NO ROLL RIBEYE” was proudly displayed at the top of the label.
I wasn’t familiar with the term “WHOLE NO ROLL RIBEYE” and I didn’t know if it was a good or bad thing. As it turns out, the term “no roll” means that the meat had not been graded by the USDA (US Department of Agriculture). Simply put, it might be a tremendous cut of beef or a not-so tremendous cut. It was, however, inspected by the USDA to ensure that it met the all of the safety requirements.
I can assure you that this was a perfectly fine cut of beef, good marbling and tender texture.
As I mentioned, this made ten 2” thick steaks, each weighing about ¾ pounds.
My intention was to make the classic American steak dinner, baked potatoes and a side of steamed vegetables or a garden salad but, my inclination to Tex-Mex cuisine overtook me and I turned this meal into a fiesta!
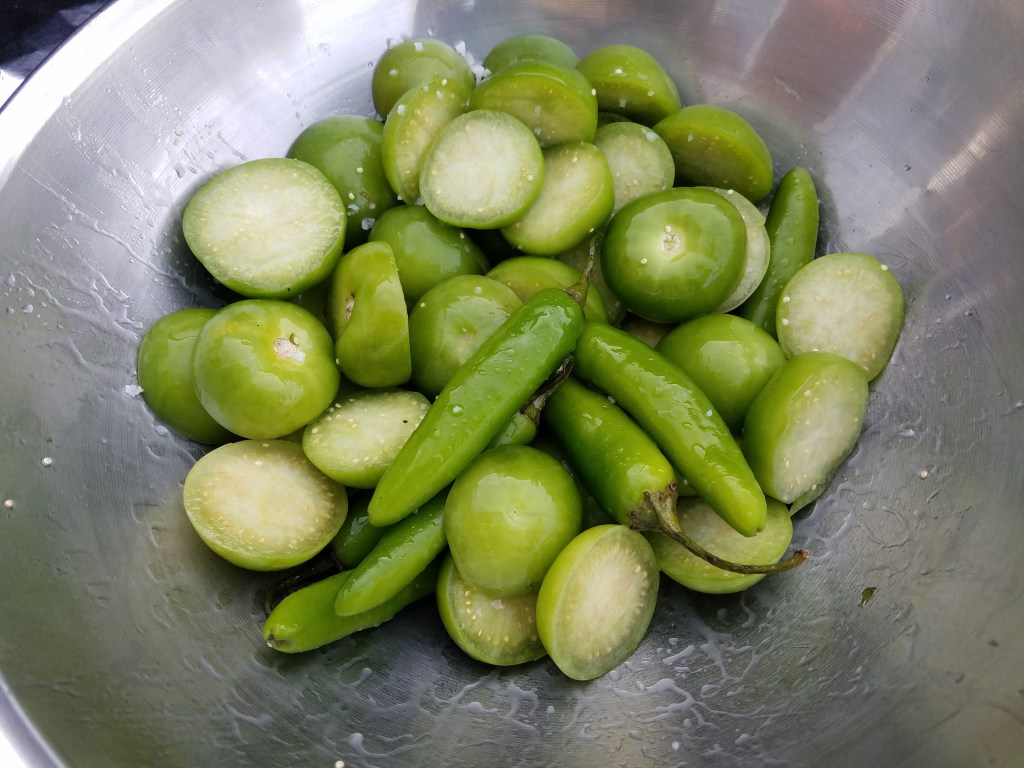
Ingredients for the salsa verde:
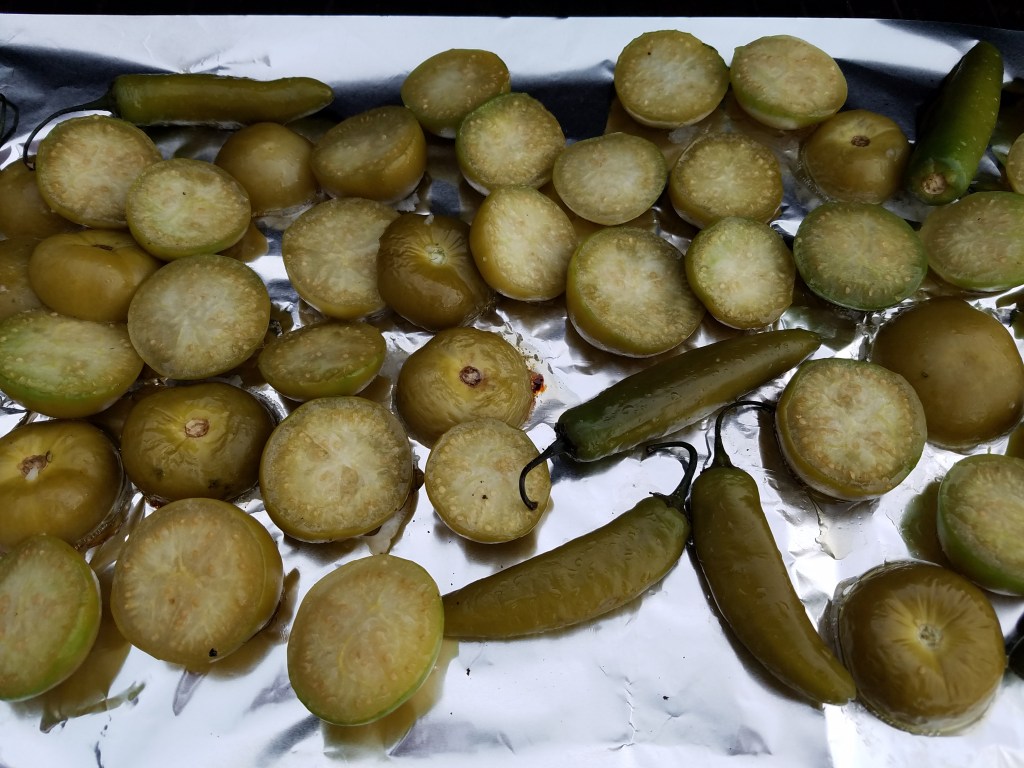
15 to 20 tomatillos (cut in half, radially)
3 serrano chiles
1 Tbs olive oil
1 Tbs kosher salt
Ingredients for the pico de gallo:
2 ripe tomatoes, seeded and chopped
½ orange bell pepper, stemmed, seeded and chopped
1 medium onion, chopped
2 jalapeños, stemmed, seeded and chopped
2 tsp salt
1 tsp Mexican oregano
2 tsp fresh lemon juice
Ingredients for the grilled steaks:
1 beef ribeye roast, 7 to 8 lbs
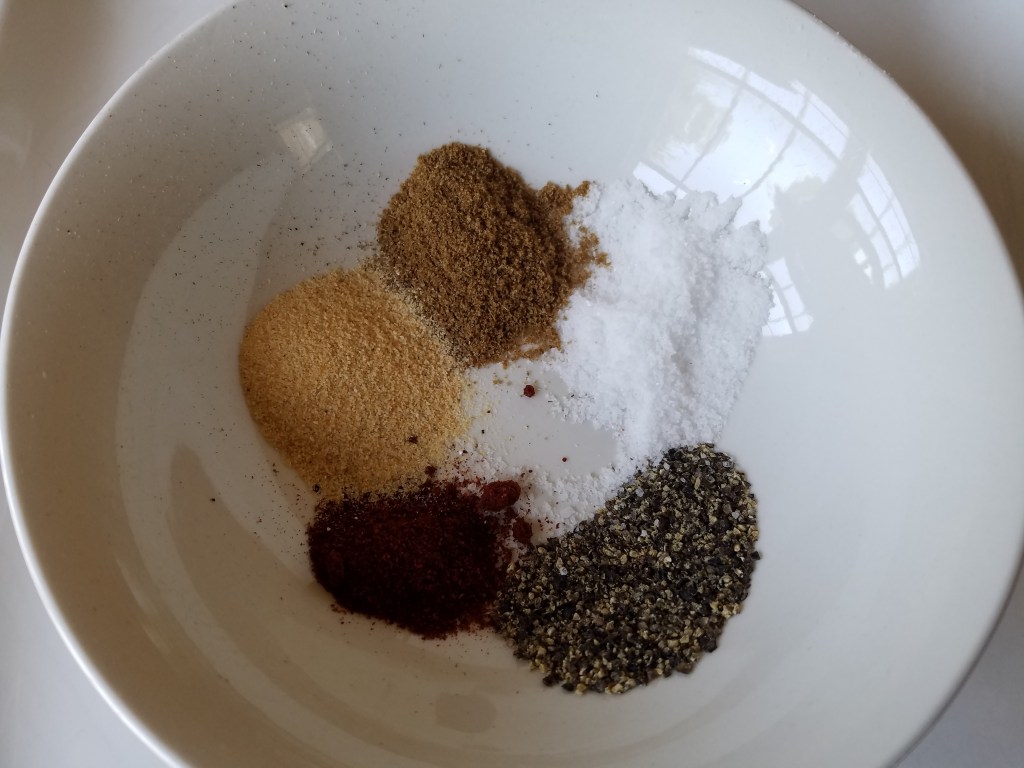
Spice rub:
2 tsp garlic powder
2 tsp cumin
2 tsp salt
1 ½ tsp cracked black pepper
1 tsp chili powder
Ingredients for the side items:
1 onion, sliced in half radially
3 serrano chiles
1 yellow bell pepper
4 medium russet potatoes
1 ½ cup prepared guacamole
2 cups fresh lettuce, rough chopped
1 ½ cups fresh cilantro leaves
16 oz prepared refried beans
Directions:
Prepare the grill by heating some charcoal.
While the coals heat, slice the tomatillos and add them to a large mixing bowl. Add the serrano chiles and splash some olive oil over the tomatillos and chiles. Sprinkle the salt over everything and toss to coat everything with the oil and salt. Set aside.
Chop the tomatoes and chiles for the pico de gallo. Add to a mixing bowl. Add the spices and squirt lemon juice over the mixture. Toss briefly and reserve for later.
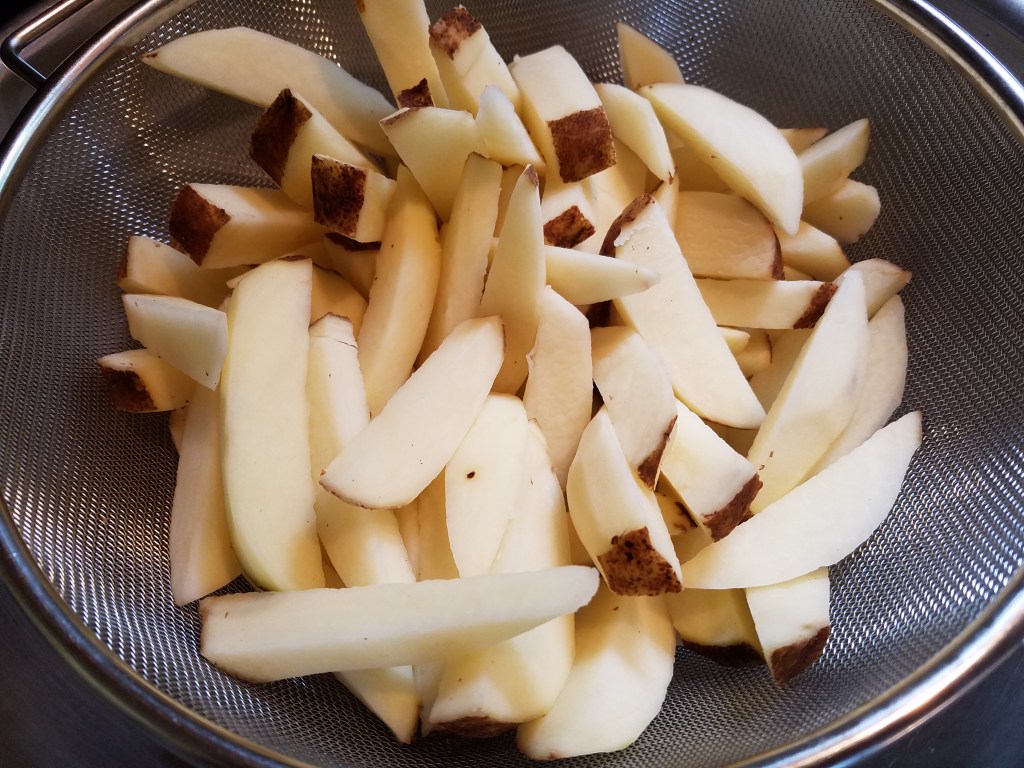
Peel the potatoes, slice into large wedges and air-dry in a colander. Set aside.
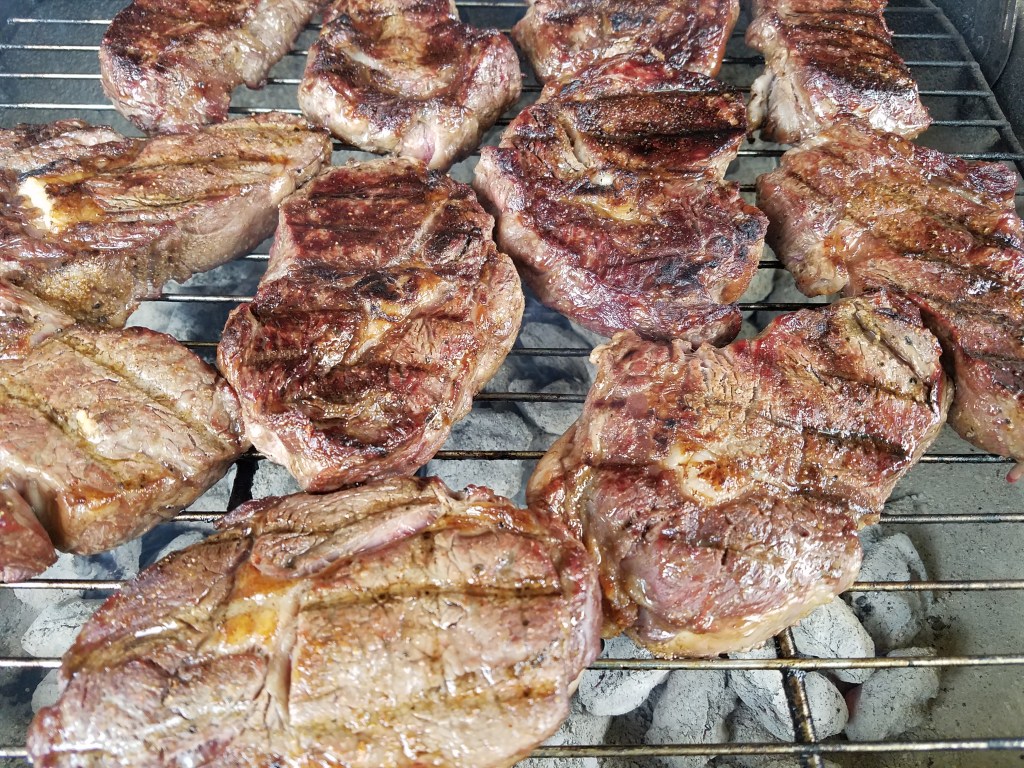
Remove the beef roast from the package, rinse under cold water and pat dry with paper towels. Slice the roast into 2” thick steaks. Lay the steaks on a platter and dust each side with the spice rub. Set aside.
Heat some oil in large pan. Add the potatoes and fry until crisp. Remove and strain the oil. Return to the pan of hot oil and fry until crisp again. Stage the potatoes in an oven-proof serving dish in a 200°.
Add the hot coals to the grill and lay a sheet of aluminum foil on top of the grill. Spread the tomatillos and chiles across the foil. Cover the grill.
Start another batch of coals. These will be added to the dwindling coals and will be added to the grill prior to grilling the steaks.
Steam and grill the tomatillos and serrano chiles for about 20 minutes, turning occasionally. Once the tomatillos become very soft, and slightly charred, pull them off the grill. Remove the aluminum foil and discard.
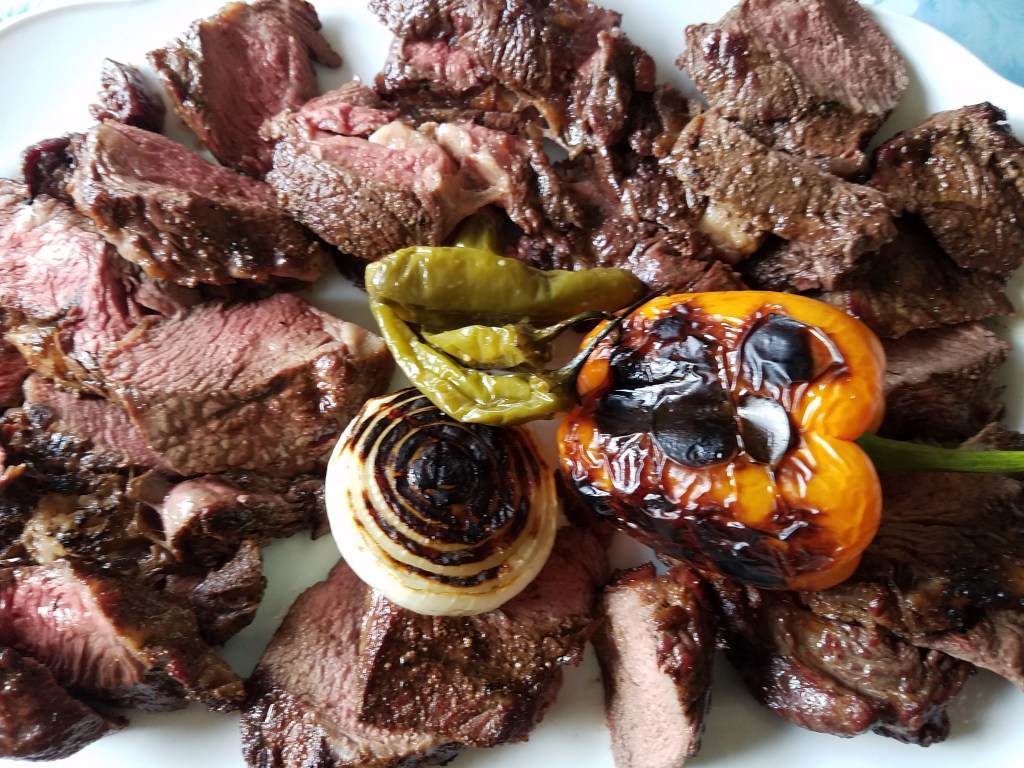
Lay the half onion, yellow bell pepper and 3 serrano peppers on the grill. Turn every few minutes until each have charred. Pull the vegetables and reserve.
Reserve 2 of the chiles and the remaining tomatillos and chiles to a blender. Puree until smooth. Set aside.
Add the new batch of hot coals to the grill. Carefully lay the steaks on the grill. Sear and cook the steaks for 5 minutes. Turn the steaks and grill on the other side for another 4 or 5 minutes. Press the steaks with the side of your thumb for doneness. If the steaks spring back, they’re done. Remove the steaks and cover loosely with foil. Stage in a 200° oven.
Prepare the sides… guacamole, lettuce, cilantro and refried beans.
Pull the steaks and potatoes from the oven. Top the steaks with the charred onion, bell pepper and serrano chiles. I sliced the steaks into slightly smaller pieces before serving. Serve warm.
There’s a reason why I turn to Mexican food so often. Mexican cuisine has a rich and long history of embracing other cultural cuisines while maintaining its own identity. Some cultures have a tendency to cling to strict tradition, when it comes to their cuisine, while other cultures are more willing to change and adapt.
When it comes to cooking at home, versatility and adaptability is the name of the game! So, when it’s time to plan a meal, I want to use items that I am familiar with but I want to combine them in new and interesting ways.
I can stuff anything I want into a tortilla and call it a taco. I can wrap anything I want in a tortilla and cover it with sauce and it becomes an enchilada. My imagination is only restricted by considering the taste, texture and nutritional quality of the final outcome. Once I consider those aspects, the rest of the process is a simple matter of deciding what cooking methods I want to use to achieve my goal.
I pulled some fresh chilis from the garden and I cooked down some fresh tomatoes to make a sauce. I had leftover smoked pork roast in the refrigerator and Monterrey Jack cheese and corn tortillas. The rest of the ingredients were spices that I always keep on hand.
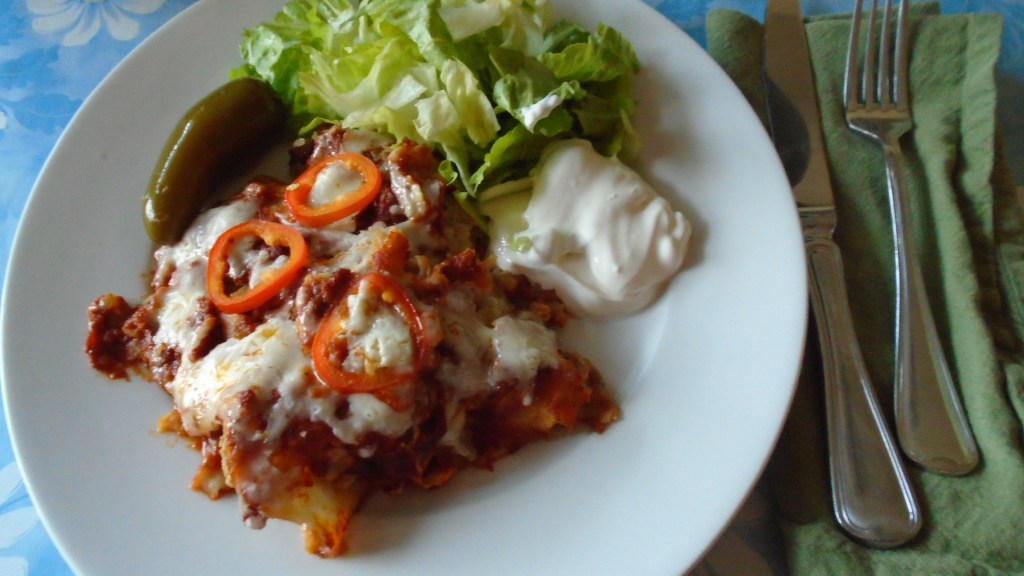
And that is why I’m making Smoked Pork Enchiladas!
Ingredients:
1 red jalapeño, seeded and sliced
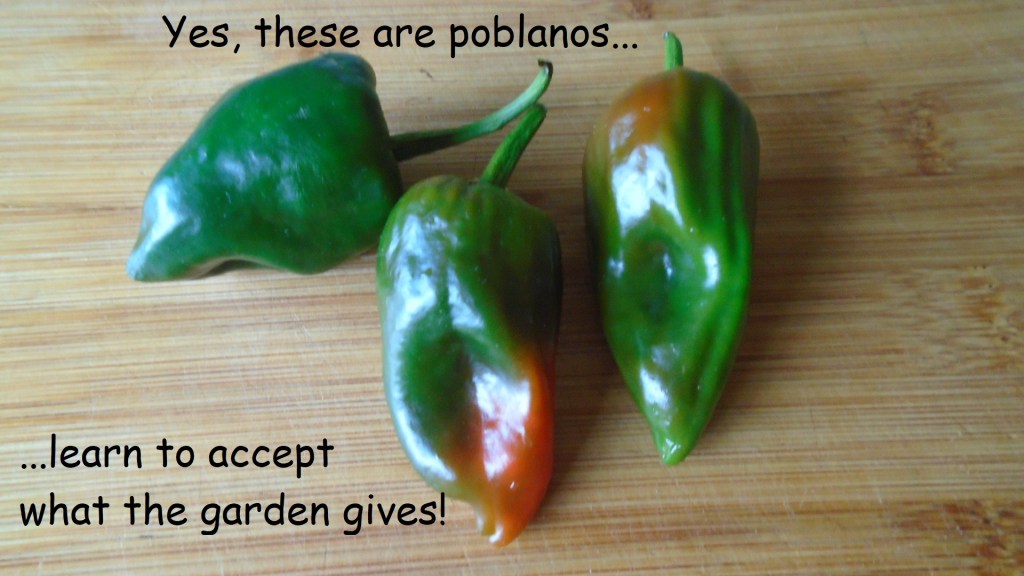
3 small poblano chilies, seeded and chopped
1 Tbs cooking oil
2 cloves garlic, smashed
½ cup diced onion
1 ½ cups tomato sauce
2 Tbs red chili powder
1 ½ Tbs cumin powder
1 Tbs Mexican oregano, crushed
2 tsp garlic powder
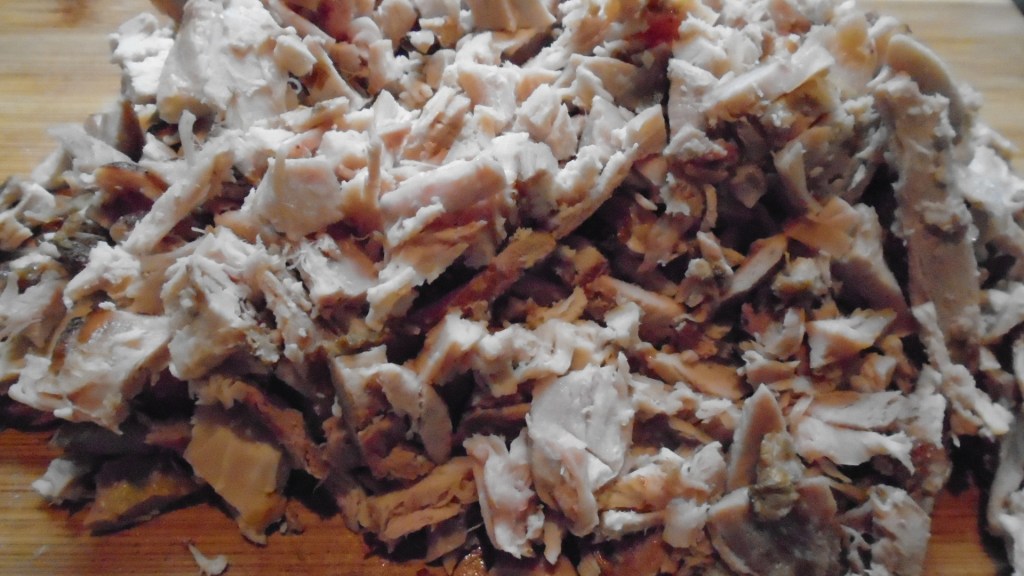
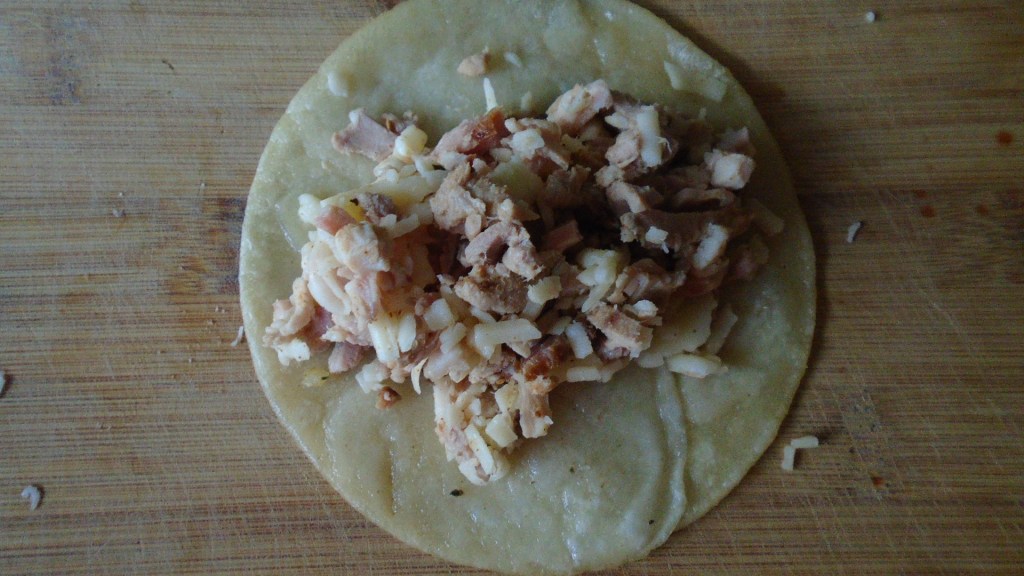
1 lb. smoked pork roast, sliced and chopped
12 oz Monterrey Jack cheese
10 corn tortillas, softened by dredging in hot oil.
Directions:
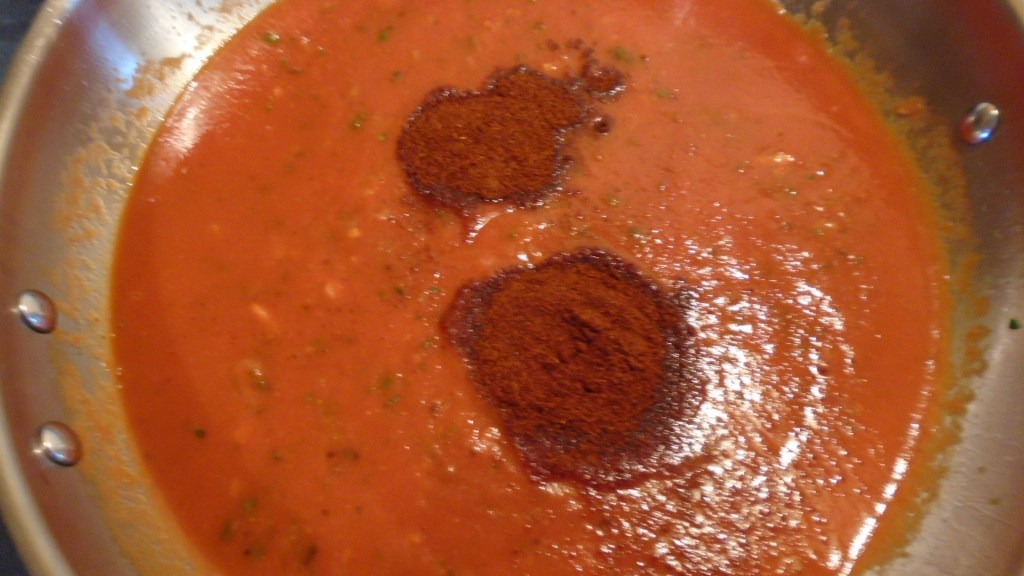
Prepare the chilies. Remove the stems and seeds. Slice the jalapeño into thin rings.
Remove the stems and seeds from the poblano chiles. Slice and dice the chilies.
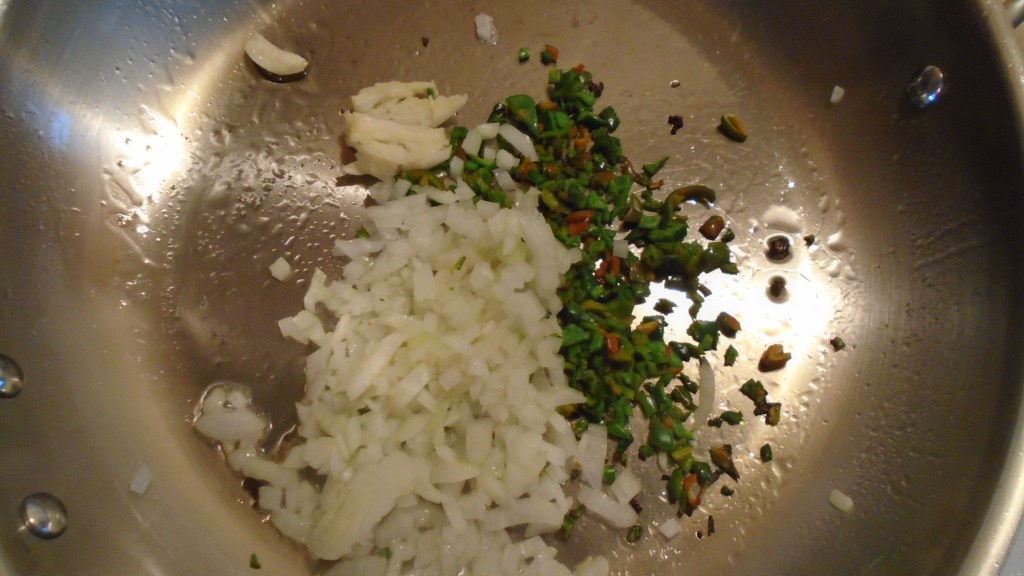
Add 1 tablespoon of cooking oil to a large, oven-proof skillet. Set the heat to low/medium heat. After the oil is hot, add the chopped poblanos and garlic. Simmer and stir for five minutes, or until the chiles and garlic sweat and soften. Add the onions and saute for another 5 minutes.
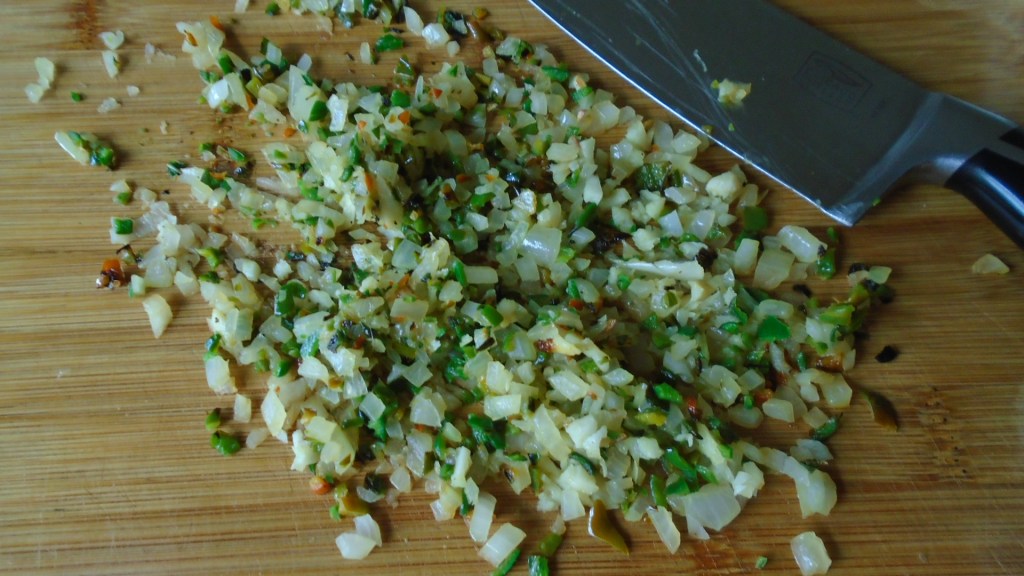
Remove the chiles and garlic and place on a cutting board. Chop the chiles and garlic into smaller pieces.
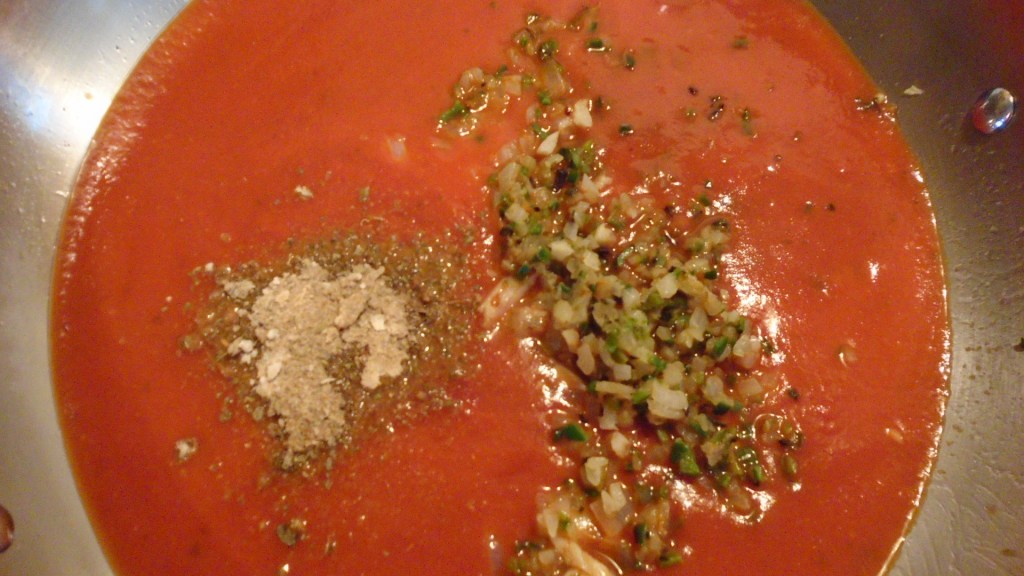
Add the tomato sauce to the pan and cook at medium heat. Add the cooked garlic, chilies and onion. Add the red chili powder, cumin, oregano and garlic powder. Simmer and stir for ten minutes. Remove the sauce and place in a bowl.
Slice and chop the smoked pork and place in a mixing bowl. Shred 12 ounces of Monterrey Jack Cheese. Set aside.
In a large mixing bowl, combine the chopped pork and 8 ounces of the shredded cheese. Reserve the other 4 ounces of cheese for the topping.
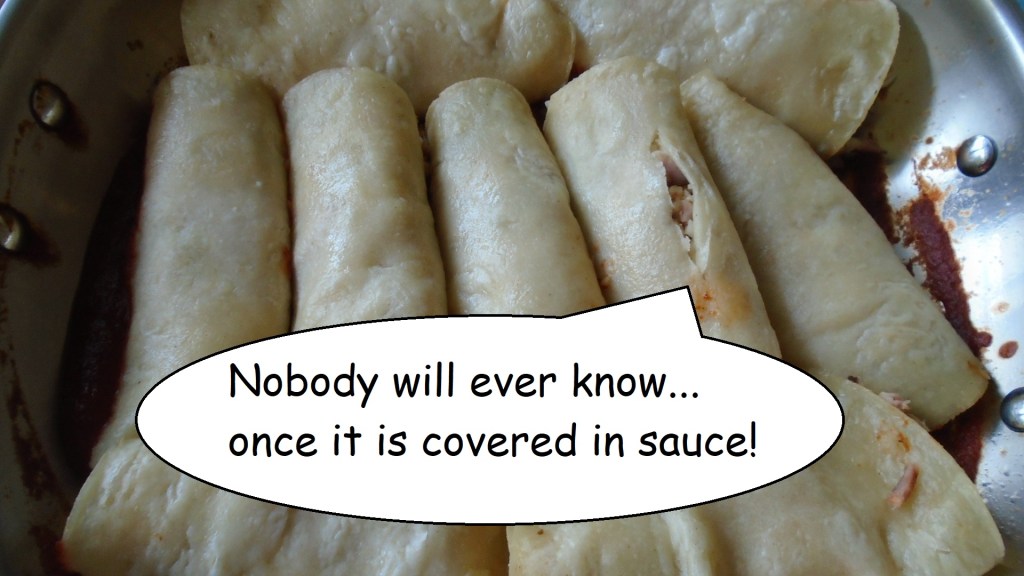
Spread the tomato sauce mixture across the bottom of an oven-proof pan. A thin layer is all you will need.
Prepare the enchiladas by placing a few tablespoons of pork and cheese mixture in a tortilla. Wrap the enchilada and place into the pan. Repeat, until all of the enchiladas fill the pan.
Cover the enchiladas with the remaining sauce.
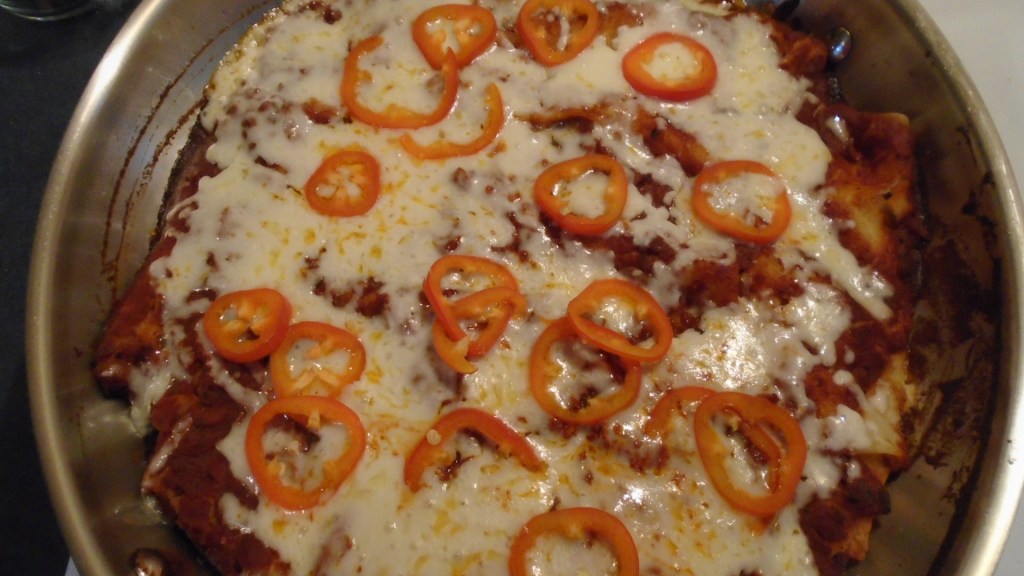
Bake in a 350° oven for 30 minutes. Top the enchiladas with the remaining 4 ounces of cheese and sliced jalapeño. Return to the oven for another 5 minutes. Remove the pan from the oven and allow the enchiladas to rest for about 5 minutes before serving.
Serve with crisp lettuce, a splotch of sour cream and a whole, pickled jalapeño.
¡Más sabroso para Tex-Mex! (give it a tasty Tex-Mex finish)