Seafood Mushrooms

For me, a trip to a farmers’ market is like a holiday.  Going to an international farmers’ market is like a romp through Disney World’s Magic Kingdom!  I run from one produce aisle to another, like a kid on a sugar rush, gawking at all of the wonderful, magnificent fruits and vegetables.  “Oooh, they have Sumo oranges!  Wow, durian fruit…that’s scary!  Hey, look at all the types of bok choy…which kind should I choose?” 

The “thinky” part of my brain, that causes me to come to the market in the first place, just to buy a thing, gives way to the impulsive, spastic part of my brain that screams, “Grab everything…you’ll figure out what to do with it when you get home!”

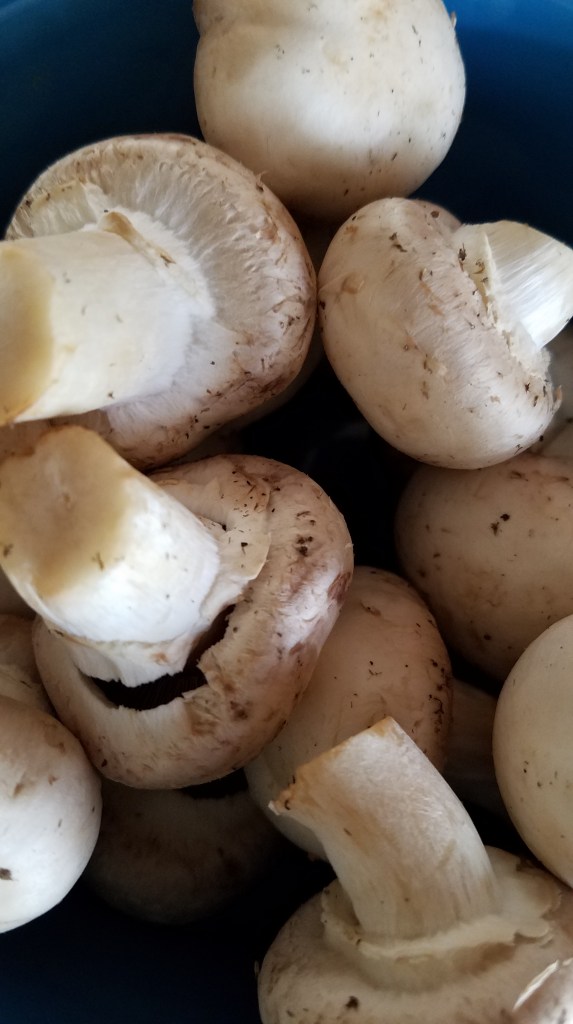
On this particular trip to the international farmers’ market, after making the rounds through the produce aisles twice, I found my way back to the refrigerated display case that houses the fungi, you know, all the different kinds of mushrooms.   I was drawn to a small package of slender, white mushrooms that were labeled, “Seafood Mushrooms”.  I had no idea what seafood mushrooms were, which is ultimately what compelled me to buy them.  I guess I’m a sucker for a good mystery!

When I returned home, I consulted the all-knowing internet to see what seafood mushrooms were and how they are used in recipes. 

Here’s what I found:

Seafood mushrooms are a smaller version of Enoki mushrooms.  They are white mushrooms with long, white stems and mushroom caps. The mushrooms have a mild, earthy, slightly sweet flavor and they taste a little like seafood when cooked, with a subtle flavor of lobster or shrimp.  They are crunchy when raw and become chewier, the longer they are cooked.

Since I only bought a small, five-ounce package of mushrooms, I decided to make an appetizer that would feature the mushrooms prominently. 

Seafood Mushroom Stir-Fry

Prepare the mushrooms.  Rinse the mushrooms under cool running water.  The mushrooms are conjoined in a bundle at the base, which needs to be trimmed away to separate the mushrooms. 

Ingredients:

1 Tablespoon olive oil

3 green onions, white parts only, cut lengthwise

1 Tablespoon fresh ginger, grated

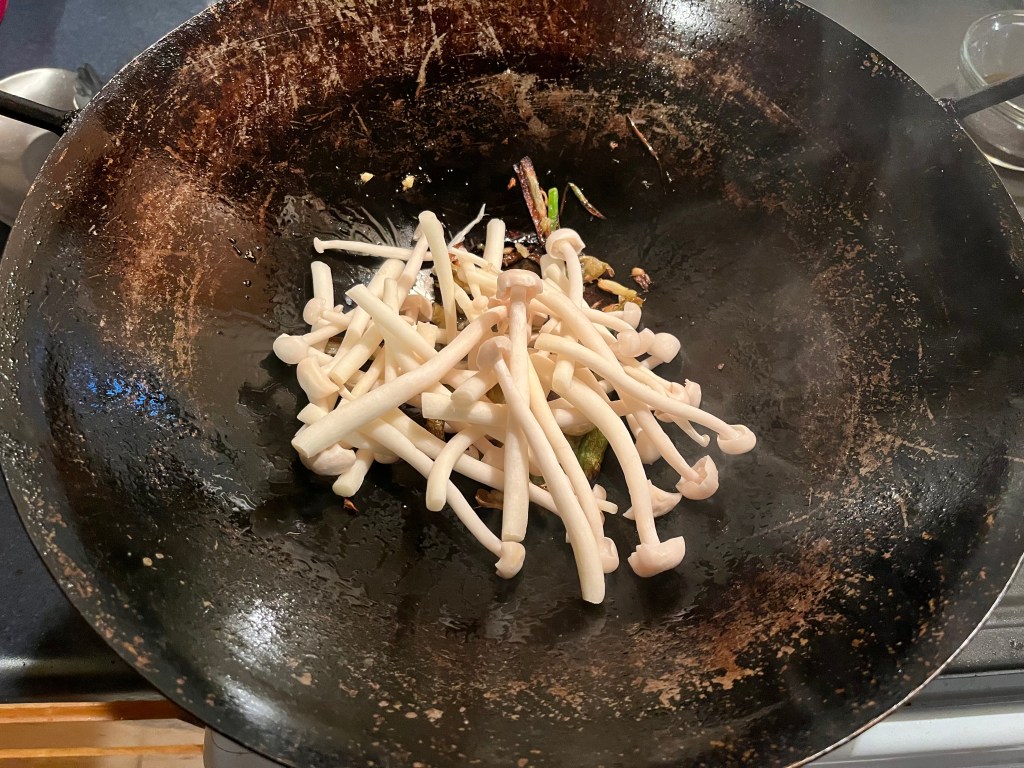
5 ounces seafood mushrooms, cleaned and separated

2 teaspoon soy sauce

1 Tablespoon Hoisin sauce

Directions:

Heat a wok to medium heat.  Add oil and green onion. 

Stir frequently for two minutes.

Add grated ginger and stir for one minute.

Add mushrooms, soy sauce and Hoisin sauce.

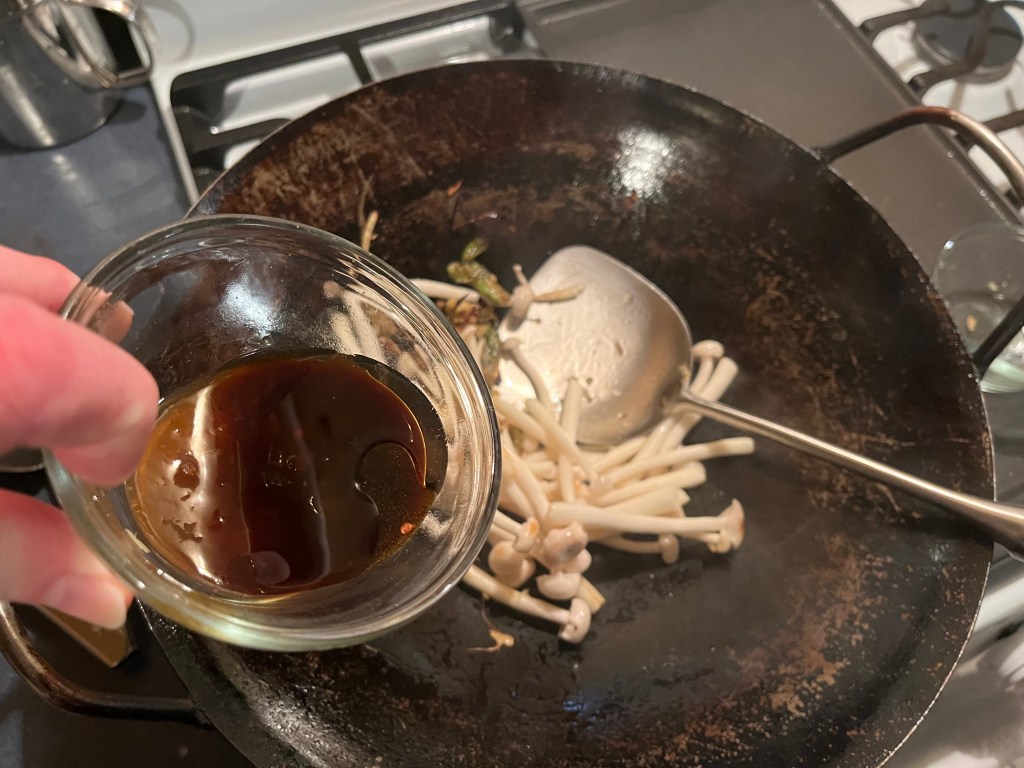
Stir for two to three minutes.

Remove and serve in small serving bowls.

Roast Pork Loin with Rosemary

A tip of the hat to legendary chef Emeril Lagasse for this one.  Emeril is a master of simplicity and he has a deep respecet for quality ingredients.  Say what you want about TV chefs but Emeril’s attention to detail and culinary skill is inspiring!  This particular recipe is about as simple as it gets and the result can make you feel like you’re eating at a four star restaurant.

As with any good cut of lean meat, high heat and short cooking time is key.  I was afraid of serving undercooked meat until I realized that it’s not the color of the finished meat that matters…it’s the temperature.  Bring the meat to a high enough temperature to kill bacteria and you’re safe to serve!

Ingredients:

4 large garlic cloves, pressed

1 Tbs Dijon mustard (I substituted with a German, stone ground mustard)

4 tsp chopped fresh rosemary

1 tsp coarse salt

1 tsp ground black pepper

2 lbs boneless pork loin roast, excess fat trimmed (I cut the roast into two equal pieces)

1 cup warmed chicken stock

Fresh rosemary sprigs or fresh parsley, for garnish

Directions:

Mix the pressed garlic cloves, mustard, rosemary, salt and pepper together. Rub the mixture over the entire pork roast.

Place the pork, fat side down, into ceramic roasting pan. Roast the pork for 30 minutes at 400° F, then turn the roast over and roast until a meat thermometer, inserted into the center of the roast, reads 140° F, about 25 to 30 more minutes.

Remove the roast from the oven and let the roast cool for about 10 minutes.

Deglaze the roasting pan with warmed chicken stock and pour into a small saucepan. Simmer the sacue for a few minutes. 

Cut the pork into thin 1/3-inch-thick slices and arrange overlapping slices on a serving platter. Drizzle the sacue over the pork and garnish fresh rosemary sprigs or parsley.

Serve with baked or steamed vegetables.  I chose broccoli and baked potatoes. 

Quick Chicken Enchiladas

Sometimes we just have to throw something together in a hurry.  This happens to the best of us, especially now.  It feels like the whole world is closing down on us and we have so little time to find joy.  So little time to give comfort to others.  So little time for ourselves.    

Yes, times are strange, but one thing remains.  We must eat, and eat, we will.

Many people have influenced the way I cook.  One of the many cast of characters was the mother of my friend, Barry.  

Ginger Hornburg was a sweet and feisty, pint-sized woman.  Her husband, Jack, was a giant, in stature and in heart.  The two were mismatched, when seen side by side, but it was clear that they were made for each other.  There was love there, and it was plain to see. 

On one occasion, I watched Ginger make dinner.  Her recipe for chicken enchiladas was typical for the time…shredded chicken, cream of mushroom soup, shredded cheese and corn tortillas.  Bake and serve.  Done!

When she realized that I was interested in watching her cook she made a point to tell me that the key ingredient was green chilis.  To prove the point she showed me a small can of Old El Paso diced green chiles (mild).  I’ve never forgotten that.  Green chilis are essential for chicken enchiladas.

I’ve grown and changed as a cook but I haven’t forgotten essential truths.  Green chilis are the defining touch to Tex-Mex chicken enchiladas and I have Ginger to thank for that!

Let’s make a fast and furious enchilada dinner.

I made these enchiladas while having a Zoom meeting with distant family members and then I followed that with a phone conservation with another friend. 

Start to finish time for this meal was about 45 minutes.  I remember when I could crank out a meal in 30 minutes.  Oh, those were the days.  I must be getting slower in my old age.  Or, maybe I’m learning to savor life’s little moments.  Yah… whatever!

I was lucky to have some grilled chicken in the refrigerator. 

Chicken Enchiladas – mas rapido!

I intentionally overstuffed these enchiladas because I wanted to use all of my left over chicken and I wasn’t working from a recipe.  I was doing the thing I do best…pulling things out of the refrigerator and pantry  and whipping up a quick meal. 

.

As I mentioned previously, the key to this dish is pickled jalapeños.  Seriously, the pickled tanginess of the chilis is the defining element of true Tex-Mex chicken enchiladas.  No exceptions.  Don’t mess with Texas and don’t mess with Ginger!

No walk-through photos on this one.  I was too busy Zooming and talking to people on the phone!  Scroll down to see a photo of the finished dish.

Ingredients:

1 ½ cups water

2 chicken bouillon cubes

1 Tbs butter

1 Tbs flour

2 cups grilled chicken, shredded and chopped

2 green onions, chopped

3 whole pickled jalapeños, chopped

1 cup fresh spinach, roughly chopped

1 ½ Tbs cumin powder

1 Tbs red chili powder

2 tsp garlic powder

1 tsp dried oregano

6 corn tortillas

8 oz Monterrey Jack cheese, shredded

¼ cup sour cream

½ cup fresh cilantro

Directions:

Add the chicken bouillon cubes to the water and heat in the microwave for 2 minutes.  Remove and set aside.

Prepare a roux by heating butter in a skillet.  Add the flour and whisk.  Add the water and whisk until the sauce thickens.  Remove the skillet from the heat set aside. 

Prepare a round 9 inch casserole dish.  Smear a little of the sauce on the bottom of the dish.

In a mixing bowl, combine the shredded chicken, green onions, jalapeños, spinach, cumin, chili powder, garlic powder and oregano.  Mix with a spatula or wooden spoon. 

Soften the corn tortillas in hot oil and set aside.

Apply a heavy portion of the chicken mixture to each of the tortillas and roll the tortillas.  Place the rolled enchiladas in the casserole dish.  Rotate the enchiladas to coat all sides with the sauce.

Top with cheese and bake at 350° for 25 to 30 minutes, or until the top is bubbling and golden brown.

Serve with sour cream and cilantro.

And please, take time to show young people how you cook, even if they are wild-eyed, scraggly teenagers!

Pizza Salad

On my never-ending quest to reinvent leftover food I was recently faced with a dilemma.

To be honest, the root of the problem can be traced back to me.  I made two large pizzas for three people.  What was I thinking?!  All of the leftover pizza was portioned in sets of three slices, wrapped in foil, and placed in the refrigerator.  And, there it sat, practically untouched, for three days. 

It wasn’t bad pizza…at least I didn’t think it was bad.  The problem was, there was too much of it and I shouldn’t have expected people to eat leftover pizza for days on end.  If I was still in college, then yes, leftover pizza might be all you get.  Be happy to have something to eat.  Live with it. 

So, I either had to eat all of the leftover pizza or figure out a way to reinvent it.

Pizza Salad

(serves 3)

Ingredients:

3 slices of leftover pizza (with various toppings)

Iceberg lettuce (one third of a head of lettuce, rough chopped)

1/3  cup Kalamata olives

¼ cup Dried Parmesan cheese

Vinegar and Oil dressing, to taste (I used store bought Italian dressing)

Directions:

Slice the pizza toppings away from the crust with a knife.  Allow the pizza topping to warm to room temperature.

Cut the thick crusty edge from the pizza and toast briefly in an oven.

Fill serving bowls with cold chopped iceberg lettuce.

Drizzle salad dressing on salad.

Rough chop the toppings and scatter them across the salads.

Add chopped Kalamata olives and top with parmesan cheese. 

Serve the salad cold with warm breadsticks (formerly known as pizza crust).

Macaroni and Cheese with Crumbled Bacon

Maybe it’s because I’m a guy, but I see mac and cheese like a good pair of blue jeans.  It goes with everything and any occasion.  Just as you can wear blue jeans with a worn out t-shirt, or a sweatshirt, or a pull-over sweater, or a crisply ironed shirt and tie, so goes mac and cheese. 

Mac and cheese rarely takes top billing, when it comes to planning a dinner but I guarantee that if it’s really good mac and cheese, you won’t have any leftovers.

True to my style, I prepare mac and cheese differently almost every time I make it.  I can’t tell you how many bad versions I’ve made but I can say I have made some good ones.  I have a tendency to let my free spirit roam and I start improvising, even when I have a perfectly good recipe in front of me.  I guess that’s what makes me, me.  If you want to make really good mac and cheese, follow the recipe by Kelsey Nixon, from the Food Network.  https://www.kelseynixon.com/mac-cheese/

Kelsey’s recipe is easy to follow and, as far as I’m concerned, flawless.  The secret is Muenster cheese.  Muenster cheese is perhaps the best melting cheese ever.  And, if you learn nothing else from that recipe, know that homemade mac and cheese starts with a béchamel (white sauce).  A béchamel is simply a roux with warm milk added to it.

I didn’t have Muenster on hand this time so I opted for Colby-Jack.  Both Colby-Jack and cheddar cheese melt well but if over-heated they can break down, and there goes the lovely cheese sauce. 

I should also note that I did not take photos throughout the cooking process.  I was hungry and I was in a hurry.  Such is the life of a working man.

1 Tbs kosher salt

2 cups elbow macaroni

3 strips cooked bacon

¼ cup butter

¼ cup all-purpose flour

4 cups milk

1 tsp dry mustard (essential!)

1 Tbs hot sauce

8 oz sharp cheddar cheese

8 ounces Colby-Jack cheese

In a 4 quart pot, boil water and add kosher salt.  Add pasta and cook until soft…just a bit beyond al dente.  Reserve 1/3 cup water from cooked pasta and set aside.  Strain the pasta and set aside.

In a large heavy saucepan, over medium/low heat add the butter.  Once the butter has melted, add the flour to make a roux.  Heat for just a minute or two. 

Heat the milk in the microwave, or stove top, to near boiling.  Slowly introduce 3 cups of the milk to the roux.  Turn the heat down (or off) while adding and mixing the milk.  Add the pasta water and dry mustard (and a little black pepper if you like).  Add the hot sauce and stir to combine.  Turn the heat up and bring the sauce to a boil.  Once the sauce begins to boil, turn the heat down.

Set the heat to low and slowly add the Colby-Jack and sharp cheddar cheese.  Gently stir with a spatula but do not over stir.  Low heat and minimal stirring helps reduce the possibility of the sauce breaking.  Add the other cup of warm milk and gently stir.  Add the pasta and stir to coat the pasta. 

Turn out to an oven proof serving bowl and place in a 350° oven for 15 minutes.

Remove from oven and top with crumbled bacon

I served this with steamed broccoli, bite-sized fried chicken and crunchy, fried shrimp.

Sheet Pan Roast

This is a great time-saving meal for a weeknight dinner…very convenient for working parents who want to make something nutritious, tasty and quickly.  The whole process takes about an hour, from start to finish.  Clean up is easy, especially if you line the sheet pan with parchment paper or foil.  I used frozen Italian sausage for this and it cooked completely and browned nicely.  The ham was cured and ready to eat, so I added it near the end of the cooking process, just to make it warm.

Ingredients:

3 large russet potatoes

2 very large carrots

8 to 10 oz broccoli

½ large onion

8 oz mushrooms

2 tsp salt

2 tsp fresh ground black pepper

3 Tbs olive oil

2 garlic cloves, smashed

2 Tbs Italian seasoning

2 mild Italian sausage links (about ½ lb)

½ lb cured ham, sliced ¼” thick.

1/3 cup shredded Parmesan cheese

Directions:

Set oven to 350°.

Peel and rough chop vegetables.  Cut vegetables into 1” to 1 ½” pieces.

Add oil, garlic, salt, pepper and Italian seasoning to a large mixing bowl.

Toss vegetables in the oil mixture and turn everything out to a lined sheet pan.

Add the sausage on top of the vegetables.

Bake at 350° for 20 minutes.  Stir vegetables and turn the sausage over to brown evenly.  Bake for another 15 minutes.  Add the ham and stir.  Top with Parmesan cheese Bake for another 5 minutes.  Serve from the baking sheet, or a serving platter.