Today’s word is: Gentle

Often times, my approach to cooking is wham-bam-get-it-done!  This is the sort of cooking that I tend to do when I prepare dinner, after coming home from work.  It’s a fun, energetic romp that usually results in a good meal and doesn’t chew up a lot of time.  That kind of approach allows for more time to sit down and enjoy a meal with the family, rather than slave away in the kitchen only to be faced with a need to eat quickly, clean up from dinner, and get ready for bed.

There are times that I enjoy a more relaxed, gentle approach to cooking, and I usually reserve those times for weekends.  That’s when I like to prepare meals that require a little more time for preparation and, today’s chile rellenos are a perfect example.

It takes a gentle touch if you want to make delicious chile rellenos.  Every step requires equal amounts of skill and care.  I recommend watching one of the many tutorial videos that can be found online before making chile rellenos, for the first time.  Pay attention to the way a chef gently handles the chiles throughout the process. 

I’m always amazed at the versatility of Mexican food, and I feel like I say that every time I talk about Mexican food, but it bears repeating!  Poblano chiles are probably the most common chiles used for chile rellenos, but you can use any fresh chile that you like.  The same goes with the stuffing.  Most chile rellenos include cheese, and any cheese is suitable, if it melts nicely.  Other items for stuffing can include meats, grains, vegetables, or fruit. 

I went with Queso Oaxaca (a Mexican cheese from southern Mexico), and I added a little cooked, ground breakfast sausage that we had, left over in the refrigerator.

I prefer roasting the chiles over an open flame, rather than broiling.  I lay the whole chiles on top of my gas burner and gently turn them until all sides are slightly charred.  After the chiles have charred, I store them in a paper bag for several minutes, so that the chiles can gently steam.  A sealable bag can be substituted for a paper bag.

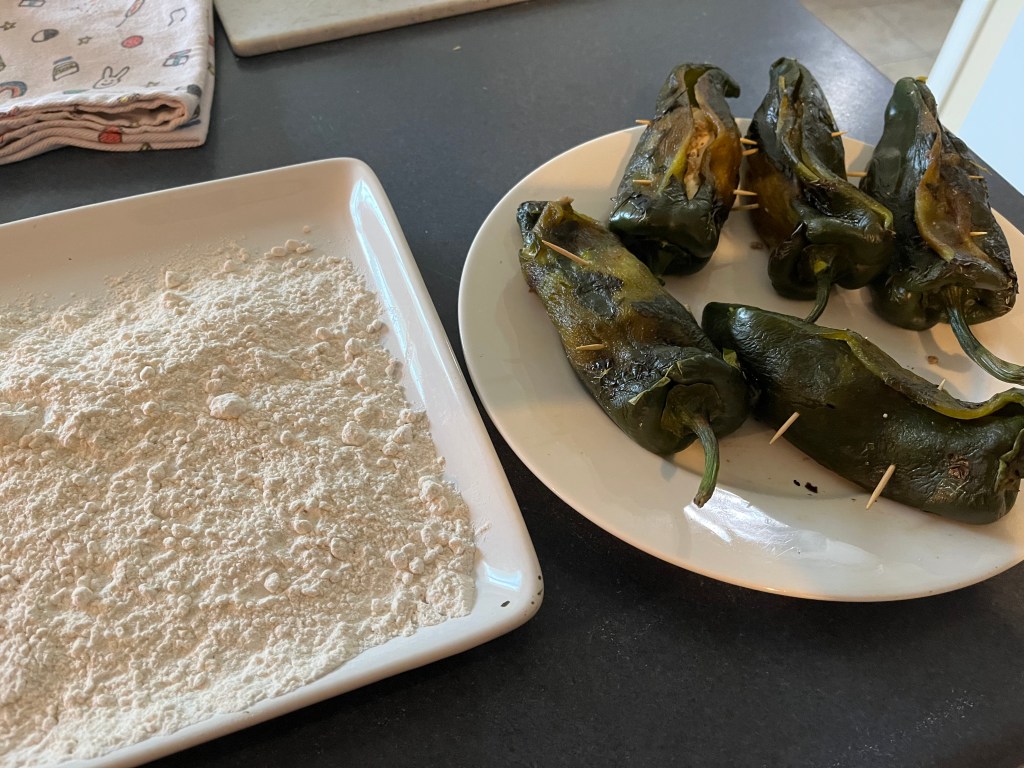
With a small, sharp knife, gently make a slit down the length of the chiles, just large enough so that you can reach in and gently remove the seeds from the top of the chiles, with your fingers. 

Form a ball of stuffing mixture in your palm and gently insert it into the cavity of the chile.  Gently seal the chiles with toothpicks.

Whip egg whites to form stiff peaks and then gently fold the egg yolks into the batter. 

Gently dredge the chiles in flour. 

Gently submerge the chiles in batter, to coat the chiles, and gently place them in a pan of hot cooking oil.  The cooking oil needs to maintain a temperature of about 350º throughout the cooking process.  If your oil is not hot enough, the chile rellenos will be greasy and, if the oil is too hot the batter will brown and burn quickly.

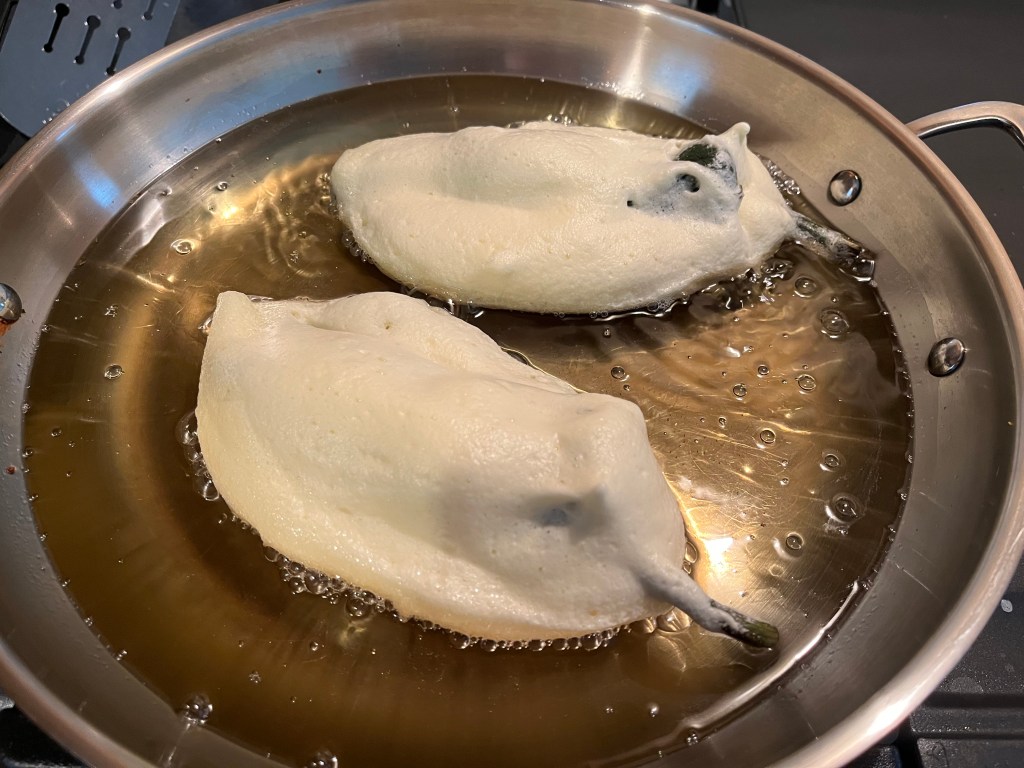
After about one minute, gently turn the chiles over to cook on the other side. 

Gently remove the cooked chiles and rest on rack, so that any residual oil can drip off.

The chile rellenos are ready to eat at this point but, you might want to consider adding an additional step. 

I prepared a warm tomato sauce that I used to bathe the chiles in, before plating.  I also spooned some of the sauce on top.

I am totally sold on the idea of adding tomato sauce!  The slightly acidic and sweet sauce brought the chile rellenos to a whole new level! 

To make the tomato sauce, I added some fresh Roma tomatoes, a little chopped onion, a few garlic cloves and about 1 cup of water to a blender.  After the sauce was pureed, I simmered the sauce in a pan, over medium-high heat to reduce a bit.  While the sauce reduced, I added some chicken bouillon, cracked black pepper, onion powder and some fresh, chopped epazote leaves.  In case you are unfamiliar with epazote, it’s a Mexican herb that is commonly used when preparing beans, soups, or stews.   Don’t worry if you don’t have epazote…it’s not essential, but it’s a nice addition, if you happen to have some on hand.

One chile relleno was enough to satisfy me, but my tastebuds wanted more!

Shrimp and Eggs

Is it just me, or does the idea of combining shrimp and eggs just seem weird?  Oh, I’m sure that there are bound to be chefs out there that know recipes that call for shrimp and eggs but, I’m just a simple home cook and, until this morning, shrimp and eggs lived in two different worlds. 

Eggs are extremely versatile, and there are many ways to prepare shrimp but, combing them into one dish never crossed my mind.  That all changed when I found some raw shrimp in the refrigerator this morning.  My daughter made (excellent) shrimp quesadillas a few nights ago and there were a few shrimp left over.

Raw shrimp doesn’t last long in the refrigerator so, quick action was needed.  I had planned on making simple scrambled eggs in the wok for breakfast but, I felt a sudden compulsion to marry the shrimp and eggs.  It was a beautiful ceremony!

Ingredients:

8 large, raw shrimp, peeled and deveined

4 large eggs

1/4 cup chicken broth

Salt and black pepper, to taste

1/2 teaspoon sake

1 teaspoon oyster sauce

1 green onion, thinly sliced on the diagonal

2 Tbs canola oil

Directions:

In a bowl, lightly beat the eggs.  Add chicken broth, salt, pepper, sake and oyster sauce.  Stir quickly, to incorporate.  Add green onions.

Heat a wok to medium-high heat.

Add 1 tablespoon of oil to the wok. When the oil is hot, add the shrimp.

Briefly stir-fry the shrimp until they turn pink. This might take only one minute.  Remove the shrimp and set aside in a warm place.

Add a tablespoon of oil into the wok and turn the heat on high.  When the oil is hot, add the egg mixture.

Scramble gently for about 1 minute, then return the shrimp to the wok.

Continue scrambling until the eggs are almost cooked. Remove from the heat and let it rest for a minute before serving.

King Cake French Toast

Mardi Gras is right around the corner and that means King Cakes are back in season.  My wife recently made her first attempt at making a King Cake and I must say, it was superb!  The texture of the cake was springy and light and the sweet glaze that topped the cake was sprinkled with yellow, green and purple confectioner sugar, in traditional New Orleans style.  We have been nibbling at the large cake for a few days and it occurred to me that it might be well suited for French toast.  So, that’s what I did this morning.

Ingredients:

Several 1” thick slices of King Cake

2 eggs

1 cup whole milk

¼ cup heavy cream

¼ lb butter (on stick)

Maple syrup

Directions:

Add eggs, milk and heavy cream to a shallow baking pan, or shallow plastic storage container.  Whisk the ingredients briskly. 

Lay the slices of King Cake in the mixture and allow the cake to soak for 15 minutes.  Turn the slices over and soak for another 15 minutes.

While the cake soaks, heat a large skillet, at low heat, and add the butter.

Once the butter begins to bubble, turn the heat up to medium heat.  Place slices of cake into the pan.  Do not overcrowd the pan. 

Cook for about 3 to 5 minutes and turn the slices over, after they have browned.  Cook for another 3 to 5 minutes and remove the slices to a serving dish. 

Serve with maple syrup, bacon and fresh fruit.

Quick and (Fancy) Easy Brunch

The inspiration for my most recent post came from a brunch dish I made recently.  I was expecting early morning visitors but I didn’t know how many (or if any) would show.  I took a page from one of my wife’s recipes and changed it a little.  She uses crescent roll dough to make a delicious breakfast sausage and cream cheese casserole.  Her recipe makes enough to feed a small army, which is perfect for large, holiday breakfasts.  Since I didn’t know how many people would actually show up, I decided to alter the recipe to make individual pastry cups.  Leftovers can be stored in the refrigerator for several days and they are can be pulled out and reheated in a microwave oven for a quick and easy breakfast, or a light snack.

Breakfast Sausage and Cream Cheese Pastry Shells

Ingredients:

2  8-count crescent roll tubes

1 lb bulk breakfast sausage (mild)

8 oz cream cheese (1 pack)

Directions:

Cook the sausage in a skillet and remove, to cool to room temperature.

Once cooled, crumble the sausage by hand to break down any large clumps.

Add the cream cheese to the sausage and mix thoroughly with a spatula.

Unroll the crescent roll dough on a clean and lightly floured surface.

Form the dough into a rectangle and press the edges together with your fingers.  Press the perforated parts of the dough together, lightly, with your fingers. 

Using a pastry cutter, or a clean credit card, if you don’t have a pastry cutter, slice the dough into 4” squares, to make 12 squares.  The squares don’t have to be perfectly square.

Lay the squares over the holes of a non-stick muffin pan.  Press the squares down to conform to the pan.

Drop the sausage and cream cheese mixture in the pastry shells by spoon.

Bake at 375° for 15 to 20 minutes, or until the edges of the pastry are golden brown.

Serve warm, with a side of fresh fruit.